Category Archives: Rainwater Harvesting

Plumbing Update

Water Switch On.

I finally switched on the water supply to the house and then checked the compression connections on the gravity based system for leaks. The reason for using the gravity based system was to keep everything as simple as possible,  consume the lowest amount of energy and have a system that would be low in maintenance cost.  All the joint connections were brass compression fittings and I used a pipe called  “qual-pex” .  I insulated the cold and  hot water pipes for both the rainwater and the calorifier tank.

Gravity Tank 

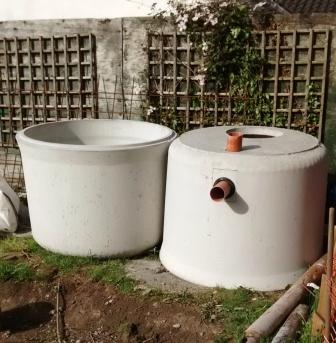
I installed a  separate gravity tank for the toilets that will be fed from the rainwater tank in the garden eventually. I need to design a control unit to pump rainwater when required and operate from the mains to flush out the gravity tank at regular intervals. At the moment it is connected to the fresh water supply for testing.  This tank was mounted 2.71 metres above floor level.  Nylon washers were placed inside and outside of the tank brass connections fittings.

Storage Tank Connections


What worked for me in relation to the toilets was an 1/2 inch pipe that ran a distance of 15 metres approximately with a storage tank base to floor height of 2.71 meters and this enabled the cistern to fill in approximately 1 minute 45 seconds.

Lessons Learned

  • When tightening compression fittings- a good bit of advice is always leave room for an extra turn on the thread. In this way if there is a leak one can tighten the compression joint further.
  • On the calorifier connections use Jet Blue Plus paste or similar paste and check it is suitable for potable water.
  • The longest run was approximately 20 meters of 1/2 qual-pex and this  supplies enough pressure for a “natural” water flow at the furthest away sink outlet-I also removed the filter in the outlet of the tap to further increase the water flow.
  • Certain isolation On-Off valves have bore diameters that are smaller than the diameter of the pipe bore further reducing the capacity of the water flow. Visually check before purchase.
  • Check that the taps and shower fittings are designed for a gravity system. I used a tap that had a minimum operating pressure of 0.1 bar from the Grohe range (1 metre height of water is = 0.1 bar).
  • I was unaware of what an air lock can look like . In one case no water flowed and in another case I had a constant trickle of water with no air gurgling. To get rid of the air lock I used a small 5 litre pressure sprayer with a silicone hose on the end.Pressure Sprayer


  • Use copper inserts instead of nylon on “qual-pex” when trying to get gravity to work in your favour . They have a wider bore (see below).
Qual-Pex Inserts Copper and Plastic
Copper versus Plastic Inserts


Toilet Cistern

As most of the inlet valves on toilet cisterns are now designed for high pressure they come with a restriction devices and sometimes a filter. For use on the gravity system I removed these.

I plan to filter the water at the feed end of the water supply.  Both the toilet storage tank and the calorifier storage tank (supply’s the hot water) are within the thermal envelope. This means that the tanks will not freeze but this brings other issues to be dealt with, such as noise from filling and potential condensation. I installed rockwool insulation around the tank to minimise temperature differences of the indoor air and reduce the noise of water filling the tank as I have no attic space.

The original toilet had a bottom inlet valve made with plastic threads which proved difficult to install.

Cistern Inlet Valve


I did have problems with the original cistern valve where I cross threaded the plastic connection (which resulted in a leak) as one finds that space is limited under a toilet/cistern (see below).

Toilet Cistern with Penny valve for turning water off and on at the toilet.
Toilet Cistern Connection


Another problem I had was I could not get it to operate correctly from the gravity tank. To solve the above I replaced the inlet valve with a Jollyfill telescopic Wirquin brass inlet valve and removed the high pressure device.

Wirquin Bottom Inlet Valve


When I installed  the inlet valve the connection leaked between the rubber seal and cistern. I removed it and placed silicone above the rubber seal. The silicone cured the problem.

Shower

The gravity flow rate proved too low for the shower valve temperature control to work so plan B was acted on. I installed a 1.5 Bar 250w pump to raise the flow rate.

It is a Salamander RP50PT pump (45.5 dBA) . It cost €200 including postage. I am impressed with the low non-intrusive noise it generates. It comes with small sound isolating pads. One can roughly equate a 3dBA increase with twice the loudness.

Another factor to take into account when selecting  and sizing a pump for one, two or three shower units is that the power usage approximately doubles when one selects a 0.5 bar increase for this range of pumps.  So If one is sizing for the use of 3 showers being on at the same time (using one 3 bar pump) and only one  shower is on then one will be using 1000 watts of power most of the time . I feel it is more energy efficient to install separate pumps and in this way one uses the least amount of energy most of the time and the pump will also be quieter as noise increases also with each 0.5 bar of pressure.

Shower Pump
Salamander


Hot Water Tank

Mains Water Plumbing

The hot water tank is a 300 litre stainless steel tank. Stainless steel is better at reducing stratification (minimising mixing) because it conducts less heat compared to copper. Different grades of stainless steel exist for different types of water (hard/soft). One also needs to check the type of welds used on the tank as some can not cope with certain water types.

The tank was modified to allow me to connect the solar PV water heating system (previous blog) in the future using thermosyphonic action i.e. hot water is lighter than cold water so it naturally flows from the top of the tank to the bottom (Reducing the need for pumps). The DC power from the solar panels will be connected to electric heating elements. As the solar power varies the heating elements will adjust the output power through a control unit I am developing.

Self Build Design
Self Build Design

IfI install a solar hot water system or another method in the future this will be done with a plate heat exchanger rather than a coil. I installed extra connections on the tank for this reason. The reason for the heat exchanger is that the tank will heat from the top down. A plate heat exchanger looks like the following

plate-heat-exchanger
Plate Heat Exchanger


If one opts for a coil it creates turbulence while heating the tank.  I found it difficult to find a tank manufacturer who will install the correct surface area of a coil for a climate like Ireland. I feel most are designed for hot countries like Spain where the sun shines and stays shining. If one opts for a coil rather than a plate heat exchanger one requires a large coil surface area to ensure that most of the solar energy transferred in the least amount of time and the temperature returned to the hot water solar panel is at a minimum. In this way the hot water solar panel can operate at its maximum efficiency.


Rainwater

Rainwater System

As discussed in an earlier blog I will use the rainwater system to feed the toilets and one outside tap. I have started to install the pipework internally . This involves running a 1/2 inch pipe to each toilet.  I note that the Drainage and Waste Water Disposal building regulations state that the pipe used must meet the following-“ for rainwater green / black / green bands and the words RAINWATER in black lettering“.  I rang around and no one appears to stock this in Ireland. I note it is available in the UK. Instead I have marked the pipe with permanent marker in the above colours with the words RAINWATER. An image is shown below.

DIY Rainwater
DIY Rainwater


The planned schematic of the rainwater system is shown below.

Rainwater Harvesting

I note that some rainwater systems top up the main tank in the ground if one runs short of water in the summer. I have opted for the header tank where I can manually top  up this smaller tank with fresh water or let it automatically bring fresh water to the tank for the duration of the drought with the control unit I built. I feel that topping up the main tank with fresh water is more wasteful.

Rain Water Harvesting

I now need to look into rainwater harvesting as the location of a tank needs to be planned so that the inspection covers can be kept as discreet as possible in the garden design. I will put the inspection covers in the  footpath area. I am only installing the rainwater harvesting initially to feed the toilets in the house, water plants and wash the car with a gravity fed tank located in the house (this looks like the simplest method to maintain and install).  My reason for only dealing with the toilets is the idea of using fresh water to flush toilets is a difficult thing to accept from an ecological point of view and toilets are a significant use of water.

Whole house rainwater systems look complicated from a health, engineering and chemical reaction point of view. Issues I understand that need to be dealt with for whole house systems are such things as if the PH level of the water falls below 7 it attacks copper pipes, the stagnation of stored water/pollen attracting pests, chemicals such as lead collected from roofs etc. 

The System

There appears to be a need to have a few inspection covers and have access to these. The first inspection cover will consist of a coarse inline filter for collecting leaves and other debris with an overflow outlet, the rainwater harvesting tank inspection cover (for servicing the pump or cleaning out the tank)-some have the inline filter built into the tank. Our new build installation also needs a soak-way and inspection cover as part of the planning application to ensure that the soak-way can be cleaned out.

As the foundation work is being carried out I plan to install a 2000 litre unit in the ground (the water in larger tanks can become stagnant and smell if not used )  and a smaller unit in another location in the garden above ground fed from a different roof. I will use this unit to prime the main tank if necessary as it appears some systems prime the main tank with fresh water if it runs dry –why would one fill a rainwater harvesting tank with fresh water and how does one know it is working correctly?.  My strategy is to prime the main 2000 litre tank using a different roof if the need should arise and have a separate fresh water feed only to the cistern gravity tank in the house with a 30 minute bypass timer. (If the rainwater main tank runs dry I will only top up the cistern tank in the attic space with fresh water). If I was to use a manual or automatic bypass I can see the fresh water supply being left on inadvertently. The most cost efficient approach for the tank and filters that I found are as follows :

  • 2000 Litre Concrete tank €450 from Carlow Providers            Phone  059 9145103

    Rainwater Harvesting Concrete Tank
    Concrete 2000 litre rainwater tank
  • First Inline Coarse Filter €120 from http://www.sturdyproducts.com  Product Code: 457-A

Another important point for any tank is the need to have a calming input (when water comes into the tank the objective is to ensure it does not mix the sediment settled in the bottom of the tank with the end result of supplying dirty looking water in the house. ) I will look into this later on once I have researched pumps in more detail. In relation to pumps/controls that are available I feel they are too expensive to buy, run and are complicated (from €250 to €600 and use 500 watts to 1000 watts of power-a small electric fire ) . In the next blog I hope to find a solution that will cost no more than €90 and is simple to maintain and reliable.

 The Current Design

I am evaluating this design I put together and I am thinking of putting a straight outlet into the soakway so that any pollen/debris gets washed directly into the soakway inspection chamber . My reasoning if correct is that this will reduce the smaller debris from stagnating and smelling when the tank overflows.

Self Build Rain Water Harvesting
Self Build Rainwater Harvesting

Above ground option for storing water

I came across these storage tanks at around €50 (value for money) . I think they have a capacity of around 1000 litres .  Lawler Pipe Sales in Johnstown, Naas at 0862561629 can supply them. One would need to paint them black or ensure that light does not cause algae to grow.

Rainwater Harvesting Tank
Water Storage Tank