Category Archives: Electrics

Solar PV for the self builder -Part 2

When the sun is close to the horizon Solar PV Panels generate less energy than when the sun is directly over the Solar Panel.

The reason for this is that the sun’s rays pass through more of the atmosphere thus reducing the sun’s energy (photon energy) on the PV panel. If it is an overcast day they will produce less energy. To translate this into numbers- in the winter when the sun is low in the sky (say 14 degrees from the horizon ) the total irradiance from the sun measures around 780 W/m2 (watts per meter square) with a clear sky. In the summer one would expect to see 1100 W/m2 (55 degrees from the horizon). The bottom line is that if one can point the solar panels perpendicular to the sun one will get a higher electrical output kw/h.

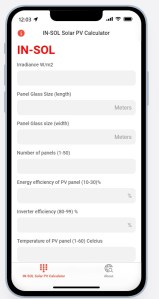
In order for consumers to purchase and compare solar PV panels manufacturers have agreed a way to compare the output power of Solar PV panels and this test is referred to as Standard Test Conditions (STC) . The test is done at an irradiance of 1000w/m2, at a air mass of 1.5 (approximately 42 degrees from the horizon) and at a temperature of 25 degrees. The value w/m2 is how solar irradiance is measured while the PV panel output power is measured in watts. The following calculator will help you understand how the output power of your PV System (in watts) is affected by solar irradiance and other factors. Check your Solar PV Output Power in watts.

IN-SOL Solar PV Calculator for checking a Solar PV Panel.
Solar PV Calculator

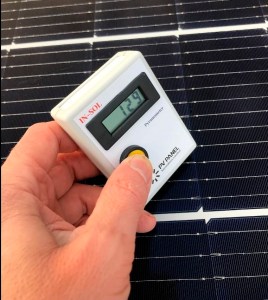
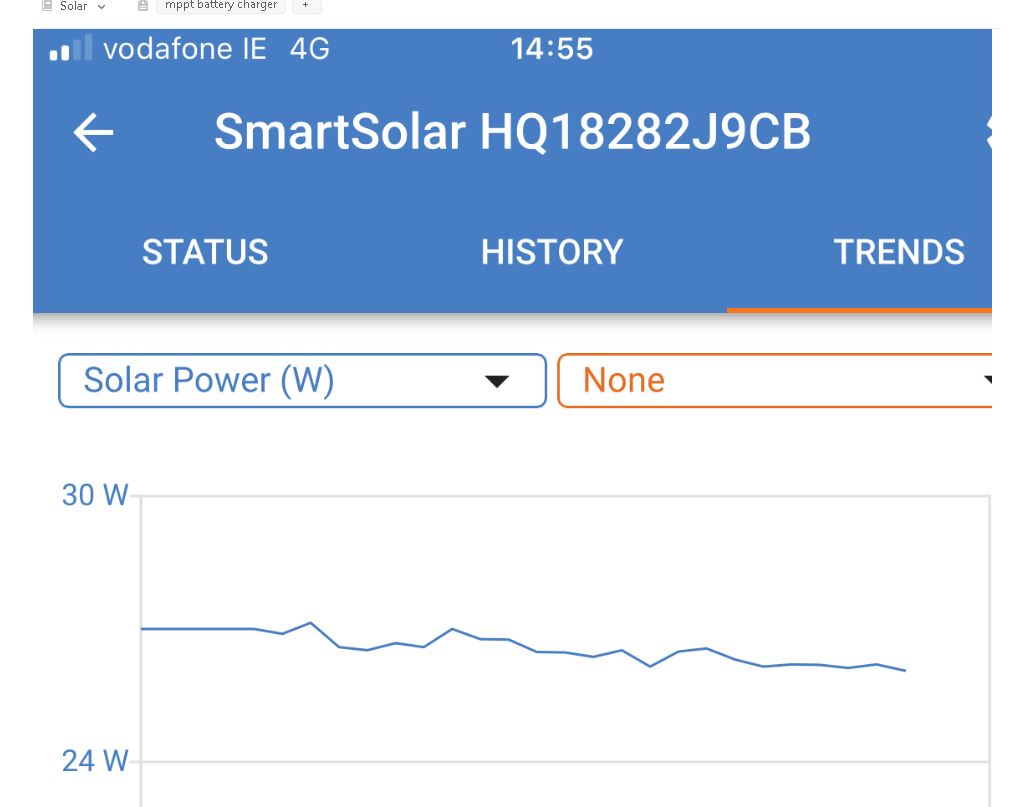
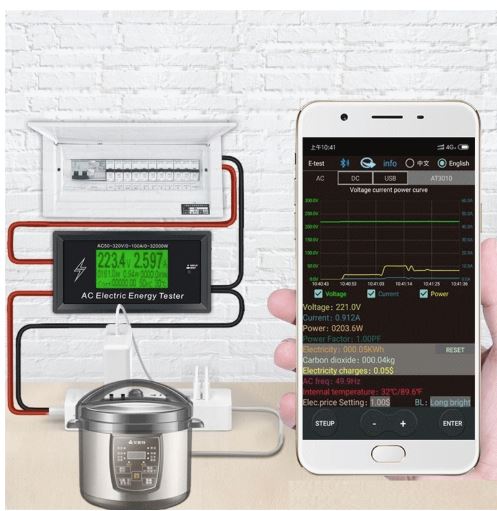
Most roofs have a pitch of around 35 degrees. The best direction to point the solar panels is usually south but with some solar PV installations, it is possible to have some pointing South and others pointing West in order to collect as much energy as possible during the summer. Meters used to measure solar irradiance are called pyranometers, Solar irradiance meters, or solar radiation meters. An example of how these meters are used to locate, measure, and check if your Solar PV system is working efficiently is shown below. The calculator above can be used with these meters.

PV Panel Shading

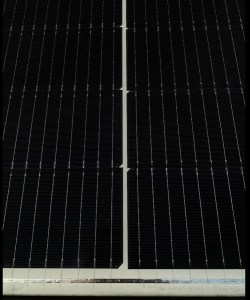
A factor that has a significant impact on the output power of a PV System is shading on an individual Solar PV panel. This can take the form of chimneys, trees or other houses. The reason for this is that if one examines each solar panel one will see that it is made up of individual cells wired together in series to make up a full solar panel (see below). If one or more cells are shaded when installing a traditional solar PV system (One inverter) the output power is reduced for the whole system. There are other solar PV systems that use microinverter’s or DC optimizers that will not be seriously impacted by shading thus the consumer will generate more electricity.

PV Panel Design
Solar PV

Another factor that significantly reduces the solar panel output power generated is the panel temperature. We are lucky in Ireland to have a mild climate with day temperatures not usually going above 20 degrees (on a good day). What this means from a practical perspective is that a solar panel in Ireland will generate more power than a solar panel in Spain on a cloudless day.

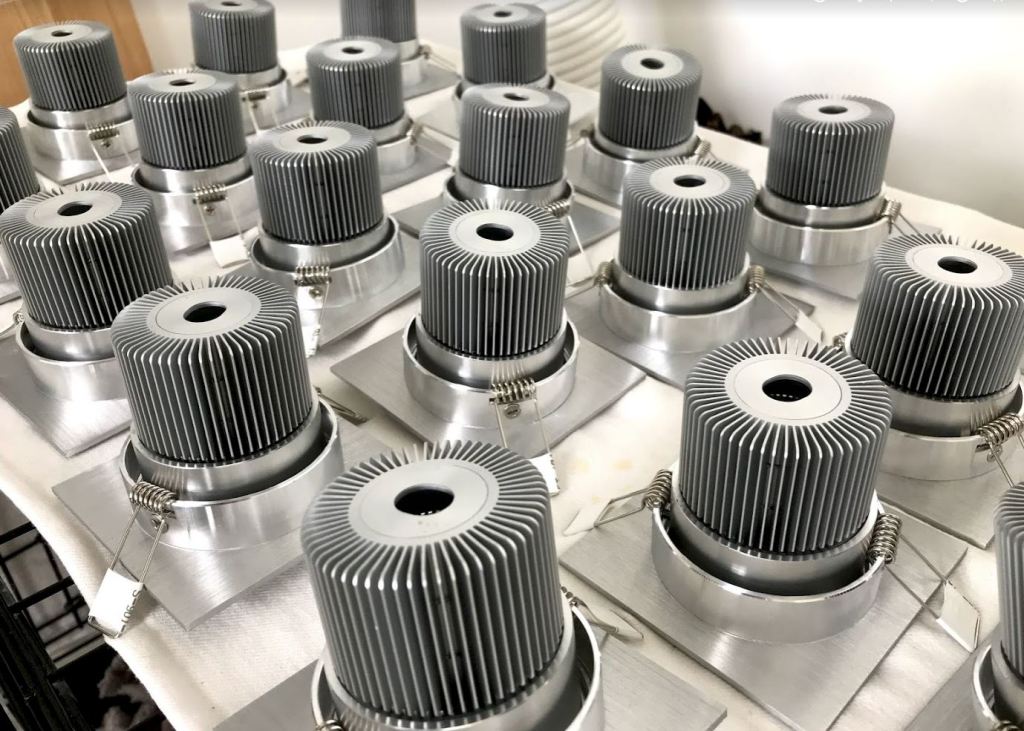
Solar PV Components.

The components that typically make up a solar PV system are PV rails which support the PV panel , roof brackets/hooks that connect the rail to the standard tile or slate roof and clamps that connect directly to a specified roof types such as zinc or steel roofs. There are separate pv panel mounting systems for flat roofs or ground mounting. If one wants to explore PV mounting system suppliers -use a google search for “roof mounting systems for solar panels“. As I used a zinc roof one must ensure expansion joints are installed in the pv rail every 3 meters.

PV Panel Types

There are three types of PV panel cells -monocrystalline (these aesthetically have an even black finishshown above), Polycrystalline which have an uneven shade of blue crystal cells and CIS types. Monocrystalline are more common and are slightly more expensive than polycrystalline and CIS are now more difficult to purchase (shown in part 1 of the blog). The options available when selecting PV panels other than the type above are length of equipment warranty and length of manufactures performance warranty. The majority of PV panels generate DC (direct current). All PV panels must be angled at least 3 degrees from the horizontal. PV panels produce DC power and to give you an idea of what 4 panels can produce and the energy they can generate for a load, loose connections or cable damage please see this video .

Inverter Options

Inverters are principally available in 3 types -one central inverter for a full PV installation without battery charging, a central inverter that has inbuilt battery charging facility and micro inverters for individual panels or a pair of PV panels.

Central inverters. The important factor here is the warranty length and how many MPPT (maximum power point tracking) channels does the inverter have. If one was installing 8 panels in two rows (strings), two separate MPPT channels would mean that the two rows of 4 panels would have their own ability to generate power independently of the other row (string) so for example if one row of pv panels got dirtier/shaded or a fault occurred on one panel the other row would keep generating at full power. As all PV panels are not exactly the same the separate MPPT channels allow for a higher output yield . When selecting an inverter one must match the PV Panels to a particular Inverter. Once this is done adding more panels can become restrictive and may mean that one needs to change the inverter again. If the inverter fails the whole system fails. If one needs to change a PV panel in the future the central inverter may also need to be changed.

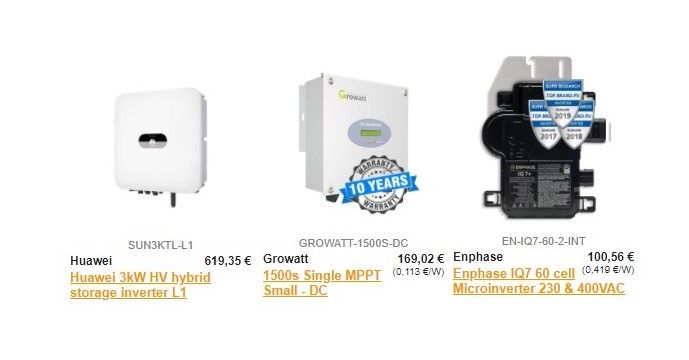
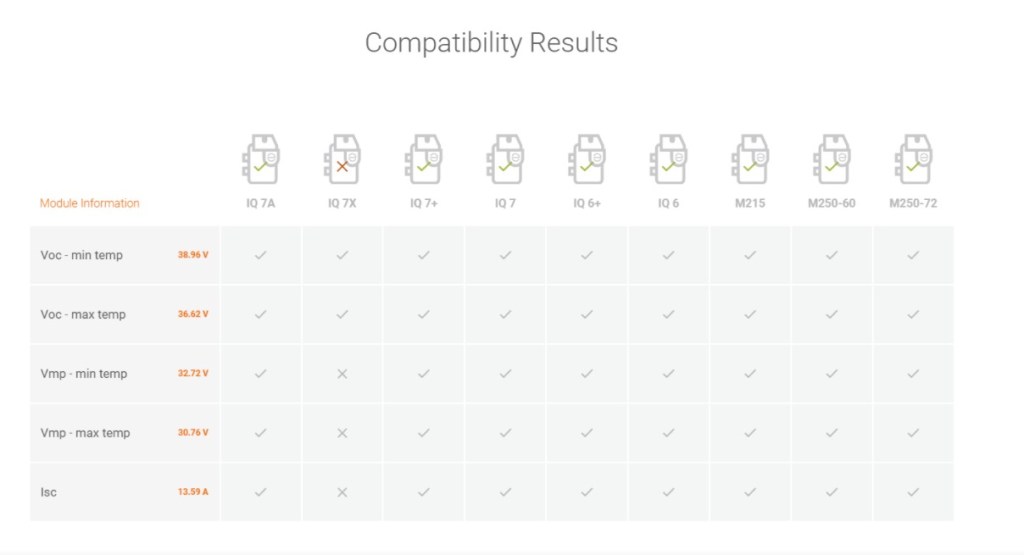
Micro Inverters-simplify the installation of a PV system and permit simple expansion. It is really close to plug and play . Because they are paired with a PV panel they manage shading better than a central inverter. The voltage generated is also different to the central inverter in that it produces low voltage AC -the same voltage as all domestic appliances like fridges, washing machines etc. There is also less of a chance of fires because of loose connections/damaged cables. They offer full management of your PV system with apps and individual panel performance monitoring. Pv panels must also be matched with the individual inverter using the PV panel data sheet. This is one such calculator.

Microinverter Compatibility
Enphase Calculator

Batteries

As stated before I personally am not in favour of using batteries for PV panel installations. The reason is that batteries are expensive, they are another failure point and I feel they are needed for vehicles more than PV installations. For example, a 300 litre water tank can store 20kw of energy at 60 degrees (a stainless steel water tank would cost around €1000-while a similar battery could cost €10,000 to €15,000 and still would need to be replaced after approximately 6000 cycles). All homes need hot water thus sending any excess electricity from the PV panels could be fed to a hot water tank. So instead of adding batteries why not consider changing the hot water tank and place elements at the bottom of the tank and the middle of the tank.

Another good idea is to switch to night time electricity which currently is half the price of the day unit to supplement the lack of PV power during the winter to heat the water tank.

My preference is to install a side arm heat exchanger to the water tank so that I can achieve better hot water stratification. Stratification is the creation of layers of hot water free from movement/mixing when one heats water. What happens for example is when cold water enters the tank at the bottom it can mix the stratified layers of hot water thus reducing the water temperature. It is difficult in Ireland to purchase water storage tanks that have simple devices fitted that maximise stratification with devices such as an inlet baffle on the cold water inlet .

To complement the above use of a water tank one can add a single shower pump and feed all showers from the tank.

Typical Shower Pump around €157

The above will reduce the use of electric showers which are the highest electrical energy consumption devices in a home. From personal experience, I can say that 150 litres of hot water (half a 300 litre tank) can provide 6 showers a day. Currently, I use off-peak electricity to heat half the tank.

If you are a new build one can plan to install the shower pump outside the house in an insulated chamber below ground level near the tank. This is what I have done to reduce the noise as we have a single-story home.

In part 2b we will look at how to analyze Solar PV quotations.

Self-Build Solar PV , MPPT Chargers and Outdoor Lighting

Self Build the plan-Solar PV

The plan is to have all the outdoor lighting (Using LED -Light Emitting  Diodes) operate from a 12 volt recycled car battery and recharged by a solar PV panel. The lights will be controlled by the in-built timer in the MPPT charger. This will keep the cable cost to a minimum (small cable size) and keep the voltage low enough to be safe in a garden environment (when digging and planting).

Parts Required

Below is the CIS thin-film solar PV Panel (copper indium gallium selenide )  I mounted on the shed roof.

Solar PV Panel
Solar Battery Charger


I selected a 60 watt solar PV panel that was manufactured using CIS . This type of panel has a higher output voltage of 52 volts which work better with the  charger I selected rather than the typical mono  or poly crystalline cells of 30 volts . One needs to select a charger to suit the PV one buys. The panel was mounted on a 3 degree pitch facing south (see above) . During tests I found that this type of cell is more forgiving for shading and dirt (bird droppings mainly)-it maintains a consistent output power . For example when I partially shaded it with my hand it still outputs almost the same power. If one partially shades a monocrystiline /polycrystaline cell it will cause it to stop working as all the cells in the unit are wired in series.

Measuring the efficiency of the installation.

In order to check the efficiency I mounted a pyranometer at the same angle (top left of image) so that I could ensure that connections and charger were working correctly. One needs to know the input power in order to check the charger efficiency and that the system is working correctly.

The MPPT Battery Charger

Victron 75/15After reviewing products available I opted for the Victron SmartSolarCharger MPPT 75/15.  This can charge a 12v or 24v battery system. When selecting a unit one needs an inbuilt MPPT which stands for Maximum Power Point Tracker. In Ireland and the UK this is  important because of our natural cloudy weather which causes the solar panels to vary their output as the irradiance changes .  What happens is that the solar panel’s internal resistance changes when the irradiance changes (sun shining on panel) -so the job of the MPPT charger is to change its load resistance as the solar panel’s internal resistance changes.  When the load resistance matches the solar panel resistance then the maximum energy can be transferred to the load. If a charger did not have the MPPT then the efficiency of the complete system would be compromised. While there are different methods (algorithms) used  to build MPPT units some are more efficient than others. Some of the different MPPT design options available are called perturb and observe , Incremental Conductance , short circuit current method etc., The idea of all these MPPT systems is to get the maximum power from the solar panel -some MPPT are low cost and others are more efficient in cloudy weather.

Solar PV Charger

There are a number of advantages of the unit compared to others that I researched . It has charging algorithms for different battery types such as deep cycle and lithium ion.  It has a bluetooth connection so that one can programme and monitor the output without other devices /connections being required. Another advantage is that it has a lighting timer that can automatically switch lights on and off at night or at dawn.


Some of the advertised benefits of the Victron MPPT unit are:

Victron MPPT Charger


The Setup .

The setup is as follows . I plan to move the battery out of the shed as it is not best practise to have any battery system in a shed/garage/house because of the fire risk. The charger is mounted on a fire resistant material (Magnesium Board)

Victron


In order to access the data collected one logs on using the Bluetooth connection on your phone/tablet and the data is available. Below are different samples of the data available . The first indicates the solar power collected and the load usage. If the battery is fully charged it will take little or no power. If there is a load during the sunshine hours then the battery and solar panel will supply it.

Data Collected


Below is a chart showing how the MPPT charger adjusts its output/load to follow the changes in the irradiance levels (power from the sun) per second .

MPPT Irradiance Changes


As I am able to measure the input power using a pyranometer I built I was able to see that the system was working efficiently. The data below is the output power from the charge controller when the input power from the sun was 471 watts/m2.  The CIS panel provides 60 watts output when the irradiance is 1000 watts/m2 at STD (Standard Test Conditions) . This would mean that if the input power was 500 watts/m2 then the output would be 30 watts/m2. The data from the charge controller indicates an output power of approximately 27 w/m2 for the 471 watt/m2 input power.

Irradiance
Output power when Solar Irradiance input power is 471W/m2.


Self Build Remote Monitoring Passive House

Self-Build for Water Leaks, Power Measurement and Temperature.

The task of monitoring for water leaks, temperature and measuring power is best served by some remote tools available on the market.

Most tools rely on Wi-Fi, zigbee, 433mHz etc., signals to communicate through the internet connection remotely to your phone.

This in itself is a weakness as if your wi-fi is not working then most of these tools fail. But if the wi-fi or ethernet connection does not fail then these tools are of value.

Lets look at some of these tools that I feel are worth considering.

sonoff 433 RF Bridge
Water Leak Passive House


The lowest cost unit is the Sonoff suite of products. The list is comprehensive and the cost is low. For example the wi-fi / 433Mhz central hub for these devices costs less than €9.00 and as an example the water leak sensors are approximately €8 each and it uses a lithium battery for reliability (needs to be purchased separately).

Water Leak Passive House
Purchase Lithium batteries separately .


The product is  very well made and a certain level of IT skill is involved in setting these up. It operates at a very safe radio frequency like that of your car remote control rather than higher frequency’s but the hub uses wifi so if one keeps it close to your router and keep the router as faraway as possible from you it is probably the best approach.

I would advise that a separate sensor unit (regardless of which product you select)  is installed in a location that you can easily check to ensure that the system is functioning correctly as water leak sensors can end up in locations that are difficult to inspect and check such as behind dishwashers etc. One needs to change the battery every year or two on each of the sensors or when your test unit fails.

Next on the list is the Samsung smarthings hub and sensors https://shop.samsung.com/ie/28020607-smartthings

Samsung Smart Things


This type of device links to other well know products such as Amazon Alexa and costs around €90. They also provide water leak sensors to connect to the above. This will be easiest to set up.

Multiple options are available to integrate with the above

https://www.smartthings.com/products

Type in smarthings hub in the search of their web site and one should find the relevant devices . Check your own country samsung web site for compatibility.

Another company that provides value is Shelly. They supply multiple sensor types including water leak sensors that integrate with the power unit below.

Power Measurement

I have not purchased this unit but it looks like good value at €69 but it uses wifi. It is made by Shelly  https://shelly.cloud/

Power Measurement


A unit that measure power consumption and provides a Bluetooth option also looks like good value. It is the AT3010 AC50~320V 100A 3KKW Phone App AC Meter. It costs around €15 and can be purchased from https://www.banggood.com .  It will need an enclosure to house the unit and it does not use wifi which is a benefit. I purchased this unit as a test and I am about to set it up.  I will use this meter to monitor the cost of heating the house and also monitor the condition of each storage heater.

Power Measurement

Lighting and KNX Update

Self -Build -LIGHTING AND KNX UPDATE-KNX Wiring

I am just getting around to installing the light switches . This is how the finished light switches look at the moment. Later on I plan to change the front plate of this switch to one of the other options such as glass, wood or marble.

This is what the above light switch looked like before installation. Standard switches can be used if one uses the method described below. I used a screened alarm cable to connect the KNX binary device known as a universal interface. This voltage is extra low around 3 volts DC.

KNX Distribution Board

As seen above this is what a typical KNX lighting distribution board looks like. One has a Power Supply (top left) and a programming Interface (next to power supply) . The three actuators (12 way) on separate rows send power directly to the rooms or other devices such as towel heaters. Functionality such as timers, last state before power failure, purging (automatically switching on pumps/valves to ensure they do not stall) etc is already built into the KNX technology.


This is one type of LED Driver I have used to power each LED. Typically when one buys an LED they have already tried to fit all the electronics contained in the above unit in the lamp one buys . This is one reason why led lamps do not always live up to their expected life time of 50,000 hours. The majority of LED failures are due to heat stress. I am using 9 watt LED in the housings shown above and the Power supply is a separate unit. For lower power LEDs one requires less electronics.

Plumbing Design

Mains Water Plumbing

Initially when researching the options available to plumb the house I came across two  main methods- Pressurised/Closed or Gravity/Open. I settled for a gravity based system because of the simplicity, DIY, reduced parts and maintainability. If one can increase the height of the gravity tank the pressure will increase at the taps.

Below is a video of what a pressurised/closed system can do (if it goes wrong and probably very rarely). When I was researching pressurised systems I felt that there seemed to be different ways of designing these and providing the necessary safety levels. I do not like systems where there are potentially hidden failures (when a safety device is supposed to work and does not).

Showers

I also was hoping to use gravity to supply the showers but it is becoming more difficult to find a good choice of shower valves and shower heads that work on low pressure .  The way around this to keep things simple is to install a shower pump in a central location for two of the showers (see below). One can then use a shower head that helps control the flow rate and keep the water use to a minimum.

For one of the showers I already have a shower valve and head that works well on gravity so I will plumb this separately directly from the tank (shower 3 in the layout below).

Design

The plumbing layout for the house is shown below. (The toilets are fed from a separate gravity tank supplied by the rainwater harvesting system as shown on a previous blog.)

Plumbing
Gravity Fed Design

Materials

I am using Qual-Pex for the plumbing in the house. It varies in price so it is a good idea to shop around (The 1/2 inch varies from €70 to €200 for the same pipe). I ended up using 200 metres  of 1/2 inch and nearly 50 metres of 3/4 inch and 25 meters of the 1 inch.

The overflow from the tank needs to be well secured or finished in copper to ensure that if the tank overheats the pipe will not sag/bend or cause a restriction.

The brass fittings are cheaper than the quick connect so I will use these. One needs a good plastic pipe cutter as using a hacksaw is not feasible. I used a Ridgid brand plastic pipe cutter and I am very happy with the quality.

With a plumbing design one needs to ensure that the size of pipes are no bigger than they need to be. One reason for this is that the volume of water in the pipe will cool down and one has to wait for this to run through fully before getting hot water at the correct temperature.

I calculated that  10 meters of 1/2 inch pipe holds approximately 1 litre of water and 10 meters of 3/4 inch holds 2.3 litres. This gives one an idea if a solution is required and the wait time.

The cold water pipes will be insulated as I am concerned that condensation could occur on the surface of the pipe.

I also tried to ensure that the number of connections/joints are kept to a minimum and I tried to place these only at accessible points.

Logistics of getting hot Water to the furthest points.

The kitchen sink hot water supply is too far from the tank so I may develop an on demand system that ensures hot water is available once certain taps are used rather flushing semi warm water down the drain and a one or two minute wait for hot water. Installing instantaneous heaters is not economical.

This on demand system is used in the USA for closed systems and two companies have developed a solution. One is http://www.gothotwater.com/on-demand-water-heater and http://www.taco-hvac.com/media/09.16.14_HotLinkCutSheet_100-93.pdf. The first solution costs around $660 -too expensive.

A way to solve this is only use one 12 volt pump and have a valve at each sink position. This pump will then feed into the gravity header tank rather than the hot water tank (I need to check the regulations) . I want to keep the plumbing connections and electrical devices to a minimum. The power to operate this can be a small solar panel charging a battery.

The plan is to develop a solution around the following -Measure the hot pipe feed temperature, Detect if the tap is going to be used and link this to controlling the pump and valve.

The only item that needs to be purchased is a 12 volt pump and a 12 volt valve and develop the control unit to suit the Irish regulations. I have started on the design of this. In the meantime I will install a third pipe in the bathroom and kitchen for the final solution.


Window Blinds

Window Blinds

I have been looking for a simple cost efficient way of installing blinds on some of the bedroom windows. The windows are nearly 3 metres above the ground and 2.1 metres wide. I did not want a manual method of using long cords hanging down to the floor level because of the child safety risk.

The blinds only purpose is to block out summer light at night. There are solutions for the outside which are the norm across Europe but these I deem too complex. These same units have multiple purposes such as security, provide darkness and reducing solar gain. The simplest to maintain I feel are shown below from one of the following suppliers . The units will not be used every day (unnecessary in the winter) so they should be reliable. The prices start at around 80 Euro.

For the above I have installed cables to supply power rather than use the solar option. These cables can then be fed from one central point with the appropriate voltage from say a battery charged by solar. I also installed the wiring so that a manual switch can be installed rather than using a mobile phone.

What will be important for the above is to find a blind mechanism that is smooth and reliable. Some of the online prices for these appear to be around €90 for 2.1 meter wide and 1 meter long.

If one wants to go the traditional way then the video below may be helpful. When I priced internal motorised blinds in Ireland they were costing around €400 each.

Wiring (Internet/Ethernet/TV)

Ethernet (Internet)

I am including an Ethernet cable connection to each room. The reason for this is that it provides a more robust signal and has a higher data rate compared to Wifi for internet use. I also ran an Ethernet cable to the TV and Stereo location as these technologies merge with the internet .

In order to install an Ethernet network one needs to select a central point to locate the switch/router and run a separate cable to each room from this position. It only took 3 or 4 hours to do this. The cost of the cable is low approximately €20 for 100 metres . The best value I came across is 305 meters for €49 (www.freetv.ie). There are a few types of Ethernet cable such as CAT5 and CAT6 and combinations of these. I installed the CAT6 un-screened cable as it offers a better performance than CAT5 and maintains the same type of connections that are used today.

The Ethernet cable looks like the following . The cores are twisted together in order to reduce noise. Terminating these cables is tricky (but the tools are low cost at around €10. )

Ethernet cable

A location worth running the cable to is the kitchen (never know what a kitchen appliance will do next).

For the TV (Terrestrial) one needs a 75 ohm cable and the satellite one requires a 75 ohm cable to match the LNB. The satellite connection needs to be kept short for the optimum signal ( I was told to keep it to less than 10 metres ). The TV 75 ohm cable can be any length. Be aware that there are low quality and good quality cables of the same type. One also needs to ensure that the 75 ohm cable bends on the cable are not below the manufacturers specification as this will increase the signal loss. A good cable manufacturer will state the minimum size of a bend.

A simple wiring diagram of the data cable routes are shown below. As the cable is very cheap it is a good idea also to install one near the front door and distribution board.

Below is my wiring diagram to ensure I do not miss something.

Data
Data


Acoustic and Fire Design

Fire and Acoustic Isolation

Having recently come across a best practice guide for Electrical installations and their effect on the fire performance of buildings I have decided to change  the approach to the fire/acoustic isolation between rooms. I will now install Rockwool flexi 50mm in the 100mm partition walls and Rockwool flexi 100mm in the 140mm partition walls .

Electrics before insulation
Partition before Insulation with Wiring

Rockwool
Partition wall with Rockwool installed

From an acoustic perspective I was advised that it is better to install the Rockwool in the centre of the partitions rather than touching one or other side of the plasterboard as this limits the sound transfer.

The Electrical Safety Council best practice guide deals with Electrical installations and their impact on the fire performance of Domestic premises at this link when one is building a home. A summary is as follows but the full document is worth reading for any self builder.

  • Fire containment in the event of a fire
  • The need to prevent fire from passing through holes in all elements whether solid or lightweight is addressed.
  • Electrical Equipment is identified that has a direct and significant influence on the fire performance of an element.
  • Partial Penetrations –those that reduce the fire performance of part of the wall/ceiling or floor.
    Full Penetrations-such as ducts and fans that go through both elements of a wall/ceiling/floor.


KNX-Lighting Control Part 2

Lighting and KNX control.

In a previous blog I discussed the advantage of using KNX for the lighting control only.  Some of the KNX control options are expensive so in order to keep things simple and affordable I have decided to use the following devices to control the lighting.  As most of the LED lights are using around 5 Watts of power I will also eliminate the dimming functions and ensure that the layout of the lights in the ceiling can be switched on separate circuits in the larger rooms (a simple form of dimming in a way).

Universal Interface

The hardware required will be a KNX binary input /output device  with 12 inputs/outputs to connect to standard light switches. The advantage is that the cost is reduced by not using a special KNX light switch.  A single KNX switch can cost up to €100 while a simple mechanical switch that costs €2 or €4 approximately can carry out most of the primary switching functions and is designed to work on the KNX system.

My preference and research on the best value for money is a product made by ABB called an Universal Interface US/U 12.2 . Expect to pay around €120 for one of these  which has 12 inputs/outputs (Equates to €12 euro per room). It can also carry out dimming control with a suitable KNX actuator (device that switches the power from a central distribution location). There are numerous other functions built in that are relevant to lighting and indication control.

Universal Interface
EIN KNX Interface

The plan is to mount one of these Universal Interfaces in 4 different areas in the house (The size of one of these units is approximately 52mm in diameter) .  A maximum of 12 light switches will connect to this Universal Interface. It is recommended to keep the cable feeding the light switches to a maximum length of 10 meters (although I have found it works reliably up to 100 meters). I will be using screened alarm cable (6 core) to each of the switches. In this way I plan to leave a spare core for each switch so that other functions can be applied in the future without re-decorating.  I will be using a push to make light switch as this allows one to use the same pair of cables for two way control and optimise the use of the cores in the cable.

Each 12 channel Universal Interface will have its own  KNX 12 channel switch actuator ( see below-it can control 12 different lights using 230 volt power in the building) that will switch the LED lights. One location to source these is http://www.eibmarkt.com

Switch Actuator

For the switch actuator (relay control of the lights) one can select the equivalent 12 channel KNX actuator. If one goes to the above web site or other KNX web sites and enters EIB KNX switch actuator 12-fold, SA.12.16  in the search engine one will find these units. Expect to pay around €230 for one. If one goes to http://www.eibmarket.com they have one for around €239 including VAT.  This works out at a cost of around €20 per room along with the savings in wiring and flexibility in the future as discussed in the previous blog.

actuator

Dimming Option

If one wants to dim LED lights one needs to research a suitable dimmer for the LED light. There  are different technologies used to dim LED lights so one needs to establish which LED lights to use first before committing to purchasing a dimming function. I am aware of two types such as leading edge and trailing edge controls for dimming.  As I will not be dimming the low wattage lights a simple actuator is all that is required.

Wall/Ceiling System

Wall/Ceiling  Electrical Services

For the internal wall build up I am using a double batten wall system. This wall system allows one to easily install services. In a previous experiment on building a workshop (used as a means to experiment on a small building before commencing the house) I installed a single row of horizontal battens on the OSB board. This made it very difficult to run services that need to run vertically. I had to install metal protecting plates and cut notches in the wood in order to ensure that I did not damage wiring due to the final layer of plasterboard screw fixing.

When one uses a counter batten system it facilitates running services such as power,  lighting, phone, internet, alarm etc without the risk of screw damage. This system also helps to reduce the cost of installing these services (see the image of a cable behind the batten below).

One can make use of a wall system like this if a soft insulation such as cellulose or fiberglass is behind the final batten which will support the plasterboard finish.

Wall Cable Routes
A row of battens run vertically behind the membrane in order to facilitate running services.

When working at ceiling level one may need to use a counter batten system in order to allow for recessed lighting otherwise it will mean installing special electrical enclosures cut into the airtight membrane. I have installed counter battens to a depth of approximately 90mm in the living and kitchen areas for LED downlights (see the previous post link on the 26/04/2015). In the bedroom areas I will only use a single batten system in order to install hanging pendent fittings.

Floor Level Insulation.

At floor level I installed Rockwool insulation for two reasons -one was to minimise the thermal bridging (heat loss around the wooden sole plate that the timber wall sits on) and the second reason was to minimise the damage to the insulation if there was a water leak.

I carried out a test where I placed 50mm of Rockwool RWA45  (product in the left bowl) and Metac (fiberglass-product in the right bowl below) in water in order to see what would happen if there was a leak. The Rockwool absorbs very little water but the fiberglass sank and became completely saturated and would possibly never dry out. Both insulation’s were submerged initially and then left for the duration of the test.

Rockwool Metac
Rockwool versus Fibreglass for water damage.

Below is an image of the Rockwool installed at floor level under the fibreglass in order to minimise the risk of insulation damage at floor level and minimise thermal bridging.

Rockwool
Rockwool Installed at Floor Level (green colour)

Airtight Membrane Installation

When installing the airtight membrane I was surprised how quickly the knife goes blunt. Rather than using the disposable knives and blades I now use a sharpener with the knife.

Knife and Sharpner