There are many options today when deciding to build. One can use a factory built design or use traditional block work or timber frame on site. Some factory built designs are as follows by way of example http://www.scanhome.ie . One can select the level of input oneself such as only construct the frame and say the self builder can do the rest or let the builder/supplier do everything.
How much Work does a self builder take on.
As a self builder I would try and get the foundation, frame, roof and windows installed then one can work in the dry to finish it. One is left with indoor wall completion, plastering , air tightness, Heat recovery, Wiring, Plumbing, Rain Water Harvesting, House heating System, Water heating system, floor finish, Painting, furniture , kitchen more than enough work for the self builder. The above need to be well thought out before laying the foundation or erecting the frame and the finish design of the roof.
The Building Standards-Self Build
One needs to comply with the building regulations. Always remember these are the minimum standard. It is always better to go for a home that will last well into the future that is warm and supplies fresh air. A lot of new homes built today are of a poor standard and this can be seen in the UK and Ireland. See example https://energysaveguy.tumblr.com.
The Sales Pitch
There are buildings that can receive different rating systems such as LEED and BREEAM. A good video on the good, the bad and the ugly of these can be seen here. They focus on equipment and energy accessories so it is best to leave these and focus on the basics. What are the basics –Insulation, Air-tightness, Windows, Heat Recovery (fresh air supply), and minimising thermal bridging(heat loss through details on the build). When one does the above one finds that the heating system is simple, the house costs very little to run and is healthy if the correct materials are selected and installed in correct sequence during the build.
The Gold Standard-Passive House
The highest energy standard to build a house , an apartment, school or commercial buildings is the passive house standard. It focuses on the basics and uses physics rather than rating systems to design the building. All the calculations are done before the house is built on a passive house planning software package (PHPP) which takes into account for example how much solar heat the glass in the window will leave into the house, how much heat will be lost through the glass from the inside to outside, how much heat is lost through the frame, and the heat lost on how the window is installed in the wall. Every building detail physics are analysised to ensure that one ends up with a comfortable home.
Floor laying continues with the Junckers System. The floor boards are 22 mm solid wood with a proprietary clip system. Each of the metal clips (shown below) connect each floor board. The clip type one selects depends on the expected humidity levels in the home. I used a soundproof underlay on the concrete floor. One can also nail this type of flooring.
Skirting Board Lighting
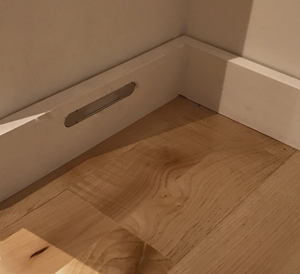
I started the design of the skirting board lighting that will be powered from a DC source (battery) connected to a solar panel. The idea is that this lighting would be on when it is dark and would also act as a lighting system if there was a power failure in order to minimise the use of candles.
The light output of this lighting would be equivalent to a candle and they are placed in bathrooms and corridors in order to allow one to walk around the house at night without switching on the main lights.
A first fix of how they will look is as shown below.
I have been looking for a simple cost efficient way of installing blinds on some of the bedroom windows. The windows are nearly 3 metres above the ground and 2.1 metres wide. I did not want a manual method of using long cords hanging down to the floor level because of the child safety risk.
The blinds only purpose is to block out summer light at night. There are solutions for the outside which are the norm across Europe but these I deem too complex. These same units have multiple purposes such as security, provide darkness and reducing solar gain. The simplest to maintain I feel are shown below from one of the following suppliers . The units will not be used every day (unnecessary in the winter) so they should be reliable. The prices start at around 80 Euro.
For the above I have installed cables to supply power rather than use the solar option. These cables can then be fed from one central point with the appropriate voltage from say a battery charged by solar. I also installed the wiring so that a manual switch can be installed rather than using a mobile phone.
What will be important for the above is to find a blind mechanism that is smooth and reliable. Some of the online prices for these appear to be around €90 for 2.1 meter wide and 1 meter long.
If one wants to go the traditional way then the video below may be helpful. When I priced internal motorised blinds in Ireland they were costing around €400 each.
Below is the plan to deal with the window/door threshold detail to minimise thermal bridging and provide airtightness.
The window sits on a 30mm piece of Compacfoam . I used Compacfoam 200. I rebated the Compacfoam under the window so that the floor boards would fit under the window and sit on the non rebated edge.
Compacfoam 30mm with rebate (Used router to rebate)
I placed 15mm Compacfoam along the lenght of the window and glued these with Orcon F. The direction of the Compacfoam will determine the floor board direction.
Strips of Compacfoam
I then used 15mm Aerogel to seal around the Compacfoam. Under the window I installed the Proclima profil tape so that I could tape the Intello membrane later.
I left the centre protection tape in place on the Intello profil so that the wooden floor would go in as far as possible on the membrane.
Aerogel 15mm
The Intello membrane was then taped ensuring that it was placed as near to the window as possible . I taped the membrane to the floor . This finished the detail.
Proclima Solitex Plus in place
An example of the possible future wooden floor sample in place is seen below or stone/slate or marble finish.
I will first seal the floor with a product from Lakeland paint in the UK in order to minimise dust. (It looks like a very high eco specification sealer ).
I then plan to install a marble /stone slab to bridge the gap and connect this to the wooden floor.
As part of the passive house requirement one needs to eliminate or minimise heat loss through linear lengths or points around the house. Some of the thermal bridges in my build are typical of other builds. I hope to provide more details in the future.
One of the main linear heat losses is with window/door installations (its connection with the wall frame ). It has been said numerous times that selecting a high quality window/door and installing it poorly can equate to buying a low energy window .
As mentioned before I will use the free software called Therm to calculate the losses. The first detail to tackle is the glazing which was directly mounted in the frame of the house without a window frame. These windows are 2.4 metres x .9 metre and there are 11 of these mounted on the south face.
The calculation of these linear losses can be expensive to get done so I will be doing the task myself and have it checked by others. I am surprised that good details are hard to come by on the web for free to help the self builder. One of the most time consuming exercises with thermal bridge calculations is drawing the detail. If one undertakes drawing this oneself using CAD (Computer Aided Design) software it can help to reduce the cost of the calculation.
When one needs to come up with a detail to minimise the losses there are a lot of products that help to keep the losses under control. These are semi-rigid insulation products like compacfoam, foamglass blocks, standard insulation, TECTEM, PU or rockwool and fibreglass products and aerogels (which is one of the highest performing insulators being made).
To date there appears to be very few online resources to guide the self builder or provide details that one can use before one starts a build.
Some background and details I found to date on thermal bridges can be found at the following links.
Below is an example of the thermal bridge calculations one needs to carry out to establish the thermal bridge performance values in W/(mk).
One draws the detail as a DXF file using a drawing package (or draw the detail manually in Therm)
Import the detail into Therm Software
Add the technical details such as thermal conductivity of each item
Tell Therm where on the drawing to stop the calculation (Adiabatic)-top and bottom of the drawing shown below.
Tell Therm what the internal and external temperatures are
Go to a spreadsheet and calculate the psi values of the thermal bridge detail for the passive house performance value.
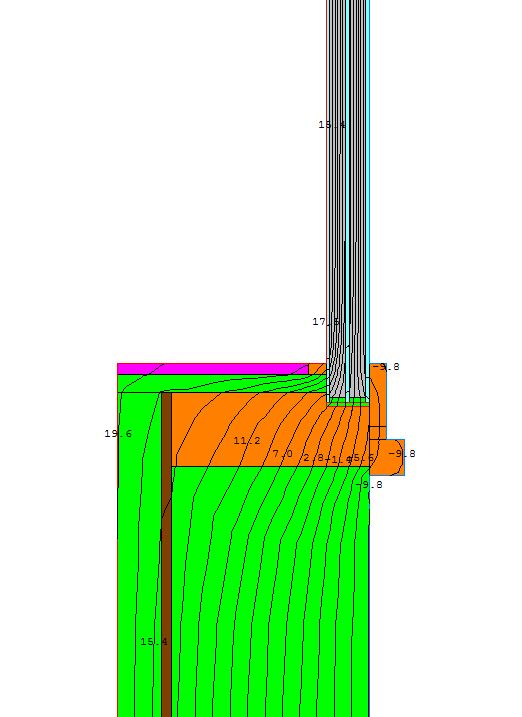
When this is done one ends up with the calculation and an image like that shown below. In this image the glass is shown near the top right.
In the next image the colours show the temperature gradients. The purple colour is the outside temperature at -10 degrees.
There is thermal bridge software that one can buy where the software calculates the psi value without using a spreadsheet but Therm is free and there are courses available in Ireland.
If one wants to show the real design and installation details of the thermal bridge values for the Irish regulations rather than the accredited details (without a performance value) one needs to use a certified thermal bridge accessors but this is not the case for the Passive House Institute.
We can all look forward to the day when standard construction details that are typically used in Ireland are already calculated for the self builder and there will be no need to pay to find out the thermal bridge losses . The Scottish accredited details (see above link) come close to taking the guess work out of construction.
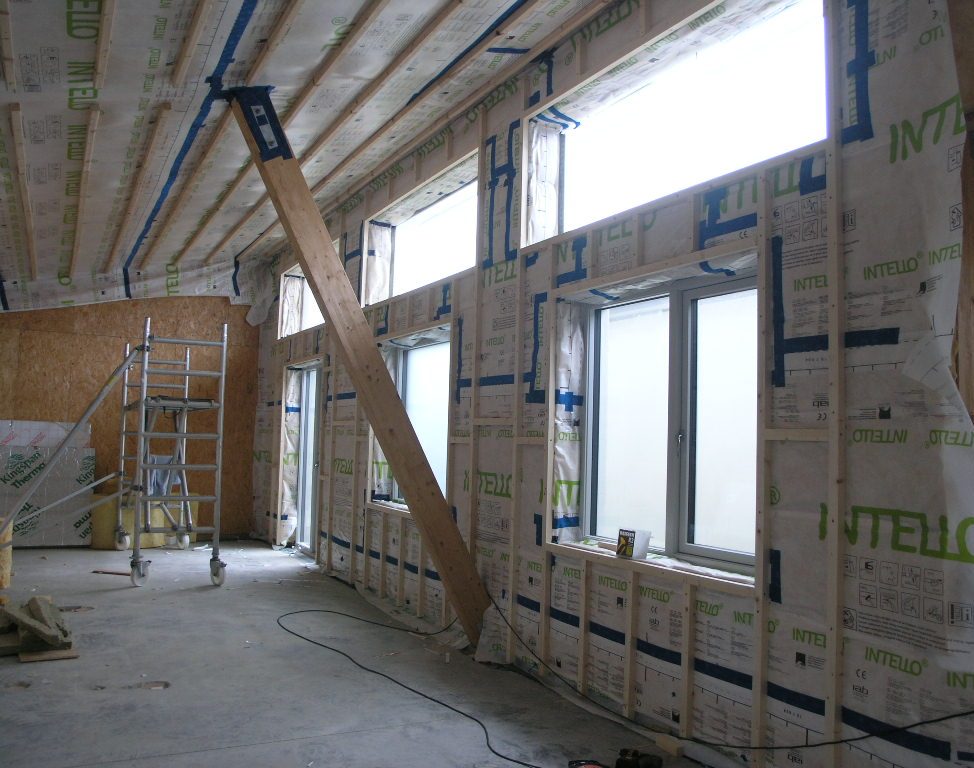
Below are a few images of the build-up I used around the windows. The first image shows the batten (45x40mm planed ) build up on the window wall. I tried to offset the battens around the windows so as to minimse thermal bridges. The wall battens are installed at 90 degrees to the vertical window sections behind the OSB.
Insulation
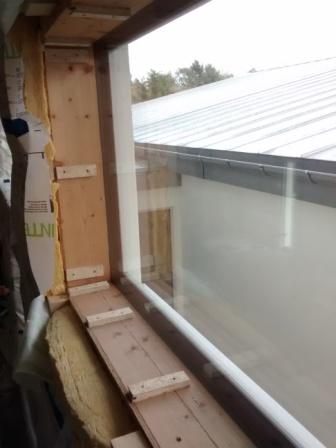
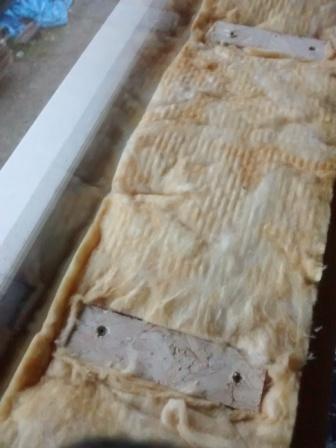
The image below is the RWA45 rockwook installation before the airtight membrane was installed. The wooden strips on the window sill are there to support the sill board. I kept them away from the window frame in order to decrease the thermal bridge. I now plan to use Rockwool RWA45 on all window sills as it performs better at not absorbing water as seen on a previous blog.
Thermal Bridge Build Up
The next image shows the finish layer of battens over the membrane.
Batten Finish Detail
The window (below) which was installed in the structural frame of the building (I purchased the glazing without the frame 2.4mx.9m) provides light and solar gain.Small lengths of floor board OSB were cut to size in order to build up the insulation and provide a base for the plasterboard finish.
Insulation is placed up against the glass and I plan to place a timber bead around the edge . Plasterboard will then finish the detail.
The finished (near finished) wall looks like this below.
I recently came across a few videos from America on the subject of building physics. They may help the self builder when trying to figure the wall system, roof design or insulation to use.
The videos are presented by Joseph Lstiburek who outlines the do’s and dont’s in a very direct manner. He is the founder of Building Science Corporation.
In the videos he references the American method of describing heat loss which is the R value (resistance to heat loss per inch- a higher number is better) while in Europe we mainly use the U value (ease in which heat travels through an object-a lower number is better but it includes boundary air films). The Rvalue is the thickness of the insulation divided by the K value or in the examples presented by Joseph Lstiburek the R value of 2 of the Irish building is approximately equivalent to a U value of 0.5.
This video starts with the progress for insulating buildings in 1000 years (starting with an Irish Church) and covers the perfect wall, roof and slab and the importance of designing buildings for the climate they are situated in.
Video (Below)
Commercial Thermal Bridging , LEED Building Problems, Water problems.
Physics Discussed (2nd law of thermodynamics)
Heat flow is from warm to cold
Moisture flow is from warm to cold
Moisture flow is from more to less
Air flow is from a higher pressure to a lower pressure
Gravity acts down
Quality Assurance-Figuring out what the right thing to do is
Quality Control– Executing it
The building layer order of importance for a wall, roof and slab and the importance of continuity between the layers as shown below in order of importance.
Water control layer
Air control layer
Vapour control
Thermal control
The 500 year wall-Keep the water out of it. Allow the vapour to get out from the inside or outside if it gets in. Keep the air out of the wall from the outside and inside. Put all the thermal layers on the outside and put the cladding on the outside.
He also analyses the LEED energy standard.
To Vent or not to Vent (Roofs-cold, warm and SIPS)
This video covers venting and airtightness of SIP roofs.
What happens when one uses a white roof membrane versus a black one.
Building Enclosures
Why increasing insulation is a game changer in the future . Moisture and durability issues that lie ahead because of extra insulation.
How many times did we see on Grand Design or other home build programs the stories of things going wrong with the windows/doors. Now after going through the process hopefully the following may help other self builders.
Technical
First of all the technical detail. The most important element of the windows is the glass. Some important functions-
Capture heat (free energy) from the sun in the winter/autumn/spring to heat the house. (Called the g value)
When the heat is captured or created in the house minimise the loss through the window (Called the Ug value for the glazing. )The Uw or U-value usually includes the whole window (including the frame ) but be aware that some window company’s may quote only the glazing value rather than the glazing and frame.
Minimise cold air draughts (cold air descending at the window surface) that one may feel if one sits near a window (this is caused by the glazing not being able to keep the differential temperature between the inside and outside below 3 to 3.5 degrees Celsius. (eliminated by triple glaze systems)
Maintain a sense of light in the room (the light level can be typically reduced by 30% (for triple glazed systems) when one tries to balance the above factors.
Ensure that west facing and south orientation windows are correctly shaded (or by means of special glass) in the summer/autumn so that the house will not overheat .
The type of glass used in a self build can reduce the amount of insulation required in the house. One has to balance the g value ( gvaluerepresents the maximum amount of solar energy passing through the glass and 0.0 or 0% represents a window with no solar energy transmittance-if glass had a 53% = 0.53 g factor it would let 53% of the solar heat through. ) with the Ug value which represents the heat loss over a surface area in W (m2/k).
The glass that works in Germany may not necessarily work in Ireland. One needs to balance these two values to suit your house and orientation in the PHPP software.
Another important factor is the glazing spacer used between the panes of glass. Most high quality windows will use a thermally broken spacer to ensure that the minimum amount of heat is lost through the glass spacer. One can see this by viewing the colour of the spacer -if is it silver/metallic then it more than likely has a high heat loss. If it is black it more than likely is a highly insulated spacer.
Window Spacer (Black)
Practical Choice
Options are available in general to have the windows opening out or opening in (with or without tilt and turn). Tilt and turn mean that blinds and curtains need to be taken into account.
I believe there are only two or three manufacturers of sliding doors that are airtight. Other options are folding units.
Review the type of hinges (galvanized, steel, brass etc) and the handles specified (shapes).
Some opening out windows/doors have the option of a locking system to ensure that a breeze will not affect the ventilation or damage them when left open.
Establish which doors need external key locks for entry .
Establish how many sets of keys you will receive
There is an option to have wooden or PVC windows clad with aluminium (evaluate which is more suitable in your environment such as being beside the sea versus fully sheltered).
Ensure the Ral colour touch up paint kit is available for small scratches and knocks that happen on site.
Establish if you want alarm contacts pre-installed.
Cost Choices
A window with minimum openings (more energy efficient) will be significantly cheaper than a window with multiple openings (less energy efficient).
A window that stays within the manufactures standard sizes and truck delivery size is going to be cheaper.
A window that has a non standard shape is going to be more expensive.
Sliding/Folding mechanisms and making them airtight is more expensive.
Establish if one can use glazing without a frame in your design (roughly 50% cheaper).
The frame that holds the glass and those used in passive houses will have an insulator such as cork or other insulation material separating the inside of the frame from the outside climate in order to reduce the heat loss. An equally important detail of a window is how it is going to be installed. This can account for over a third of the heat loss if it is just placed in an opening and secured with a steel band/bracket and then foam filled around the edges. So in real terms money spent on a high performance window/door can be negated completely by installing it poorly.
Below is a video I came across for guidance on installing windows in a timber frame build (Ireland) with a breathable insulation on the outside and a sketch of an externally insulated block work building later on in the video. There are a number of videos in this series.
In my case I installed the windows in a wooden frame on a ventilated facade. As wood is a fairly good insulator (thermal conductivity of approximately 0.13w/(mk) ) I took the extra step of providing a better insulator around the reveal in order to improve the installation method and reduce the heat loss on the frame as the external cladding is vented with cement board. I am in the process of doing up the thermal bridge calculation using the free software Therm to calculate the actual linear heat loss (Thermal Bridge psi value denoted by the symbol Ψ). The other type of heat loss is known as the U value and is a measure of surface area in watts per m2 per degree change (W/m2/K).
Where the window or doors were installed on concrete I installed Compacfoam (rigid insulation) under the window/door and I will insulate and provide an airtight seal up to this material.
Window Frame Mounted on Compacfoam (insulator) in order to minimise the heat loss against the concrete floor.
Glazing (with no frames)
I installed some glazing in the structure of the building without the frames in order to reduce costs. The timber frame manufacturer, Matthew O Malley Timber Limited, rebated the openings and I then taped and sealed the glazing. There were 12 glazing units of 2.4 metres by 0.9 metres approximately.
I installed security tape in the rebate. I experimented with other security tape but found the following tape to be better-Closed cell polyolefin foam tape which conform to BS 7950 Manual Glazing Test from tapes direct in the UK.
Glazing openings with rebate in timber.
As the structure of our home is made with gluelam this helps to minimise the movement in a timber frame build to facilate installing glazing without a frame. I am not sure if glazing can be installed directly in a standard timber frame build.
Other important factors to consider are:
air-tightness (the normal passive certified window will have two or three seals mounted in the frame) .