Category Archives: Alarm

Self Build Remote Monitoring Passive House

Self-Build for Water Leaks, Power Measurement and Temperature.

The task of monitoring for water leaks, temperature and measuring power is best served by some remote tools available on the market.

Most tools rely on Wi-Fi, zigbee, 433mHz etc., signals to communicate through the internet connection remotely to your phone.

This in itself is a weakness as if your wi-fi is not working then most of these tools fail. But if the wi-fi or ethernet connection does not fail then these tools are of value.

Lets look at some of these tools that I feel are worth considering.

sonoff 433 RF Bridge
Water Leak Passive House


The lowest cost unit is the Sonoff suite of products. The list is comprehensive and the cost is low. For example the wi-fi / 433Mhz central hub for these devices costs less than €9.00 and as an example the water leak sensors are approximately €8 each and it uses a lithium battery for reliability (needs to be purchased separately).

Water Leak Passive House
Purchase Lithium batteries separately .


The product is  very well made and a certain level of IT skill is involved in setting these up. It operates at a very safe radio frequency like that of your car remote control rather than higher frequency’s but the hub uses wifi so if one keeps it close to your router and keep the router as faraway as possible from you it is probably the best approach.

I would advise that a separate sensor unit (regardless of which product you select)  is installed in a location that you can easily check to ensure that the system is functioning correctly as water leak sensors can end up in locations that are difficult to inspect and check such as behind dishwashers etc. One needs to change the battery every year or two on each of the sensors or when your test unit fails.

Next on the list is the Samsung smarthings hub and sensors https://shop.samsung.com/ie/28020607-smartthings

Samsung Smart Things


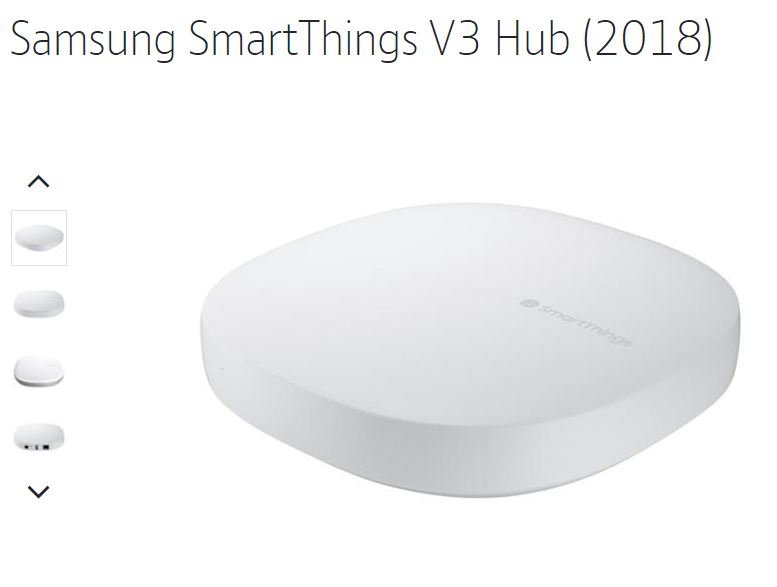
This type of device links to other well know products such as Amazon Alexa and costs around €90. They also provide water leak sensors to connect to the above. This will be easiest to set up.

Multiple options are available to integrate with the above

https://www.smartthings.com/products

Type in smarthings hub in the search of their web site and one should find the relevant devices . Check your own country samsung web site for compatibility.

Another company that provides value is Shelly. They supply multiple sensor types including water leak sensors that integrate with the power unit below.

Power Measurement

I have not purchased this unit but it looks like good value at €69 but it uses wifi. It is made by Shelly  https://shelly.cloud/

Power Measurement


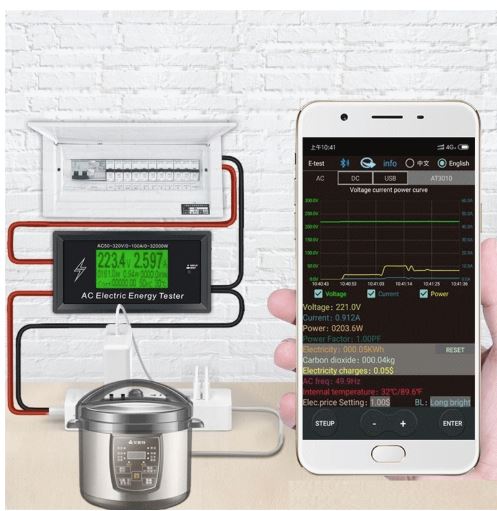
A unit that measure power consumption and provides a Bluetooth option also looks like good value. It is the AT3010 AC50~320V 100A 3KKW Phone App AC Meter. It costs around €15 and can be purchased from https://www.banggood.com .  It will need an enclosure to house the unit and it does not use wifi which is a benefit. I purchased this unit as a test and I am about to set it up.  I will use this meter to monitor the cost of heating the house and also monitor the condition of each storage heater.

Power Measurement

Wall/Ceiling System

Wall/Ceiling  Electrical Services

For the internal wall build up I am using a double batten wall system. This wall system allows one to easily install services. In a previous experiment on building a workshop (used as a means to experiment on a small building before commencing the house) I installed a single row of horizontal battens on the OSB board. This made it very difficult to run services that need to run vertically. I had to install metal protecting plates and cut notches in the wood in order to ensure that I did not damage wiring due to the final layer of plasterboard screw fixing.

When one uses a counter batten system it facilitates running services such as power,  lighting, phone, internet, alarm etc without the risk of screw damage. This system also helps to reduce the cost of installing these services (see the image of a cable behind the batten below).

One can make use of a wall system like this if a soft insulation such as cellulose or fiberglass is behind the final batten which will support the plasterboard finish.

Wall Cable Routes
A row of battens run vertically behind the membrane in order to facilitate running services.

When working at ceiling level one may need to use a counter batten system in order to allow for recessed lighting otherwise it will mean installing special electrical enclosures cut into the airtight membrane. I have installed counter battens to a depth of approximately 90mm in the living and kitchen areas for LED downlights (see the previous post link on the 26/04/2015). In the bedroom areas I will only use a single batten system in order to install hanging pendent fittings.

Floor Level Insulation.

At floor level I installed Rockwool insulation for two reasons -one was to minimise the thermal bridging (heat loss around the wooden sole plate that the timber wall sits on) and the second reason was to minimise the damage to the insulation if there was a water leak.

I carried out a test where I placed 50mm of Rockwool RWA45  (product in the left bowl) and Metac (fiberglass-product in the right bowl below) in water in order to see what would happen if there was a leak. The Rockwool absorbs very little water but the fiberglass sank and became completely saturated and would possibly never dry out. Both insulation’s were submerged initially and then left for the duration of the test.

Rockwool Metac
Rockwool versus Fibreglass for water damage.

Below is an image of the Rockwool installed at floor level under the fibreglass in order to minimise the risk of insulation damage at floor level and minimise thermal bridging.

Rockwool
Rockwool Installed at Floor Level (green colour)

Airtight Membrane Installation

When installing the airtight membrane I was surprised how quickly the knife goes blunt. Rather than using the disposable knives and blades I now use a sharpener with the knife.

Knife and Sharpner

Foundation (Services)

Plumbing Services

A few notes that may be helpful to the self builder when planning the services such as sink waste, cold/hot water feeds, toilet services. The layout of the foundation services necessitates the early planning of bathroom layouts and even the choice of toilets and shower outlets before the floor slab is poured.

Foundation
Foundation Services-White pipes are electrical services.

We visited a local bathroom showroom and we were informed that there are a few different types of toilet systems and they require a different pipe outlet location in the floor to ensure that they will fit. One has also to be sure that the layout of the bathrooms and toilets are what you want before the slab is poured.

For the shower outlets one has to decide between the use of trays or a walk in that is tiled flush with the floor or other finish. This will necessitate different floor slab preparations.

Another factor to keep in mind is that showers or sinks that are lightly used may dry out in the pipe trap resulting in unwelcome smells. I am trying to locate a unit with a larger water trap.

For sink outlets waste pipes it is beneficial to have these mounted in the walls so that different arrangements can be facilitated later on. This necessitates the slab pipework being brought up in the centre of the partition or in the service cavity. I have tried to keep all these inside the airtight membrane.

Kitchen Services

These need a special mention as one has to consider a duct for power cables if a kitchen island is used, water drain outlets for dishwasher etc and a cold water feed for a sink. It is practical to have the water main feed coming into the kitchen first before branching to other locations around the house. (This is more than likely the place one expects to switch the supply on/off) . Consider the grease trap outlet location also as they are substantial in size.

Electrical Services

In relation to electrical cables entering and leaving the house one needs to plan for cable ducts to garden lighting, main electrical supply (using special red ducting), rainwater harvesting cables, power for central vacuum unit if mounted outside the house, telephone line, broadband cables, power for outside shed if applicable, control wiring for services in plant room if situated outside, CCTV/alarm cables if applicable or a plan for these. I feel it is better to put the ducts in now as any unplanned cable changes in the future will affect the fabric of the building. My preference was to use a single 40mm duct for each cable with large sweeping bends for the electrical services. I feel it will be easier to ensure an airtight/rodent/insect seal with heat-shrink tubing on each duct.

Foundation
Foundation Services Layout


Ducts

Separate 40mm ducts for each electrical service.

HRV Drip

The HRV unit may also need a water condensation drip outlet. For this I plan to use a half inch heavy duty pipe that will go outside rather than plumbing it into the sewerage outlet.

Garden Water Supply

Because we plan to use a gravity based system the garden taps will be fed from inside the house using a 1/2 inch or 1/4 inch pipe installed in the foundation. One will feed either side of the garden.

Central Vacuum System

If this is being installed a special flexible PVC duct is required if the unit is situated outside the house.

Vcuum
Vacuum duct if placing a central vacuum outside