Category Archives: Window/Door Installation

Self Build-Building a New Home-Self Builder

Factory Built or Site Construction 

There are many options today when deciding to build. One can use a factory built design or use traditional block work or timber frame on site. Some factory built designs are as follows by way of example  http://www.scanhome.ie .  One can select the level of input oneself such as only construct the frame and say the self builder can do the rest or let the builder/supplier do everything.

How much Work does a self builder take on.

As a self builder I would try and get the foundation, frame, roof and windows installed then one can work in the dry to finish it. One is left with indoor wall completion, plastering , air tightness, Heat recovery, Wiring, Plumbing, Rain Water Harvesting, House heating System, Water heating system, floor finish, Painting, furniture , kitchen more than enough work for the self builder. The above need to be well thought out before laying the foundation or erecting the frame and the finish design of the roof.

The Building Standards-Self Build

One needs to comply with the building regulations. Always remember these are the minimum standard. It is always better to go for a home that will last well into the future that is warm and supplies fresh air.  A lot of new homes built today are of a poor standard and this can be seen in the UK and Ireland. See example https://energysaveguy.tumblr.com.

The Sales Pitch

There are buildings that can receive different rating systems such as  LEED and BREEAM.  A good video on the good, the bad and the ugly of these can be seen here.  They focus on equipment and energy accessories so it is best to leave these and focus on the basics. What are the basics –Insulation, Air-tightness, WindowsHeat Recovery (fresh air supply), and minimising thermal bridging (heat loss through details on the build).  When one does the above one finds that the heating system is simple, the house costs very little to run and is healthy if the correct materials are selected and installed in correct sequence during the build.

The Gold Standard-Passive House

The highest energy standard to build a house , an apartment, school or commercial buildings is the passive house standard. It focuses on the basics and uses physics rather than rating systems to design the building.  All the calculations are done before the house is built on a passive house planning software package (PHPP) which takes into account for example how much solar heat the glass in the window will leave into the house, how much heat will be lost through the glass from the inside to outside, how much heat is lost through the frame, and the heat lost on how the window is installed in the wall. Every building detail physics are analysised to ensure that one ends up with a comfortable home.


Self Build-Images and Lighting Design Progress.

Progress to date.

Passive House

Floor Laying

Floor laying continues with the Junckers System. The floor boards  are 22 mm solid wood with a proprietary clip system. Each of the metal clips (shown below) connect each floor board. The clip type one selects depends on the expected humidity levels in the home. I used a soundproof underlay on the concrete floor. One can also nail this type of flooring.


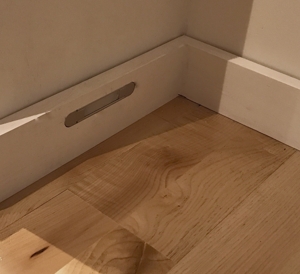
Skirting Board Lighting

I started the design of the skirting board lighting that will be powered from a DC source (battery) connected to a solar panel. The idea is that this lighting would be on when it is dark and would also act as a lighting system if there was a power failure in order to minimise the use of candles.

The light output of this lighting would be equivalent to a candle and they are placed in bathrooms and corridors in order to allow one to walk around the house at night without switching on the main lights.

A first fix of how they will look is as shown below.

Lighting


Window Blinds

Window Blinds

I have been looking for a simple cost efficient way of installing blinds on some of the bedroom windows. The windows are nearly 3 metres above the ground and 2.1 metres wide. I did not want a manual method of using long cords hanging down to the floor level because of the child safety risk.

The blinds only purpose is to block out summer light at night. There are solutions for the outside which are the norm across Europe but these I deem too complex. These same units have multiple purposes such as security, provide darkness and reducing solar gain. The simplest to maintain I feel are shown below from one of the following suppliers . The units will not be used every day (unnecessary in the winter) so they should be reliable. The prices start at around 80 Euro.

For the above I have installed cables to supply power rather than use the solar option. These cables can then be fed from one central point with the appropriate voltage from say a battery charged by solar. I also installed the wiring so that a manual switch can be installed rather than using a mobile phone.

What will be important for the above is to find a blind mechanism that is smooth and reliable. Some of the online prices for these appear to be around €90 for 2.1 meter wide and 1 meter long.

If one wants to go the traditional way then the video below may be helpful. When I priced internal motorised blinds in Ireland they were costing around €400 each.

Window/Door Thermal Bridge Detail

Installation Detail

Below is the plan to deal with the window/door threshold detail to minimise thermal bridging and provide airtightness.

The window sits on a 30mm piece of Compacfoam . I used Compacfoam 200. I rebated the Compacfoam under the window so that the floor boards would fit under the window and sit on the non rebated edge.

frame mounted on compacfoam with a routed rebate
Compacfoam 30mm with rebate (Used router to rebate)

I placed 15mm Compacfoam along the lenght of the window and glued these with Orcon F.  The direction of the Compacfoam will determine the floor board direction.

compacfoam
Strips of Compacfoam

I then used 15mm Aerogel to seal around the Compacfoam. Under the window I installed the Proclima profil tape so that I could tape the Intello membrane later.

I left the centre protection tape in place on the Intello profil so that the wooden floor would go in as far as possible on the membrane.

aerogel
Aerogel 15mm

The Intello membrane was then taped ensuring that it was placed as near to the window as possible .  I taped the membrane to the floor . This finished the detail.

proclima
Proclima Solitex Plus in place

An example of the possible future wooden floor sample in place is seen below or stone/slate or marble finish.

floor board

I will first seal the floor with a product from Lakeland paint in the UK in order to minimise dust. (It looks like a very high eco specification sealer ).

I then plan to install a marble /stone slab to bridge the gap and connect this to the wooden floor.


Window Wall Build Up

Batten and Counter Batten fixing

Below are a few images of the build-up I used around the windows. The first image shows the batten (45x40mm planed ) build up on the window wall. I tried to offset the battens around the windows so as to minimse thermal bridges. The wall battens are installed at 90 degrees to the vertical window sections behind the OSB.

Passive House Timber Frame Build Up
Insulation

The image below is the RWA45 rockwook installation before the airtight membrane was installed. The wooden strips on the window sill are there to support the sill board. I kept them away from the window frame in order to decrease the thermal bridge. I now plan to use Rockwool RWA45 on all window sills as it performs better at not absorbing water as seen on a previous blog.

Window Insulation Detail Passive House
Thermal Bridge Build Up

The next image shows the finish layer of battens over the membrane.

Passive House Window Detail
Batten Finish Detail


The window (below) which was installed in the structural frame of the building (I purchased the glazing without the frame 2.4mx.9m) provides light and solar gain. Small lengths of floor board OSB were cut to size in order to build up the insulation and provide a base for the plasterboard finish.

wood spacers for insulation


Insulation is placed up against the glass and I plan to place a timber bead around the edge . Plasterboard will then finish the detail.

glazing insulation for glass in structure


The finished (near finished) wall looks like this below.

Passive House Wall Detail
Window Wall Detail