I am just getting around to installing the light switches . This is how the finished light switches look at the moment. Later on I plan to change the front plate of this switch to one of the other options such as glass, wood or marble.
This is what the above light switch looked like before installation. Standard switches can be used if one uses the method described below. I used a screened alarm cable to connect the KNX binary device known as a universal interface. This voltage is extra low around 3 volts DC.
KNX Distribution Board
As seen above this is what a typical KNX lighting distribution board looks like. One has a Power Supply (top left) and a programming Interface (next to power supply) . The three actuators (12 way) on separate rows send power directly to the rooms or other devices such as towel heaters. Functionality such as timers, last state before power failure, purging (automatically switching on pumps/valves to ensure they do not stall) etc is already built into the KNX technology.
LED Housings before I assembled the LED and its LED Driver.
Led mounted on Heatsink
This is one type of LED Driver I have used to power each LED. Typically when one buys an LED they have already tried to fit all the electronics contained in the above unit in the lamp one buys . This is one reason why led lamps do not always live up to their expected life time of 50,000 hours. The majority of LED failures are due to heat stress. I am using 9 watt LED in the housings shown above and the Power supply is a separate unit. For lower power LEDs one requires less electronics.
In a previous blog I discussed the advantage of using KNX for the lighting control only. Some of the KNX control options are expensive so in order to keep things simple and affordable I have decided to use the following devices to control the lighting. As most of the LED lights are using around 5 Watts of power I will also eliminate the dimming functions and ensure that the layout of the lights in the ceiling can be switched on separate circuits in the larger rooms (a simple form of dimming in a way).
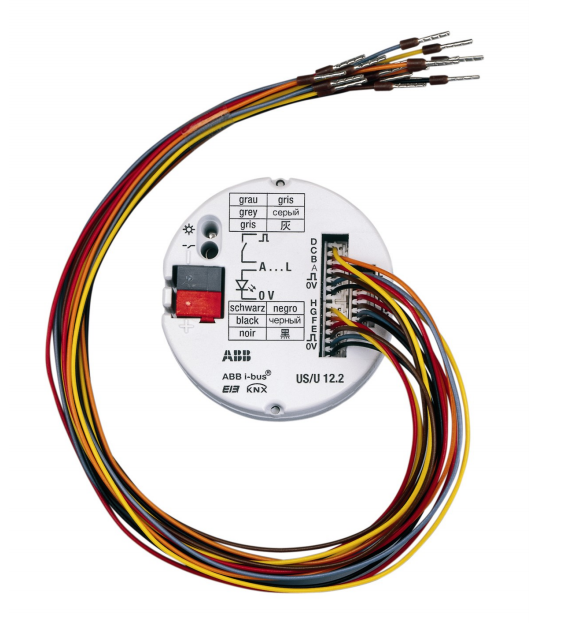
Universal Interface
The hardware required will be a KNX binary input /output device with 12 inputs/outputs to connect to standard light switches. The advantage is that the cost is reduced by not using a special KNX light switch. A single KNX switch can cost up to €100 while a simple mechanical switch that costs €2 or €4 approximately can carry out most of the primary switching functions and is designed to work on the KNX system.
My preference and research on the best value for money is a product made by ABB called an Universal Interface US/U 12.2 . Expect to pay around €120 for one of these which has 12 inputs/outputs (Equates to €12 euro per room). It can also carry out dimming control with a suitable KNX actuator (device that switches the power from a central distribution location). There are numerous other functions built in that are relevant to lighting and indication control.
EIN KNX Interface
The plan is to mount one of these Universal Interfaces in 4 different areas in the house (The size of one of these units is approximately 52mm in diameter) . A maximum of 12 light switches will connect to this Universal Interface. It is recommended to keep the cable feeding the light switches to a maximum length of 10 meters (although I have found it works reliably up to 100 meters). I will be using screened alarm cable (6 core) to each of the switches. In this way I plan to leave a spare core for each switch so that other functions can be applied in the future without re-decorating. I will be using a push to make light switch as this allows one to use the same pair of cables for two way control and optimise the use of the cores in the cable.
Each 12 channel Universal Interface will have its own KNX 12 channel switch actuator ( see below-it can control 12 different lights using 230 volt power in the building) that will switch the LED lights. One location to source these is http://www.eibmarkt.com
Switch Actuator
For the switch actuator (relay control of the lights) one can select the equivalent 12 channel KNX actuator. If one goes to the above web site or other KNX web sites and enters EIB KNX switch actuator 12-fold, SA.12.16in the search engine one will find these units. Expect to pay around €230 for one. If one goes to http://www.eibmarket.com they have one for around €239 including VAT. This works out at a cost of around €20 per room along with the savings in wiring and flexibility in the future as discussed in the previous blog.
Dimming Option
If one wants to dim LED lights one needs to research a suitable dimmer for the LED light. There are different technologies used to dim LED lights so one needs to establish which LED lights to use first before committing to purchasing a dimming function. I am aware of two types such as leading edge and trailing edge controls for dimming. As I will not be dimming the low wattage lights a simple actuator is all that is required.