Water Switch On.
I finally switched on the water supply to the house and then checked the compression connections on the gravity based system for leaks. The reason for using the gravity based system was to keep everything as simple as possible, consume the lowest amount of energy and have a system that would be low in maintenance cost. All the joint connections were brass compression fittings and I used a pipe called “qual-pex” . I insulated the cold and hot water pipes for both the rainwater and the calorifier tank.
Gravity Tank
I installed a separate gravity tank for the toilets that will be fed from the rainwater tank in the garden eventually. I need to design a control unit to pump rainwater when required and operate from the mains to flush out the gravity tank at regular intervals. At the moment it is connected to the fresh water supply for testing. This tank was mounted 2.71 metres above floor level. Nylon washers were placed inside and outside of the tank brass connections fittings.

What worked for me in relation to the toilets was an 1/2 inch pipe that ran a distance of 15 metres approximately with a storage tank base to floor height of 2.71 meters and this enabled the cistern to fill in approximately 1 minute 45 seconds.
Lessons Learned
- When tightening compression fittings- a good bit of advice is always leave room for an extra turn on the thread. In this way if there is a leak one can tighten the compression joint further.
- On the calorifier connections use Jet Blue Plus paste or similar paste and check it is suitable for potable water.
- The longest run was approximately 20 meters of 1/2 qual-pex and this supplies enough pressure for a “natural” water flow at the furthest away sink outlet-I also removed the filter in the outlet of the tap to further increase the water flow.
- Certain isolation On-Off valves have bore diameters that are smaller than the diameter of the pipe bore further reducing the capacity of the water flow. Visually check before purchase.
- Check that the taps and shower fittings are designed for a gravity system. I used a tap that had a minimum operating pressure of 0.1 bar from the Grohe range (1 metre height of water is = 0.1 bar).
- I was unaware of what an air lock can look like . In one case no water flowed and in another case I had a constant trickle of water with no air gurgling. To get rid of the air lock I used a small 5 litre pressure sprayer with a silicone hose on the end.

- Use copper inserts instead of nylon on “qual-pex” when trying to get gravity to work in your favour . They have a wider bore (see below).

Toilet Cistern
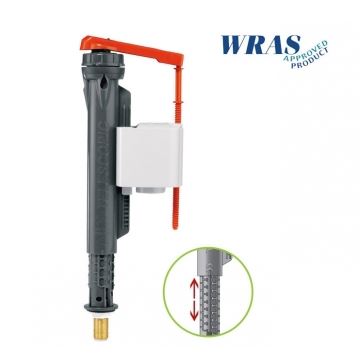
As most of the inlet valves on toilet cisterns are now designed for high pressure they come with a restriction devices and sometimes a filter. For use on the gravity system I removed these.
I plan to filter the water at the feed end of the water supply. Both the toilet storage tank and the calorifier storage tank (supply’s the hot water) are within the thermal envelope. This means that the tanks will not freeze but this brings other issues to be dealt with, such as noise from filling and potential condensation. I installed rockwool insulation around the tank to minimise temperature differences of the indoor air and reduce the noise of water filling the tank as I have no attic space.
The original toilet had a bottom inlet valve made with plastic threads which proved difficult to install.

I did have problems with the original cistern valve where I cross threaded the plastic connection (which resulted in a leak) as one finds that space is limited under a toilet/cistern (see below).

Another problem I had was I could not get it to operate correctly from the gravity tank. To solve the above I replaced the inlet valve with a Jollyfill telescopic Wirquin brass inlet valve and removed the high pressure device.

When I installed the inlet valve the connection leaked between the rubber seal and cistern. I removed it and placed silicone above the rubber seal. The silicone cured the problem.
Shower
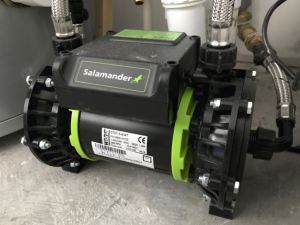
The gravity flow rate proved too low for the shower valve temperature control to work so plan B was acted on. I installed a 1.5 Bar 250w pump to raise the flow rate.
It is a Salamander RP50PT pump (45.5 dBA) . It cost €200 including postage. I am impressed with the low non-intrusive noise it generates. It comes with small sound isolating pads. One can roughly equate a 3dBA increase with twice the loudness.
Another factor to take into account when selecting and sizing a pump for one, two or three shower units is that the power usage approximately doubles when one selects a 0.5 bar increase for this range of pumps. So If one is sizing for the use of 3 showers being on at the same time (using one 3 bar pump) and only one shower is on then one will be using 1000 watts of power most of the time . I feel it is more energy efficient to install separate pumps and in this way one uses the least amount of energy most of the time and the pump will also be quieter as noise increases also with each 0.5 bar of pressure.
