For those building to the Passive House standard the HRV is independently tested by the Passive House Institute. They provide a full list of certified units at the following link Passive House Certified Heat Recovery Units.
HRV Efficiency (How is it calculated)
There are principally three methods it seems. One is the Supply method (used by manufactures) and this usually gives a higher efficiency value than the real world values. The Extract efficiency method is used to give a closer to real world value and then the passive house efficiency method which adds the following formulae to the Extract efficiency method.
Pel = real electrical power, W
M = mass flow, kg/h
Cp = specific heat of the air, kJ/kgK
The good news is that it appears if the HRV is certified to the Passive House standard then the difference between the supply method and the extract method is very small.
In the near future I plan to connect to the HRV unit I purchased and view the efficiency values.
The Passive House certificate shows the following
HRV Calculation
Cost Efficiency
The most cost efficient unit I came across was the Airflow DV145 passive house certified unit for our 200 m2 house with an airflow capacity of 542 m3/h. I paid around €2200 for it. If one has a smaller floor area then more savings can be made by using a smaller unit. As a self builder technical support was important and their main offices are in the UK.
If one opts for a non-certified HRV unit a 12% reduction must be applied to the manufacturers specification . Some manufacturers might not renew the certificate each year so it is a good idea to ask if a certificate exists. The data must be entered in the planning software for the passive house. For those interested in the passive house planning software (PHPP) there are courses run in Ireland frequently so I would suggest that one does this 3 day course (typical) and usually one finds the software discounted on the course.
It is an enjoyable course where one can select your own pace (the first time I did the course I wanted to listen and learn rather than calculate the performance of our own home). One such place is http://www.passivehouseacademy.com/
There are two types of HRV units that I came across -Heat (HRV) or Energy (ERV). The ERV is used principally for recovering humidity and heat. I selected a HRV unit,
Size Matters
When selecting a HRV unit it appears that one of the biggest mistakes is to select a unit that is too small but still satisfies the current regulations. What appears to happen in the competitive world of quotations is that a unit that just ticks the box comes in as the best price.
In selecting a unit for our home I selected a unit that has a manufacturers capacity of 542m3/h where the floor area of our house is 205 m2. Currently the unit is running at 31% of its capacity and it is maintaining a CO2 (Carbon Dioxide) level of around 700 ppm when the four of us occupy it . I use a stand alone CO2 sensor to measure the CO2 in different rooms. (I have not commissioned the unit yet as the internal doors/glazing are not installed).
Another advantage of selecting a larger unit is that it can run more efficiently at lower speeds and generates less noise through the ducts or from the unit itself.
Some of the options from the manufacturer Airflow (my unit is the third from the right).
A choice from one particular manufacturer.
September 2018 performance (with no heating switched on yet).
The graph below gives an idea of how the HRV works when managing heat from the house and supplying fresh air. For the coldest days of the year so far (2 degrees at night-in September) I put the unit into summer bypass mode the next morning (take in outside air directly and pump it around the house) because the sun was shining that day. The winter sun is lower in the sky so solar gain increases in the winter (when the sun shines). The house is made of timber/glulam construction. The main thermal mass is the concrete floor at the moment soon to be covered by a 32 mm thick wooden floor so the response times of house I suspect will change. The floor and wall temperatures are approximately 22 degrees Celsius.
Example above of HRV in use in our home.
Sample Data in our home using Google Fusion to visualise the HRV data for a week in October. (see link below)
One can select the chart tab and visualise the graph.
Use the bottom graph to zoom in.
The data is from the 21 October to the 28 October 2018.
One storage heater rated at 1.7kwh was used for 5.5 hours a day off peak.
The storage heater was switched off for one day on the 23rd October.
The graph starts at midnight on the 21 October.
Each ref reading is every 10 minutes.
The CO2 reading vary between 480ppm and 700ppm when fully occupied.
All HRV units contain a maintainable part called filters. They have a number of functions.
Clean the air being pumped into the house, and
Keep the internal components such as fans, ducts and HRV housing clean.
One typically finds one coarse filter and one fine filter on the air supply into the house and a coarse filter on the extract air from the house before the extract fan. The coarse filter is typically a G4 and the fine filter is a F7 (Pollen filter). I installed a 400mm x 400mm G4 coarse filter at the duct inlet so that I could keep the main supply duct clean. It is a bit more effort to maintain this but it will hopefully minimise the maintenance of the duct.
How many times did we see on Grand Design or other home build programs the stories of things going wrong with the windows/doors. Now after going through the process hopefully the following may help other self builders.
Technical
First of all the technical detail. The most important element of the windows is the glass. Some important functions-
Capture heat (free energy) from the sun in the winter/autumn/spring to heat the house. (Called the g value)
When the heat is captured or created in the house minimise the loss through the window (Called the Ug value for the glazing. )The Uw or U-value usually includes the whole window (including the frame ) but be aware that some window company’s may quote only the glazing value rather than the glazing and frame.
Minimise cold air draughts (cold air descending at the window surface) that one may feel if one sits near a window (this is caused by the glazing not being able to keep the differential temperature between the inside and outside below 3 to 3.5 degrees Celsius. (eliminated by triple glaze systems)
Maintain a sense of light in the room (the light level can be typically reduced by 30% (for triple glazed systems) when one tries to balance the above factors.
Ensure that west facing and south orientation windows are correctly shaded (or by means of special glass) in the summer/autumn so that the house will not overheat .
The type of glass used in a self build can reduce the amount of insulation required in the house. One has to balance the g value ( gvaluerepresents the maximum amount of solar energy passing through the glass and 0.0 or 0% represents a window with no solar energy transmittance-if glass had a 53% = 0.53 g factor it would let 53% of the solar heat through. ) with the Ug value which represents the heat loss over a surface area in W (m2/k).
The glass that works in Germany may not necessarily work in Ireland. One needs to balance these two values to suit your house and orientation in the PHPP software.
Another important factor is the glazing spacer used between the panes of glass. Most high quality windows will use a thermally broken spacer to ensure that the minimum amount of heat is lost through the glass spacer. One can see this by viewing the colour of the spacer -if is it silver/metallic then it more than likely has a high heat loss. If it is black it more than likely is a highly insulated spacer.
Window Spacer (Black)
Practical Choice
Options are available in general to have the windows opening out or opening in (with or without tilt and turn). Tilt and turn mean that blinds and curtains need to be taken into account.
I believe there are only two or three manufacturers of sliding doors that are airtight. Other options are folding units.
Review the type of hinges (galvanized, steel, brass etc) and the handles specified (shapes).
Some opening out windows/doors have the option of a locking system to ensure that a breeze will not affect the ventilation or damage them when left open.
Establish which doors need external key locks for entry .
Establish how many sets of keys you will receive
There is an option to have wooden or PVC windows clad with aluminium (evaluate which is more suitable in your environment such as being beside the sea versus fully sheltered).
Ensure the Ral colour touch up paint kit is available for small scratches and knocks that happen on site.
Establish if you want alarm contacts pre-installed.
Cost Choices
A window with minimum openings (more energy efficient) will be significantly cheaper than a window with multiple openings (less energy efficient).
A window that stays within the manufactures standard sizes and truck delivery size is going to be cheaper.
A window that has a non standard shape is going to be more expensive.
Sliding/Folding mechanisms and making them airtight is more expensive.
Establish if one can use glazing without a frame in your design (roughly 50% cheaper).
The frame that holds the glass and those used in passive houses will have an insulator such as cork or other insulation material separating the inside of the frame from the outside climate in order to reduce the heat loss. An equally important detail of a window is how it is going to be installed. This can account for over a third of the heat loss if it is just placed in an opening and secured with a steel band/bracket and then foam filled around the edges. So in real terms money spent on a high performance window/door can be negated completely by installing it poorly.
Below is a video I came across for guidance on installing windows in a timber frame build (Ireland) with a breathable insulation on the outside and a sketch of an externally insulated block work building later on in the video. There are a number of videos in this series.
In my case I installed the windows in a wooden frame on a ventilated facade. As wood is a fairly good insulator (thermal conductivity of approximately 0.13w/(mk) ) I took the extra step of providing a better insulator around the reveal in order to improve the installation method and reduce the heat loss on the frame as the external cladding is vented with cement board. I am in the process of doing up the thermal bridge calculation using the free software Therm to calculate the actual linear heat loss (Thermal Bridge psi value denoted by the symbol Ψ). The other type of heat loss is known as the U value and is a measure of surface area in watts per m2 per degree change (W/m2/K).
Where the window or doors were installed on concrete I installed Compacfoam (rigid insulation) under the window/door and I will insulate and provide an airtight seal up to this material.
Window Frame Mounted on Compacfoam (insulator) in order to minimise the heat loss against the concrete floor.
Glazing (with no frames)
I installed some glazing in the structure of the building without the frames in order to reduce costs. The timber frame manufacturer, Matthew O Malley Timber Limited, rebated the openings and I then taped and sealed the glazing. There were 12 glazing units of 2.4 metres by 0.9 metres approximately.
I installed security tape in the rebate. I experimented with other security tape but found the following tape to be better-Closed cell polyolefin foam tape which conform to BS 7950 Manual Glazing Test from tapes direct in the UK.
Glazing openings with rebate in timber.
As the structure of our home is made with gluelam this helps to minimise the movement in a timber frame build to facilate installing glazing without a frame. I am not sure if glazing can be installed directly in a standard timber frame build.
Other important factors to consider are:
air-tightness (the normal passive certified window will have two or three seals mounted in the frame) .
There are a few tools that I found very useful as a self builder (which are free).
One such tool is Evernote. As self building involves plenty of research and the need to access information. This tool has proved invaluable for me to store information, share information, find information and make it accessible on a smart phone, any computer and automatically back up the information (nothing worse than loosing or not being able to find information). It also allows one to take pictures and have these stored in the same place.
All one needs to do is tag the information (a tag example could be the word insulation)-when you store the price/information you found on the internet about insulation it is stored with this tag and any other insulation data found over time. All pdf documents (these are usually research papers) can be stored also. There is an option to buy the premium version at €40 a year then the individual pdf content of the documents can be searched.
Another tool is Autodesk Design Review 2013. This tool allows you to open autocad files that your architect or engineer may have used for your build. It also allows you to edit these with your comments , take measurements of the drawing and draw simple shapes to highlight issues.
Another tool worth mentioning is Autodesk DWG Trueview. This is more similar to Autocad as it is mainly a viewer (allows one to open files).
THERM
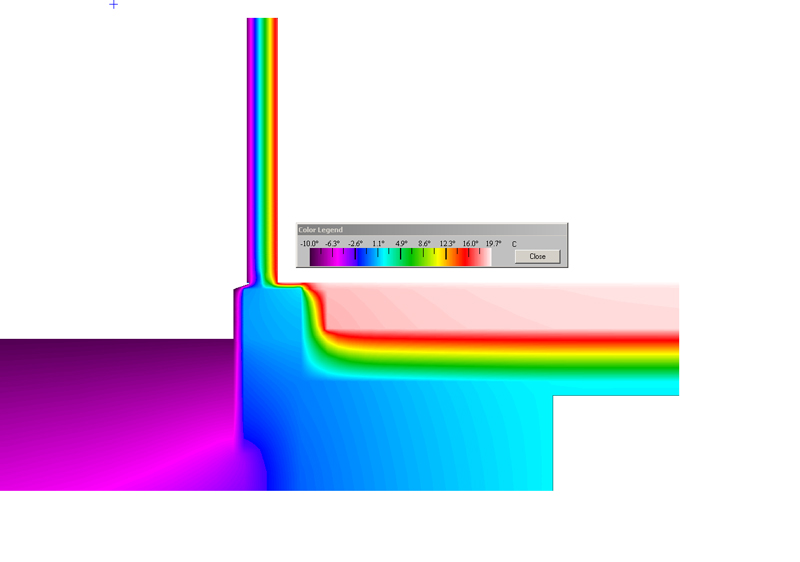
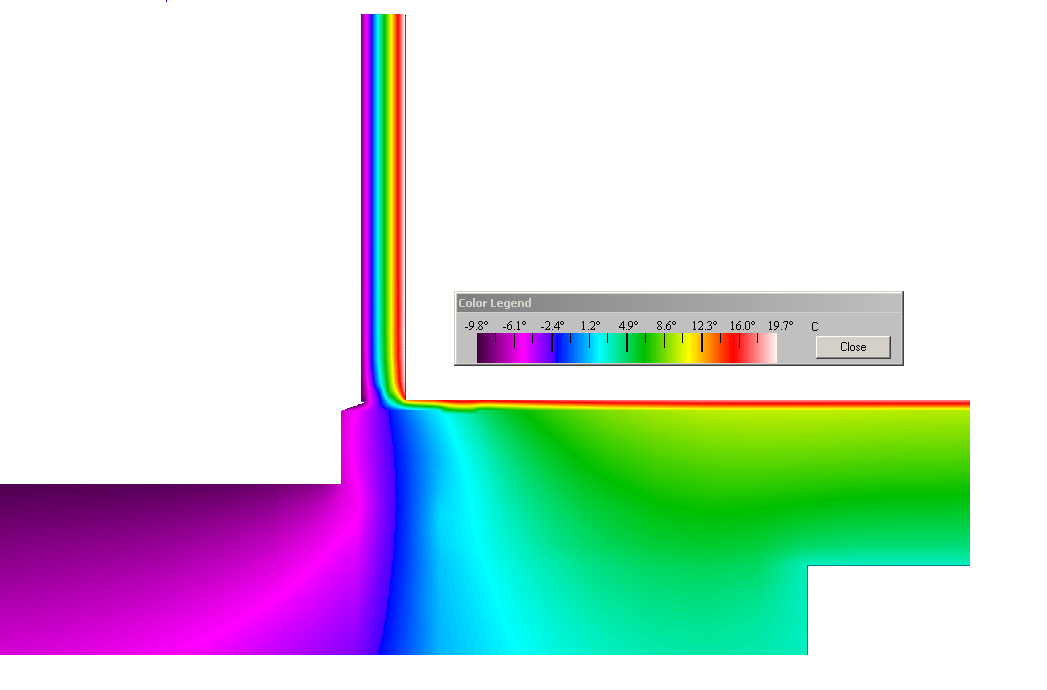
A tool that allows one to calculate the heat loss of thermal bridges is Therm. It was developed by Lawrence Berkeley National Laboratory (LBNL) and again it is free. This tool will show you how cold (and the heat loss) your floor/window reveal etc is going to be near outside walls and the actual performance value so that the real heat loss can be calculated. (One can easily get a feel of the importance of this detail and the energy lost if you see mold/condensation around windows/doors etc ). This software will show graphically how much heat is lost (once calculated) and the temperature/heat loss you can expect on details such as window frames, door thresholds, the steel ties in your block work, the steel beam sitting on your inner wall or foundation etc.
There are two parts to calculating the actual heat loss – the first is drawing the detail (fairly simple and involves time) and the other is the actual calculation (tricky I feel for a self builder). If one draws the detail this can save costs if a third party does the calculation for you).
Thermal image of temperature changes in a foundation with low heat loss. The right hand side is the internal floor. The blue, purple and green colours are low temperatures. The green colour is 5 degrees Celsius.The above foundation with no insulation. The inside floor has a high heat loss when the inside room temperature is 20 degrees Celsius. The small red line on the floor shows a wooden floor installed thus delaying the heat loss.
SketchUP
This tool allows one to model in 3D your house design and carry out a walk through to get a feeling of the internal or external design. It also is used by the passive house institute on their energy balancing software PHPP so it is a worthwhile tool to learn.
Hardware
Other than a smart phone which is a real help when one wants to send/receive files, images or emails and keep things moving on site a device called the Samsung Note 10.1 (2014 Edition) makes documenting ideas and drawings a great resource while on the move. It is only one of a few devices that has a real pen and sketch pad that allows one I feel to replace a piece of paper because one can rest your palm on the screen like a piece of paper and write or draw.
Sun and Climate
Sun Surveyor Lite predicts and visualizes Sun, Sunrise and Sunset positions and times with a 3D Compass on your smart phone. It is useful in identifying the site layout and potential shading issues from trees etc. One can simulate the sun at different times of the year. If one want to do the exercise on paper then this web may be of help- http://www.gaisma.com/en/

 To be continued………