November 3rd to December 3rd -2025-The total power consumption to heat the house excluding water heating was 184.11 KWh which equates to approximately 6 kwh per day to heat the house to the slightly higher temperature of 22 degrees in the main living area and the dining/kitchen room to 24 degrees 24 hours a day.
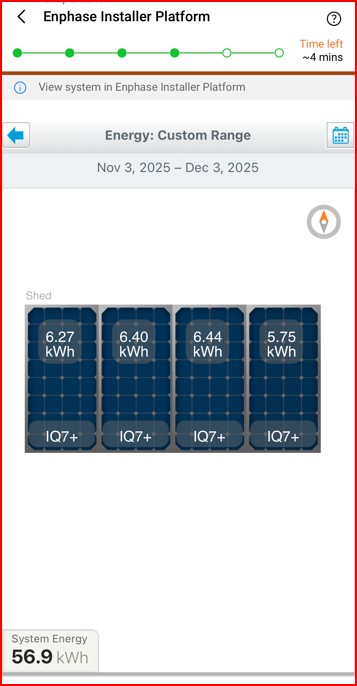
Solar PV generated November =60kwh from the 3kw pv system.
December 3rd to January 3rd -2026- The total power consumption to heat the house excluding water heating was 232 KWh which equates to approximately 7.73 kwh per day to heat the house to the slightly higher temperature of 22 degrees in the main living area and the dining/kitchen room to 23 degrees 24 hours a day. The total for the space heating season is 416kwh to date.
Solar PV generated December =32kwh from 3kw pv system.
January 3rd to February 3rd -2026- The total power consumption to heat the house excluding water heating was 286 KWh which equates to approximately 9.53 kwh per day to heat the house to the slightly higher temperature of 22 degrees in the main living area and the dining/kitchen room to 23 degrees 24 hours a day.
Solar PV -from January 3rd to February 3rd the 3kw system generated 45.4KWh which equates to about 17% of the energy for heating the house if all the solar was used for home heating .
Updated on the 5th March -2026
February 3rd to March 3rd-2026- The total power consumption to heat the house excluding water heating was 205 KWh which equates to approximately 6.8kwh per day to heat the house to the slightly higher temperature of 22 degrees in the main living area and the dining/kitchen room to 23 degrees 24 hours a day.
Solar PV -from February 3rd to March 3rd the 3kw system generated 87.5KWh which equates to about 40% of the energy to heat the house if all the solar was used for home heating . Half of the solar PV installation is pointed North at an angle of 12 degrees. The other half of the PV system is mounted flat (3 degress) , south and shaded .
Background– As previously discussed we had used two storage heaters to heat the house. The capital cost of this heating system wa €70. The passive house standard requires a heating load of approximately 1 Kwh for every 100m2 on the coldest day of the year. With the increase in energy prices and the slow pace of global warming the off peak electricity costs have risen from below 9 cents to its current price of 19 cents. We then made the decission to install an air to air heat pump as shown below that would reduce the real cost to approximately 1/3 rd of what we use to heat the house. The unit cost approximately €700 to buy and approximately €1000 to install.
In this blog I will discuss the learnings from the use of one air to air heat pump to heat a 200m2 house designed with the PHPP software to the passive house standard. The location to install the internal and external unit is very important. What is not covered in the passive house standard I feel is the dampness in Ireland that penetrates the human body to the bone. The operating design temperature of the passive house is generaly 21 degrees celcius. We found we needed 22 degrees for the living room and 18 degrees approximtely for bedrooms. The kitchen/dining room temperature will be explained below.
How to deal with the Irish Weather
Thawing Out in Ireland -AI generated
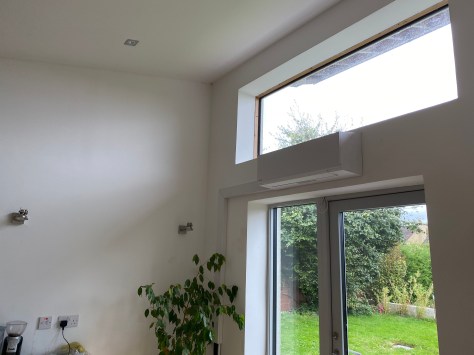
The other factor when one installs a central heating appliance whether it is a stove, an air to air heat pump or an electric fire in a passive house is I feel is to ensure more heat is available in one particular room to thaw out. This I feel is a good thing for the Irish climate because we found the constant temperature of 21 degrees one was slow to heat up when we came in from the cold. I feel one needs a stronger heat source to drive that initial dampness out of ones bones. We can all relate to standing in front of a fire to thaw oneself out, this can take the form of standing in front of a fire, a stove or an aditional heater. In our case we used the air to air heat pump by installing it in a selected room.
The location is important because the air to air heat pump does blow out warm air and this would be uncomfortable if it was installed in front of a seating area. Our selected location was the kitchen /dining room and aimed between two worktop islands in the kitchen that normally only has foot fall. In the dining room/kitchen I also installed two seperate air supply ducts (92mm each) with one extract duct. This also benefits in ditributing the heat throughout the house as more air is supplied into the kitchem/dining room rather than extracted. Most of the extract air ducts belonging to the Heat Recovery Ventilation (HRV) unit are also at the far end of corridors of each living space which means that air has to be drawn from the supply areas to the extract areas for ventilation.
The first room we go to if we encounter that outside cold damp Irish weather is the kitchen/dining room where the air to air heat pump is installed. The temperature in this room is around 24 degrees which is then dispersed to the rest of the house by the means outlined above. As it is a single storey house the heat does move around slowly with the help of the heat recovery unit. If it was a two storey dwelling with a better form factor then I would imagine the heat would rise to the bedroom areas easier if one wanted higher temperatures than what we use.
I also experimented with the extract and intake fan speed rates of the HRV as this affects the temperature of the house. If one increases the HRV ventilation rate higher than one needs for a healty air supply then more energy is used by the heat pump to keep the temperature at the levels required.
The other factor to take into account is that we found that if more doors are closed then the distribution of heat can be controlled in the house. For example when measuring the co2 rates at night in our bedrooms we found that we needed a higher air flow when more doors are closed around the house. What we found works is that if we reduce the HRV fan speed during the day (which reduces the heating load of the air to air heat pump) when people are using more of the house and increase the HRV at night because more doors are closed this works. So simply by closing and opening doors one can control the temperature of the house -for example if we leave the TV room door open during the day the heat enters that room. If one closes the door then the temperature drops to 1 to 2 degrees less than the rest of the house.
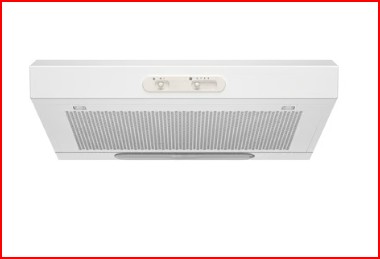
We also recently installed a simple electric hop extraction unit with a carbon filter that is not ducted to the outside to reduce cooking smells around the house because more air is supplied to the kitchen/dining room than extracted .
I think one also needs to have an extraction unit for air fryers as this is now more widley used than the hob to reduce the cooking smells being dispersed around the house. This will be a seperate project to be accommodated for when we install a new kitchen .
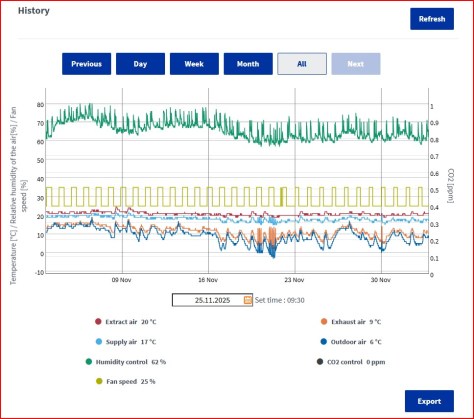
The performace for the Samsung 1.6 KW air to air heat pump over the month of November 2025 is as follows .
The electricity usage from the 3/11 to the 3/12 2025 was €1.60 a day when one takes into account the current night rate and day rate of 19 cents and 29 cents. The lowest outdoor temperature recorded was -1 degrees celcius . The total power consumption was 184.11 KWh which equates to approximately 6 kwh per day to heat the house to the slightly higher temperature of 22 degrees in the main living area and the dining/kitchen room to 24 degrees 24 hours a day . Below is the plot of the air temperature recorded by the Airflow Adroit DV145 HRV unit I installed . The bedroom temperatures were approximately 18 to 19 degrees celcius.
HRV Data November to December 2025
SOLAR PV electricity offset
I have installed 3kw of solar PV panels and plan to add another two panels in the comming weeks. Solar PV panels can now be purchased for approximately €60 each (450watt). As I use the enphase micro invertor system the installation is easy to expand as discussed in another blog. The only disadvantage in our house is orientation as most of the solar panels are pointing north at 12 degrees while in order to maximise the solar gain of winter sun one needs 60 degrees panel orientation in a south-east direction. Even so for the month of November above 56.9 KWh of electricity was generated. If I was to offset the electricity generated the cost of heating the house would drop to around €1.02 per day when using the day time electricity rate of 29 cents per kwh.
Group 1
CO2
I started recording the co2 readings this month in the hallway rather than in one particulat room. A new co2 unit has been ordered so that I can get seperate reading for different rooms. The co2 readings varied from 672ppm to 1000 ppm in the hallway as the house is open plan with no doors in the kitchen/dining , the living room or onto the hallway.
Air to Air heat pump
For all the above measurements I set the heat pump to 75% capacity and a fan rate of 2 (4 available to adjust the air flow speed) which equates to 50% . My undertanding is that if one can set the heat pumpl rating to a lower output capacity this extends the life of the heat pump. Currently the temperature setting on the heat pump is set to 23 degrees in the kitchen/dining room.
Air to water cylinder-The next plan is to install in the kithen/dining room a small air to water cylinder to reduce the cost of heating water. Some of these units have a seperate coil where one can connect solar hot water panels with drainback or vacuum tubes to get free water heating in the summer months. We currently heat the water on a night time electricity rate of 19 cents. While this electric element is a simple low cost method and easy to maintain with the lowest installation cost -the long term cost of electricity is only going up. The plan is to reduce this rate to a third of the price with a unit like that shown below.
PV Panel Options-Output wattage of pv panels are typically available in the range 270 Watt, 340 Watt, 375 Watt, 455 Watt. A manufacturer’s brand name will add to the price. Some brands names are LG, QCELL, LONGI, REC etc. A manufacturer warranty can be up to 25 years. A performance warranty of up to 25 years is available.
Example -A Qcell 340 W , 25 year manufacturer warranty and performance warranty can be purchased for €60 ex vat, a REC 365W for €165, a LG 440W for €261. Some manufacturers are now including a labour warranty of between 10 and 25 years.
Inverters Options-The standalone single inverter price varies from around €160 for a 1.5kw system and increases to approximately €1,300 for a 10kw inverter for the domestic market (single phase). The number of MPPT channels provided in the inverter changes the price-a single MPPT channel inverter will usually be cheaper than a dual MPPT channel inverter. MPPT methods also affect the price (a list of the mppt types available are listed here–for the techies.) As above the manufacturer brand name and the length of the manufacturers warranty also dictate the price you pay.
Hybrid Inverters (those that charge batteries) start at around €600 for a 3kw system and increase to €1600 for a 5kw system. The warranty varies from about 2 years to 25 years. When purchasing an inverter one must ensure that it has a certificate of compliance to match the national grid profile (a grid profile determines when the inverter should switch off and on if there was a power failure) . So purchasing a cheaper inverter online might not be compatible with the national standards required in each country. This grid profile is usually programmed/selected when installing the inverter.
Another option when purchasing a central inverter is to install optimizers . These provide as a means to improve the solar output if shading exists when using a central inverter. These cost around €50 each.
Microinverters prices start at around €100 for a 350 watt pv panel and increase to approximately €160. Warranty’s vary from 10 years to 25 years. Some brand names that exist are Enphase, TSUN , BPE. They require a single management control unit that controls, configures and allows one to monitor the performance remotely on a desktop or mobile phone App. The brand name also carries a cost. The microinverter is able to monitor the performance of each individual solar panel and inform you about an individual failure or issues. They also offer one of the best ways to manage shading from trees, chimneys, etc., or different orientations as stated earlier. This single control unit costs approximately €140 to €280 depending on the functions you require. These unit types generally have an AC charging function similar to the Tesla battery systems.
When the sun is close to the horizon Solar PV Panels generate less energy than when the sun is directly over the Solar Panel.
The reason for this is that the sun’s rays pass through more of the atmosphere thus reducing the sun’s energy (photon energy) on the PV panel. If it is an overcast day they will produce less energy. To translate this into numbers- in the winter when the sun is low in the sky (say 14 degrees from the horizon ) the total irradiance from the sun measures around 780 W/m2 (watts per meter square) with a clear sky. In the summer one would expect to see 1100 W/m2 (55 degrees from the horizon). The bottom line is that if one can point the solar panels perpendicular to the sun one will get a higher electrical output power.
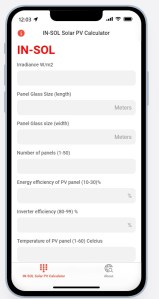
In order for consumers to purchase and compare solar PV panels manufacturers have agreed a way to compare the output power of Solar PV panels and this test is referred to as Standard Test Conditions (STC) . The test is done at an irradiance of 1000w/m2, at a air mass of 1.5 (approximately 42 degrees from the horizon) and at a temperature of 25 degrees. The value w/m2 is how solar irradiance is measured while the PV panel output power is measured in watts. The following calculator will help you understand how the output power of your PV System (in watts) is affected by solar irradiance and other factors. Check your Solar PV Output Power in watts.
Solar PV Calculator
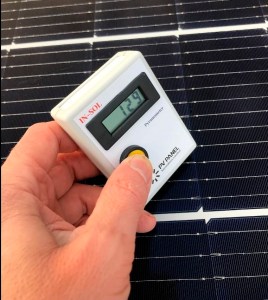
Most roofs have a pitch of around 35 degrees. The best direction to point the solar panels is usually south but with some solar PV installations, it is possible to have some pointing South and others pointing West in order to collect as much energy as possible during the summer. Meters used to measure solar irradiance are called pyranometers, Solar irradiance meters, or solar radiation meters. An example of how these meters are used to locate, measure, and check if your Solar PV system is working efficiently is shown below. The calculator above can be used with these meters. An affordable pyranometer can be seen here https://pvpanelinnovations.com/
PV Panel Shading
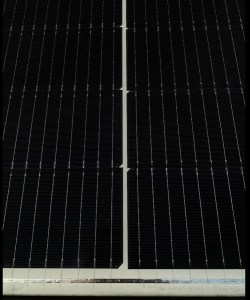
A factor that has a significant impact on the output power of a PV System is shading on an individual Solar PV panel. This can take the form of chimneys, trees or other houses. The reason for this is that if one examines each solar panel one will see that it is made up of individual cells wired together in series to make up a full solar panel (see below). If one or more cells are shaded when installing a traditional solar PV system (One inverter) the output power is reduced for the whole system. There are other solar PV systems that use microinverter’s or DC optimizers that will not be seriously impacted by shading thus the consumer will generate more electricity.
Solar PV
Another factor that significantly reduces the solar panel output power generated is the panel temperature. We are lucky in Ireland to have a mild climate with day temperatures not usually going above 20 degrees (on a good day). What this means from a practical perspective is that a solar panel in Ireland will generate more power than a solar panel in Spain on a cloudless day.
Solar PV Components.
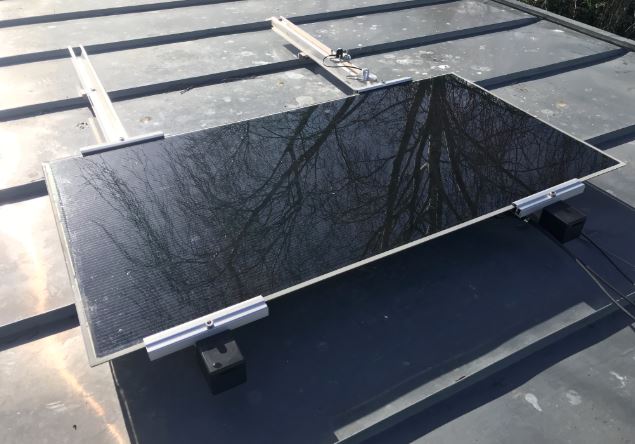
The components that typically make up a solar PV system are PV rails which support the PV panel , roof brackets/hooks that connect the rail to the standard tile or slate roof and clamps that connect directly to a specified roof types such as zinc or steel roofs. There are separate pv panel mounting systems for flat roofs or ground mounting. If one wants to explore PV mounting system suppliers -use a google search for “roof mounting systems for solar panels“. As I used a zinc roof one must ensure expansion joints are installed in the pv rail every 3 meters.
PV Panel Types
There are three types of PV panel cells -monocrystalline (these aesthetically have an even black finish –shown above), Polycrystalline which have an uneven shade of blue crystal cells and CIS types. Monocrystalline are more common and are slightly more expensive than polycrystalline and CIS are now more difficult to purchase (shown in part 1 of the blog). The options available when selecting PV panels other than the type above are length of equipment warranty and length of manufactures performance warranty. The majority of PV panels generate DC (direct current). All PV panels must be angled at least 3 degrees from the horizontal. PV panels produce DC power and to give you an idea of what 4 panels can produce and the energy they can generate for a load, loose connections or cable damage please see this video .
Inverter Options
Inverters are principally available in 3 types -one central inverter for a full PV installation without battery charging, a central inverter that has inbuilt battery charging facility and micro inverters for individual panels or a pair of PV panels.
Central inverters. The important factor here is the warranty length and how many MPPT (maximum power point tracking) channels does the inverter have. If one was installing 8 panels in two rows (strings), two separate MPPT channels would mean that the two rows of 4 panels would have their own ability to generate power independently of the other row (string) so for example if one row of pv panels got dirtier/shaded or a fault occurred on one panel the other row would keep generating at full power. As all PV panels are not exactly the same the separate MPPT channels allow for a higher output yield . When selecting an inverter one must match the PV Panels to a particular Inverter. Once this is done adding more panels can become restrictive and may mean that one needs to change the inverter again. If the inverter fails the whole system fails. If one needs to change a PV panel in the future the central inverter may also need to be changed.
Inverter Options for SOLAR PV
Micro Inverters-simplify the installation of a PV system and permit simple expansion. It is really close to plug and play . Because they are paired with a PV panel they manage shading better than a central inverter. The voltage generated is also different to the central inverter in that it produces low voltage AC -the same voltage as all domestic appliances like fridges, washing machines etc. There is also less of a chance of fires because of loose connections/damaged cables. They offer full management of your PV system with apps and individual panel performance monitoring. Pv panels must also be matched with the individual inverter using the PV panel data sheet. This is one such calculator.
Enphase Calculator
Batteries
As stated before I personally am not in favour of using batteries for PV panel installations. The reason is that batteries are expensive, they are another failure point and I feel they are needed for vehicles more than PV installations. For example, a 300 litre water tank can store 20kw of energy at 60 degrees (a stainless steel water tank would cost around €1000-while a similar battery could cost €10,000 to €15,000 and still would need to be replaced after approximately 6000 cycles). All homes need hot water thus sending any excess electricity from the PV panels could be fed to a hot water tank. So instead of adding batteries why not consider changing the hot water tank and place elements at the bottom of the tank and the middle of the tank.
Another good idea is to switch to night time electricity which currently is half the price of the day unit to supplement the lack of PV power during the winter to heat the water tank.
My preference is to install a side arm heat exchangerto the water tank so that I can achieve better hot water stratification. Stratification is the creation of layers of hot water free from movement/mixing when one heats water. What happens for example is when cold water enters the tank at the bottom it can mix the stratified layers of hot water thus reducing the water temperature. It is difficult in Ireland to purchase water storage tanks that have simple devices fitted that maximise stratification with devices such as an inlet baffle on the cold water inlet .
To complement the above use of a water tank one can add a single shower pump and feed all showers from the tank.
Typical Shower Pump around €157
The above will reduce the use of electric showers which are the highest electrical energy consumption devices in a home. From personal experience, I can say that 150 litres of hot water (half a 300 litre tank) can provide 6 showers a day. Currently, I use off-peak electricity to heat half the tank.
If you are a new build one can plan to install the shower pump outside the house in an insulated chamber below ground level near the tank. This is what I have done to reduce the noise as we have a single-story home.
As energy prices increase and the switch from fossil fuels takes place one is left with few options to offset rising electricity costs. In this blog I am going to go through the choices that are available when using Solar PV. Solar PV systems typically generate DC (direct current) power and this is then converted to AC (alternating current) power for use around the home. These systems also synchronise with your own electricity supply grid so that you can use it. The standard system one purchases will automatically disconnect from the national grid if there is a power failure thus ensuring that you do not send power into the national grid. The abbreviation PV stands for Photovoltaics (when light is used to generate electricity from a semiconductor material).
Solar PV Panel
A common-sense starting point before considering Solar PV is to try and reduce your existing electric energy use. This might be as simple as changing old fridges, washing machines, dryers, or pumps. If one uses electricity to heat one’s house then insulating the house and upgrading the hot water tank is also a good starting point. For example, one 300 litre water tank will store 20kw of energy at 60 degrees Celcius (see the previous blog on the water tank). Typical battery systems can not economically or environmentally compete with water as an energy storage system. All homes need hot water and you will not find a safer, more economical, and environmental approach for storing excess energy from Solar PV. One can also opt for reduced price electricity at night (approximately half the price of daytime electricity) which helps the national grid balance its load.
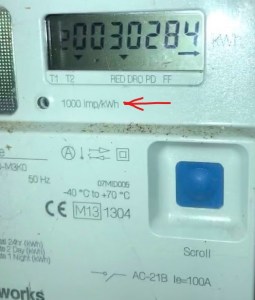
A simple starting point is to visit your home supply meter and work out how much electricity you use per minute on a typical day. This is the load one uses without using main appliances such as kettles, cookers, water heaters, etc. It typically would include fridges, ovens timers, clocks, computers plugged in, modems, etc.
To do this one only needs to look at your meter and it will display a number that tells you how many revolutions or pulses it uses to record one Kw/h (kilowatt per hour) of electricity. One is billed by your electricity supplier for each kw/h you use. Above and below are examples of where you can find the numbers. In the example above the digital meter has 1000 Impules per kw/h and the old type shown below has revolutions -in this case, it is 250 revolutions per kw/h.
To calculate your typical energy use without using main electrical appliances follow this example. Set your phone/ watch to the stopwatch setting. When you see the first pulse start your timer and visually count the impulses in that minute. If you get 10 impulses in 1 minute then multiply 10×60 minutes=600 impulses in an hour. So we know that we now use 600 watts of power in one hour without using main appliances.
In the old type meter, you will notice that there is a red/black mark on the wheel when it revolves in one revolution. In the meter above we can see that it does 250 revolutions in one hour to record 1kw/h use of electricity. So if it does 125 revolutions it is 500 watts of power in one hour or 0.5kw/h. One can use the same principle above and use a two-minute count to increase the accuracy of your calculation. InPart 2 I will look at what PV systems are available to purchase and the parts that make up a good Solar PV system.
The plan is to have all the outdoor lighting (Using LED -Light Emitting Diodes) operate from a 12 volt recycled car battery and recharged by a solar PV panel. The lights will be controlled by the in-built timer in the MPPT charger. This will keep the cable cost to a minimum (small cable size) and keep the voltage low enough to be safe in a garden environment (when digging and planting).
Parts Required
Below is the CIS thin-film solar PV Panel (copper indium gallium selenide ) I mounted on the shed roof.
Solar Battery Charger
I selected a 60 watt solar PV panel that was manufactured using CIS . This type of panel has a higher output voltage of 52 volts which work better with the charger I selected rather than the typical mono or poly crystalline cells of 30 volts . One needs to select a charger to suit the PV one buys. The panel was mounted on a 3 degree pitch facing south (see above) . During tests I found that this type of cell is more forgiving for shading and dirt (bird droppings mainly)-it maintains a consistent output power . For example when I partially shaded it with my hand it still outputs almost the same power. If one partially shades a monocrystiline /polycrystaline cell it will cause it to stop working as all the cells in the unit are wired in series.
Measuring the efficiency of the installation.
In order to check the efficiency I mounted a pyranometer at the same angle (top left of image) so that I could ensure that connections and charger were working correctly. One needs to know the input power in order to check the charger efficiency and that the system is working correctly.
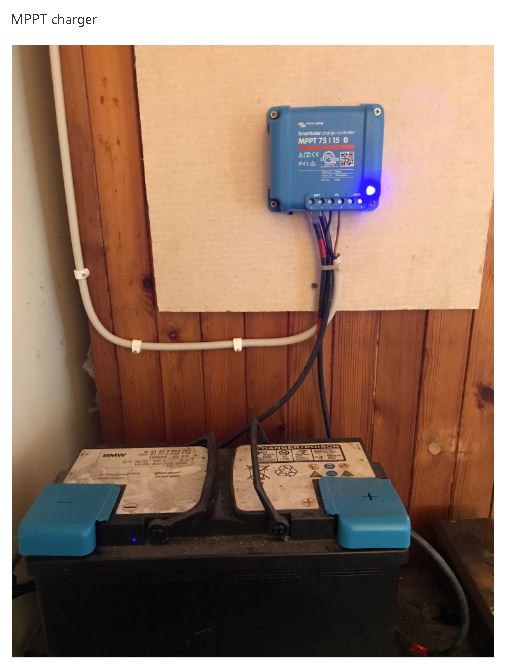
The MPPT Battery Charger
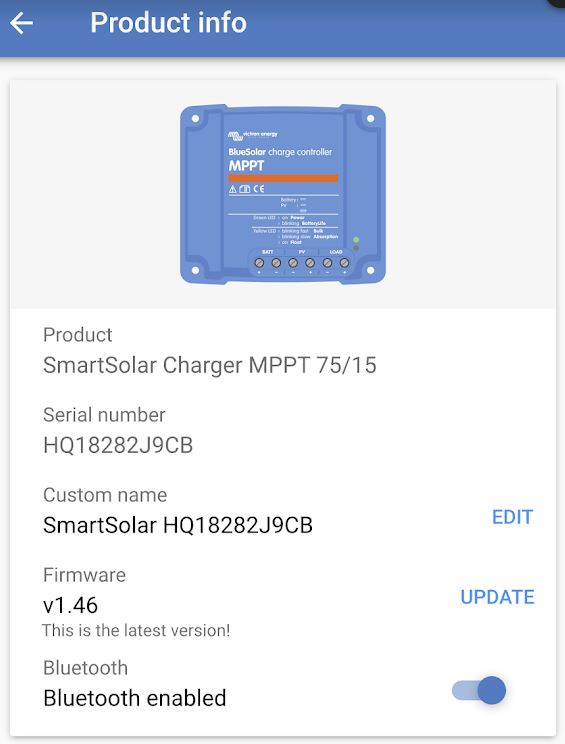
After reviewing products available I opted for the Victron SmartSolarCharger MPPT 75/15. This can charge a 12v or 24v battery system. When selecting a unit one needs an inbuilt MPPT which stands for Maximum Power Point Tracker. In Ireland and the UK this is important because of our natural cloudy weather which causes the solar panels to vary their output as the irradiance changes . What happens is that the solar panel’s internal resistance changes when the irradiance changes (sun shining on panel) -so the job of the MPPT charger is to change its load resistance as the solar panel’s internal resistance changes. When the load resistance matches the solar panel resistance then the maximum energy can be transferred to the load. If a charger did not have the MPPT then the efficiency of the complete system would be compromised. While there are different methods (algorithms) used to build MPPT units some are more efficient than others. Some of the different MPPT design options available are called perturb and observe , Incremental Conductance , short circuit current method etc., The idea of all these MPPT systems is to get the maximum power from the solar panel -some MPPT are low cost and others are more efficient in cloudy weather.
There are a number of advantages of the unit compared to others that I researched . It has charging algorithms for different battery types such as deep cycle and lithium ion. It has a bluetooth connection so that one can programme and monitor the output without other devices /connections being required. Another advantage is that it has a lighting timer that can automatically switch lights on and off at night or at dawn.
Some of the advertised benefits of the Victron MPPT unit are:
The Setup .
The setup is as follows . I plan to move the battery out of the shed as it is not best practise to have any battery system in a shed/garage/house because of the fire risk. The charger is mounted on a fire resistant material (Magnesium Board)
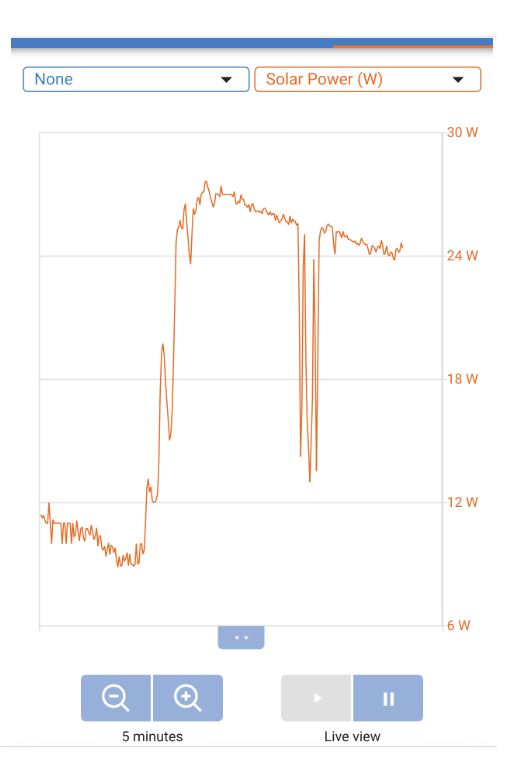
In order to access the data collected one logs on using the Bluetooth connection on your phone/tablet and the data is available. Below are different samples of the data available . The first indicates the solar power collected and the load usage. If the battery is fully charged it will take little or no power. If there is a load during the sunshine hours then the battery and solar panel will supply it.
Below is a chart showing how the MPPT charger adjusts its output/load to follow the changes in the irradiance levels (power from the sun) per second .
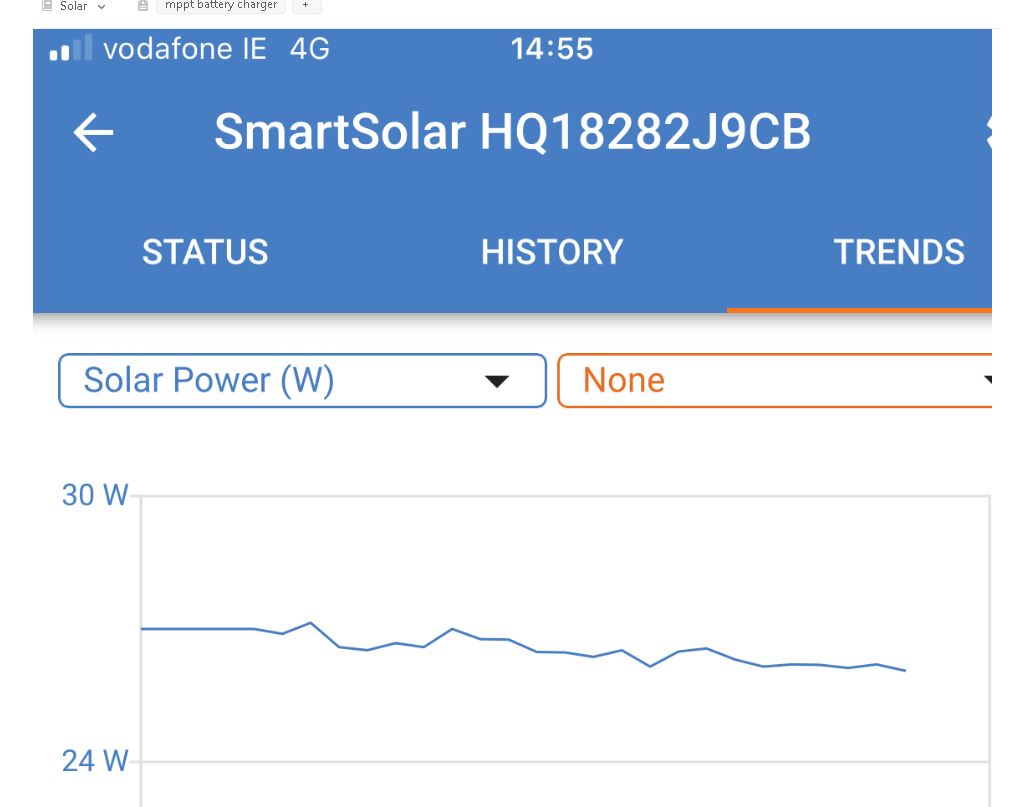
As I am able to measure the input power using a pyranometer I built I was able to see that the system was working efficiently. The data below is the output power from the charge controller when the input power from the sun was 471 watts/m2. The CIS panel provides 60 watts output when the irradiance is 1000 watts/m2 at STD (Standard Test Conditions) . This would mean that if the input power was 500 watts/m2 then the output would be 30 watts/m2. The data from the charge controller indicates an output power of approximately 27 w/m2 for the 471 watt/m2 input power.
Output power when Solar Irradiance input power is 471W/m2.
I really like the possibility of converting light to electricity. In the spirit of innovation I will simplify the PV system and reduce the cost by returning to using DC power directly from the PV panels. As I have no intention of transmitting power around the countryside this is another reason for staying with DC.
The passive house standard I feel helps in this approach by reducing the energy required in a house to a very low level which creates the synergy to make this leap for me to design a DC power heating system for our house.
Solar Background Information
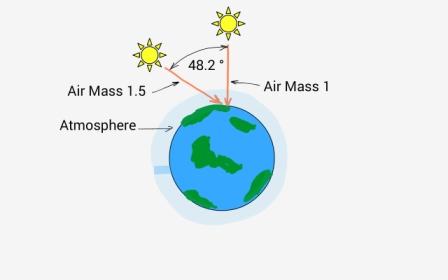
The energy from the sun varies throughout the year due to cloud and the amount of air mass (AM) it has to pass through to reach the earth. When the angle of the sun is low in the sky the solar energy has to pass through more air which means less solar energy is available to convert light into electricity (example winter months).
Air Mass
When a PV manufacturer quotes the output power of their PV panel the international standard is to quote the output power at an air mass of 1.5 . An air mass of 0 is know as outer space where no air exists (AM0) . This is where the maximum energy can be captured if one lived in space. An air mass of 1 is when the sun is at its highest point in the sky (AM1) when on earth. The AM value of 1.5 is around 48 degrees off the highest point on earth.
Measuring the Solar Energy (W/m2)
In the winter months from tests I have carried out with my pyranometer ( a device that measures the solar energy-see below) the solar power I am recording with a data logger was between 0 and 400 watts per m2 (It can be higher on sunny days). In the spring/summer months the power can reach 1000 watts per m2 and more.
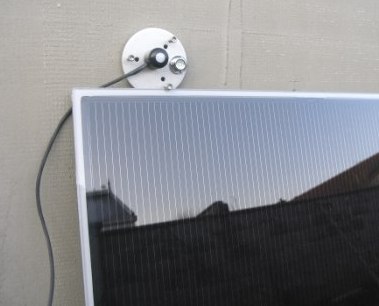
Pyranometer for measuring Solar Energy (Sensor top left of image and Solar Panel under test beneath it)
Harvesting Solar energy in the winter months for me is the priority which will entail the correct location and angle of the solar PV panel for the winter sun. The strategy is to try capture as much of the winter sun as possible by balancing the solar gain of the glass in the south windows of the house (part of the passive house performance phpp calculations) and supplement this with the DC (Direct Current) electricity from solar PV panels to provide space and primary heating etc. It is very noticeable at this stage of the build the real benefit of gathering energy from the winter sun through the glass. (See previous blog on performance data 23/05/2015).
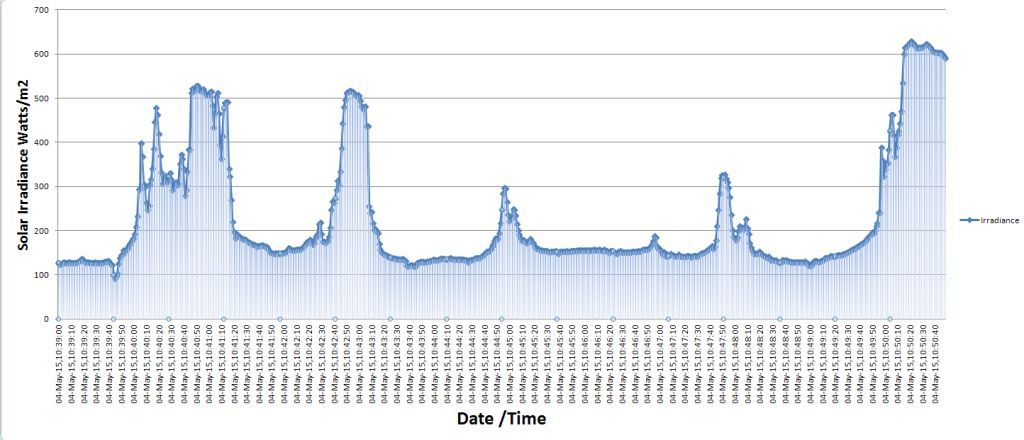
In order to give an idea of the solar energy available I recorded the irradiance when the sun was behind a dark cloud (see image below). This equates to around 200 watts per m2 solar energy. When the sun came out from behind the cloud it reached over 1000 watts per m2 in the month of April.
Sun behind dark grey cloud is approximately 200 W/m2 of solar energy (above image). Most inverters start to loose their effeciencys at this point.
Sun behind dark grey cloud is approximately 112 W/m2 of solar energy on the typical overcast day. Most inverters would stop working at this level.
Below is an example of the changes that take place on a sunny/cloudy day in May
Solar Irradiance Level examples over a 10 minute period.
In the above chart one can see an example of how difficult it is for an inverter to keep working efficiently (they work efficiently from approximately 200 w/m2). The bottom line on the left is 100 watts/m2, The top line is 700 watts/m2 (click on the image to see more detail) . In the winter time values from around 50w/m2 to 200w/m2 are the lower limits and the upper limits are around 600w/m2.
Self Build Homework (Develop a DC powered Solar Harvesting Unit)
For the above I do need to find a way of maximizing the output power of the PV panels as the iradiance varies. For this I need to develop a simple black box (a small amount of simple components) that will match the solar energy created by the PV panels and maximise the output over the winter months. I am close to having a working prototype to see this in action (all tests look good so far ).
The equipment to be purchased for the above will be 4 solar panels and the mounting brackets. 4 solar panels will provide around 1 KW of power (max). This will cost around €1000. More groups of these will be added in the future. (If any one has 4 spare panels to loan so that I can test the control unit I am building – please let me know.)
In essence I plan to create what I call a DC Solar Harvesting Unit (DCSHU) that will have specific electric power functions around the house.