How I installed the SOLAR PV system on a zinc roof.
One of the most challenging areas when installing PV on a Zinc roof is the preparation and minimising long term damage to the roof. There are a number of challenges on a standing seam roof.
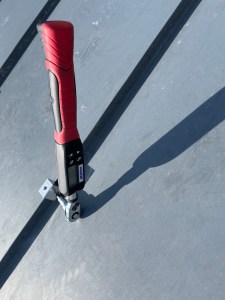
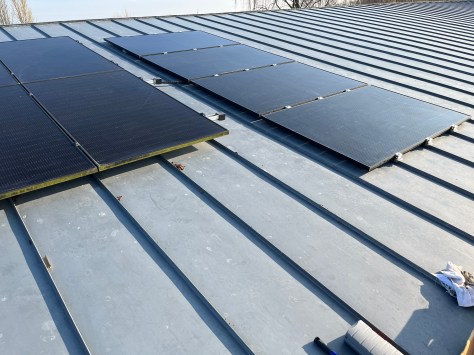
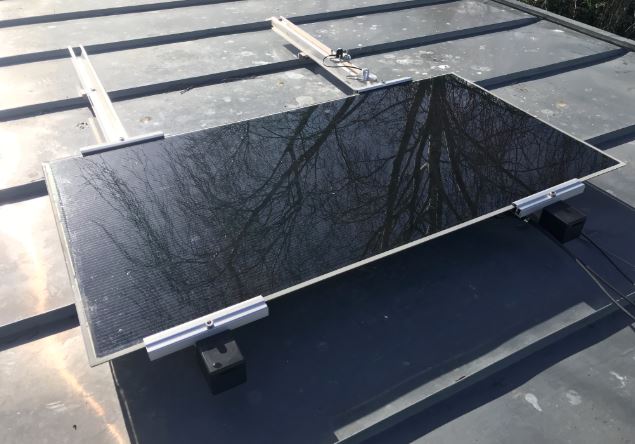
Zinc roof clamps that are designed for the exact type of standing seam on the zinc roof or rail system , Shown above is the S5 single screw mount for 0.7 mm zinc.
Cable routes that do not puncture the zinc.
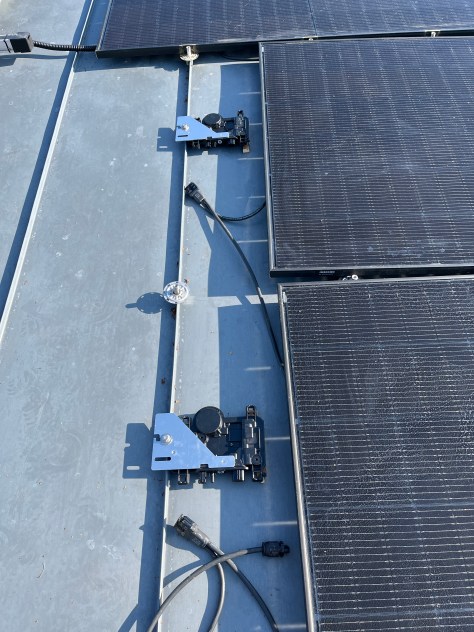
The advantages of the S-5-S system is that the panels sit on the zinc seam and allows one to have a very low profile.
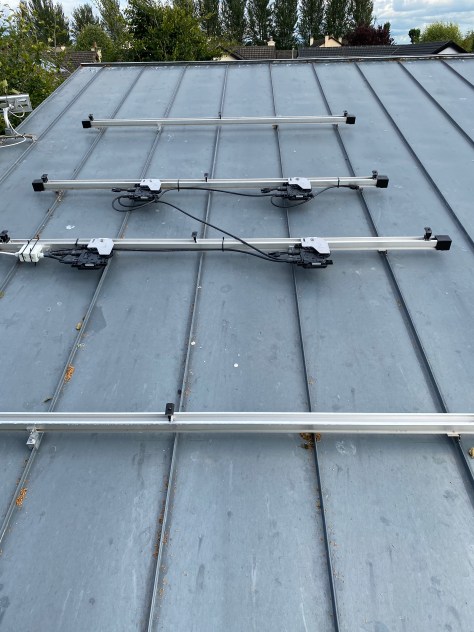
Above and Below is an example on the mounting of the S-5 sytem with two new panels using Enphase IQ8 microinvertors.
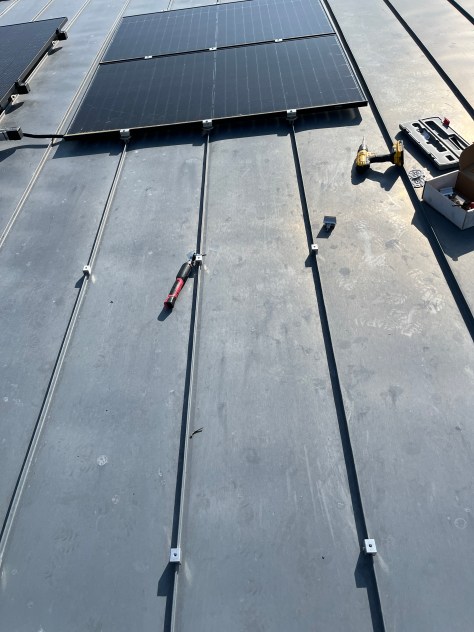
Rail Mounted System below
If one uses PV rails they need expansion joints perpendicular to the standing seam and the rail supporting the solar panels must not be longer than approximately 3 meters. This is to ensure that the zinc roof as it expands does not continously bend the seam over time and cause a crack on the seam.
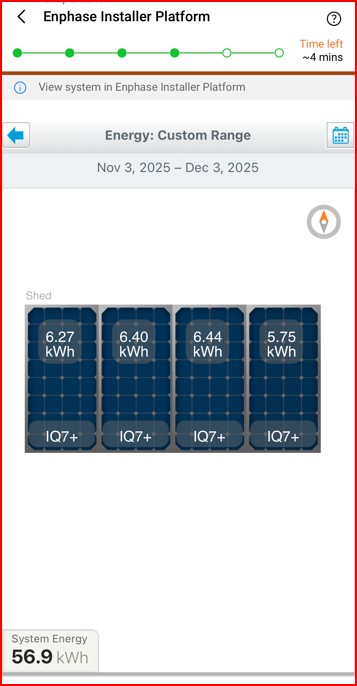
November 3rd to December 3rd -2025-The total power consumption to heat the house excluding water heating was 184.11 KWh which equates to approximately 6 kwh per day to heat the house to the slightly higher temperature of 22 degrees in the main living area and the dining/kitchen room to 24 degrees 24 hours a day.
Solar PV generated November =60kwh from the 3kw pv system.
December 3rd to January 3rd -2026- The total power consumption to heat the house excluding water heating was 232 KWh which equates to approximately 7.73 kwh per day to heat the house to the slightly higher temperature of 22 degrees in the main living area and the dining/kitchen room to 23 degrees 24 hours a day. The total for the space heating season is 416kwh to date.
Solar PV generated December =32kwh from 3kw pv system.
January 3rd to February 3rd -2026- The total power consumption to heat the house excluding water heating was 286 KWh which equates to approximately 9.53 kwh per day to heat the house to the slightly higher temperature of 22 degrees in the main living area and the dining/kitchen room to 23 degrees 24 hours a day.
Solar PV -from January 3rd to February 3rd the 3kw system generated 45.4KWh which equates to about 17% of the energy for heating the house if all the solar was used for home heating .
Updated on the 5th March -2026
February 3rd to March 3rd-2026- The total power consumption to heat the house excluding water heating was 205 KWh which equates to approximately 6.8kwh per day to heat the house to the slightly higher temperature of 22 degrees in the main living area and the dining/kitchen room to 23 degrees 24 hours a day.
Solar PV -from February 3rd to March 3rd the 3kw system generated 87.5KWh which equates to about 40% of the energy to heat the house if all the solar was used for home heating . Half of the solar PV installation is pointed North at an angle of 12 degrees. The other half of the PV system is mounted flat (3 degress) , south and shaded .
Background– As previously discussed we had used two storage heaters to heat the house. The capital cost of this heating system wa €70. The passive house standard requires a heating load of approximately 1 Kwh for every 100m2 on the coldest day of the year. With the increase in energy prices and the slow pace of global warming the off peak electricity costs have risen from below 9 cents to its current price of 19 cents. We then made the decission to install an air to air heat pump as shown below that would reduce the real cost to approximately 1/3 rd of what we use to heat the house. The unit cost approximately €700 to buy and approximately €1000 to install.
In this blog I will discuss the learnings from the use of one air to air heat pump to heat a 200m2 house designed with the PHPP software to the passive house standard. The location to install the internal and external unit is very important. What is not covered in the passive house standard I feel is the dampness in Ireland that penetrates the human body to the bone. The operating design temperature of the passive house is generaly 21 degrees celcius. We found we needed 22 degrees for the living room and 18 degrees approximtely for bedrooms. The kitchen/dining room temperature will be explained below.
How to deal with the Irish Weather
Thawing Out in Ireland -AI generated
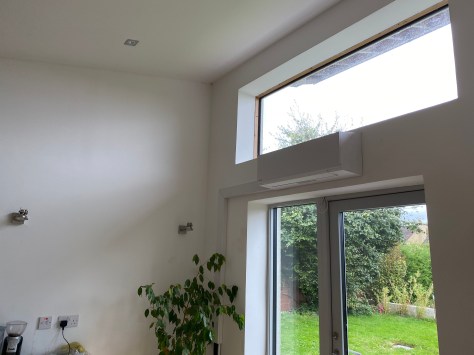
The other factor when one installs a central heating appliance whether it is a stove, an air to air heat pump or an electric fire in a passive house is I feel is to ensure more heat is available in one particular room to thaw out. This I feel is a good thing for the Irish climate because we found the constant temperature of 21 degrees one was slow to heat up when we came in from the cold. I feel one needs a stronger heat source to drive that initial dampness out of ones bones. We can all relate to standing in front of a fire to thaw oneself out, this can take the form of standing in front of a fire, a stove or an aditional heater. In our case we used the air to air heat pump by installing it in a selected room.
The location is important because the air to air heat pump does blow out warm air and this would be uncomfortable if it was installed in front of a seating area. Our selected location was the kitchen /dining room and aimed between two worktop islands in the kitchen that normally only has foot fall. In the dining room/kitchen I also installed two seperate air supply ducts (92mm each) with one extract duct. This also benefits in ditributing the heat throughout the house as more air is supplied into the kitchem/dining room rather than extracted. Most of the extract air ducts belonging to the Heat Recovery Ventilation (HRV) unit are also at the far end of corridors of each living space which means that air has to be drawn from the supply areas to the extract areas for ventilation.
The first room we go to if we encounter that outside cold damp Irish weather is the kitchen/dining room where the air to air heat pump is installed. The temperature in this room is around 24 degrees which is then dispersed to the rest of the house by the means outlined above. As it is a single storey house the heat does move around slowly with the help of the heat recovery unit. If it was a two storey dwelling with a better form factor then I would imagine the heat would rise to the bedroom areas easier if one wanted higher temperatures than what we use.
I also experimented with the extract and intake fan speed rates of the HRV as this affects the temperature of the house. If one increases the HRV ventilation rate higher than one needs for a healty air supply then more energy is used by the heat pump to keep the temperature at the levels required.
The other factor to take into account is that we found that if more doors are closed then the distribution of heat can be controlled in the house. For example when measuring the co2 rates at night in our bedrooms we found that we needed a higher air flow when more doors are closed around the house. What we found works is that if we reduce the HRV fan speed during the day (which reduces the heating load of the air to air heat pump) when people are using more of the house and increase the HRV at night because more doors are closed this works. So simply by closing and opening doors one can control the temperature of the house -for example if we leave the TV room door open during the day the heat enters that room. If one closes the door then the temperature drops to 1 to 2 degrees less than the rest of the house.
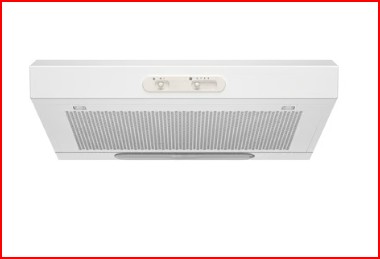
We also recently installed a simple electric hop extraction unit with a carbon filter that is not ducted to the outside to reduce cooking smells around the house because more air is supplied to the kitchen/dining room than extracted .
I think one also needs to have an extraction unit for air fryers as this is now more widley used than the hob to reduce the cooking smells being dispersed around the house. This will be a seperate project to be accommodated for when we install a new kitchen .
The performace for the Samsung 1.6 KW air to air heat pump over the month of November 2025 is as follows .
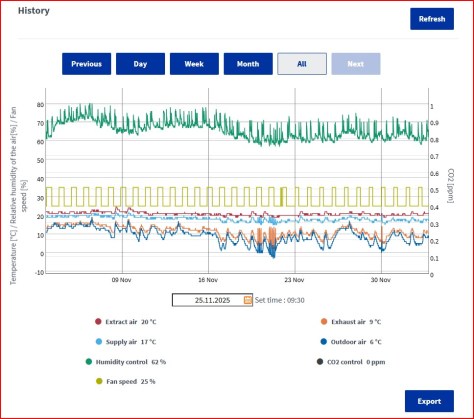
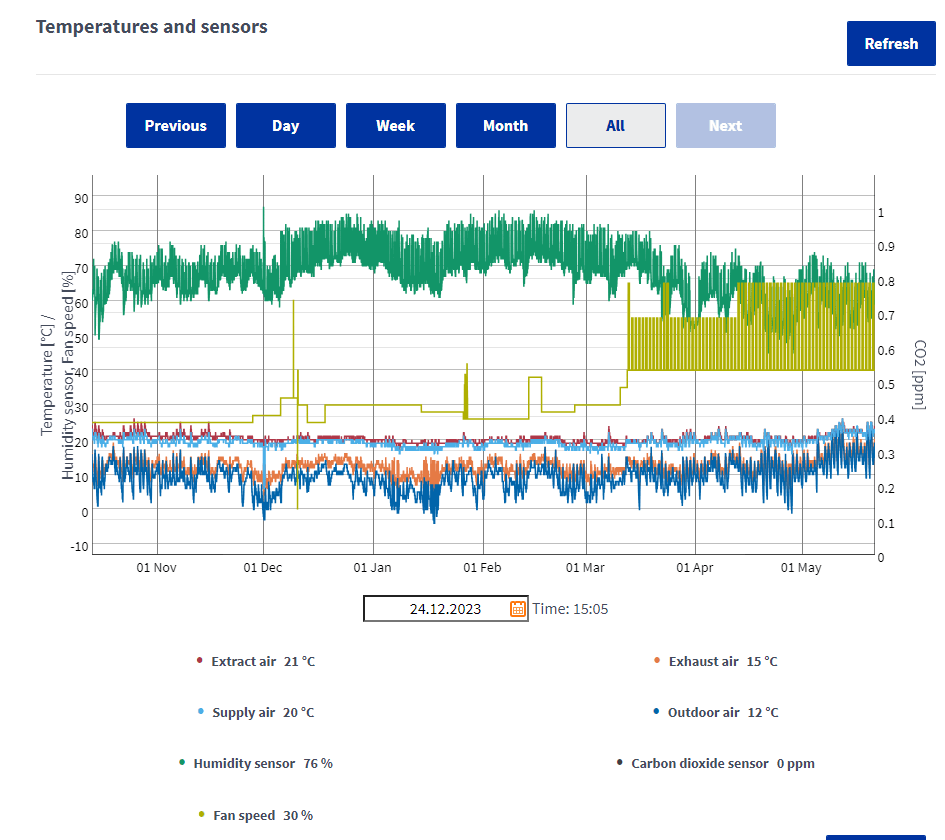
The electricity usage from the 3/11 to the 3/12 2025 was €1.60 a day when one takes into account the current night rate and day rate of 19 cents and 29 cents. The lowest outdoor temperature recorded was -1 degrees celcius . The total power consumption was 184.11 KWh which equates to approximately 6 kwh per day to heat the house to the slightly higher temperature of 22 degrees in the main living area and the dining/kitchen room to 24 degrees 24 hours a day . Below is the plot of the air temperature recorded by the Airflow Adroit DV145 HRV unit I installed . The bedroom temperatures were approximately 18 to 19 degrees celcius.
HRV Data November to December 2025
SOLAR PV electricity offset
I have installed 3kw of solar PV panels and plan to add another two panels in the comming weeks. Solar PV panels can now be purchased for approximately €60 each (450watt). As I use the enphase micro invertor system the installation is easy to expand as discussed in another blog. The only disadvantage in our house is orientation as most of the solar panels are pointing north at 12 degrees while in order to maximise the solar gain of winter sun one needs 60 degrees panel orientation in a south-east direction. Even so for the month of November above 56.9 KWh of electricity was generated. If I was to offset the electricity generated the cost of heating the house would drop to around €1.02 per day when using the day time electricity rate of 29 cents per kwh.
Group 1
CO2
I started recording the co2 readings this month in the hallway rather than in one particulat room. A new co2 unit has been ordered so that I can get seperate reading for different rooms. The co2 readings varied from 672ppm to 1000 ppm in the hallway as the house is open plan with no doors in the kitchen/dining , the living room or onto the hallway.
Air to Air heat pump
For all the above measurements I set the heat pump to 75% capacity and a fan rate of 2 (4 available to adjust the air flow speed) which equates to 50% . My undertanding is that if one can set the heat pumpl rating to a lower output capacity this extends the life of the heat pump. Currently the temperature setting on the heat pump is set to 23 degrees in the kitchen/dining room.
Air to water cylinder-The next plan is to install in the kithen/dining room a small air to water cylinder to reduce the cost of heating water. Some of these units have a seperate coil where one can connect solar hot water panels with drainback or vacuum tubes to get free water heating in the summer months. We currently heat the water on a night time electricity rate of 19 cents. While this electric element is a simple low cost method and easy to maintain with the lowest installation cost -the long term cost of electricity is only going up. The plan is to reduce this rate to a third of the price with a unit like that shown below.
Other advantages of an Air to Air heat pump compared to air to water heat pumps is the ability to supply heating when it is required and quickly switch off the unit if there is solar gain in the winter (the sun has been known to shine in Ireland in the winter months). The air to water heat pump will have a slower response time through the concrete floor.
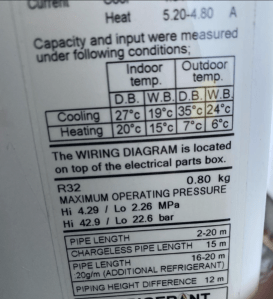
Installation-The installation of the internal and external unit needs careful design/planning. Both need to be considered at the same time. The factors to consider for the external (Inverter) unit is a location that is not subjected to high winds (higher winds will mean lower temperatures during the heating season and reduced efficiency), mounting the external unit at least 100mm (I used 300mm) from the rear wall (restricting air increases the energy usage). There should be no air flow restrictions in front of the unit either. Mount the unit on a secure and flat surface (the external inverter requires a flat surface so that compressors are balanced to reduce vibration). Vibration leads to lower reliability. The length of the pipework also needs to be considered and noise levels. The maximum noise level for our unit is 61db if on full power.
The external unit requires an electrical isolation switch and a condensation drain for the cooling season (it removes moisture from inside the house).
Power Consumption-The maximum power consumption of the external unit is 1.6kw with a typical power consumption of 1.08kw to produce up to 4kw of internal heating. Typically a passive house requires 1kw of internal heating for each 100m2 on the coldest day of the year . Our home is 200m2 so 2kw is required. The 4kw output power will allow more heat capacity if required. Most Air to Air heat pumps have an option to control the output power using the remote control. One can reduce the power to 50% or 75% of its rating. I will set ours to 50% for year 2 (2024-2025) which approximately equates to a max heat output of 2Kw on the coldest day of the year. This has the advantage for passive house builds of increasing the life of the Heat Pump compressor and ensuring the unit does not use more power than is required. It will also reduce the noise level by 4db (which equates to a reduction of noise by approximately half).
Typical Operation-The operating temperature range of the external inverter is –15 degrees to +24 degrees in the heating cycle. The typical internal heating temperatures achieved for 6 degrees and 7 degrees outside temperatures are shown below. Most heat pumps will also have an automatic defrost cycle when the external unit freezes over due to low outside temperatures. No heat will be delivered inside the home during this cycle and it only lasts a short period of time. If a house is designed with the passive house software (PHPP software) it could take a day or two for the temperature to drop significantly due to the highest air tightness standard in the world (0.6 ACH), quality control around the building fabric and designed to a performance standard.
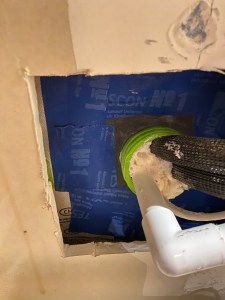
It is also important to mount the unit above ground level so that snow does not block the unit from functioning. A HO7RN-F (A rubber/Neoprene flexible cable) 4 core cable is required to connect the outside unit to the isolation switch (red switch shown below) which in turn requires another isolation switch inside that in turn controls both the inside and outside unit.
Cables and Ductwork-The cables and ductwork installation for a heat pump with a timber frame construction requires care during installation. When locating the cable and duct route through the wall use a narrow hollow pipe to find a path through the insulation and then drill through this pipe. If one uses a drill on its own with fibreglass insulation will wrap itself around the drill and leave thermal gaps in the wall and result in thermal bridges. The method I used is shown below. I used a rubber airtight gland to seal the larger duct. Ensure that this hole is mechanically sealed during the interim works from any rodents entering your build.
Power Usage-For year one of the installation I experimented with different settings -example using a high heating mode during off peak lower cost electricity and then returned to lower heat output during day. For year two I will set the unit at 50% of its output heating capacity and try an option called ECO mode which automatically reduces the temperature over time. For the last two weeks in this mode (October week 1 and 2) the unit used 20Kwh (€5 @ 0.25 cents per Kwh) to heat the house. The input power used by the air to air heat pump was approximately 300 watts when heat was required. The plan is to increase the number of solar PV panels to offset this 300 watts during daytime use. The power consumption varies as the external temperature changes. In the first year we used between 28Kwh per week up to a max of 50kwh during the first year of experimentation during the winter heating season. A power meter is now installed to record the daily/weekly and monthly power usage as shown below.
Below is the HRV (Heat Recovery Unit) temperature /humidity plot over the 2022-2023 winter period with the air to air heat pump. I reduced the HRV fan speed to minimise the amount of energy consumed in the winter time and increased it at the end of the winter season as shown below .
Internal Unit-The internal unit requires a height above floor level of 2.4 meters and at least 65mm clearance above the unit. In our installation there is approximately 1000mm clearance above the unit to allow the unit to blow air upwards to ensure a more balanced room temperature and air flow in the room. This is a built in function of this particular unit .
Further Experimentsand Research-I am also experimenting with a secondary heat distribution unit to improve heat flow around the living area of the house in year 2 in order to optimise the temperature differences one finds at ceiling height versus floor temperature.
Selection of a Low cost heating system for a passive house.
There are a number of options to heat a home when energy efficiency is designed into the build from day one. This statement is particularly true when one aims for the passive house performance standard using the PHPP (passive house planning package) software. When we moved into the house one will see from a previous blog that we started out with two storage heaters to heat the house with off-peak electricity with a capital cost of €70 (One storage heater was free and the other we paid €70 ).
Times have changed and the next energy crisis came along in 2022. We now have switched to a 1.6 kw air to air heat pump . These units are cheaper to run and more efficient than other types of heat pumps or heating systems. The other reason a dedicated home heating single unit was selected was to simplify maintenance. The hot water system is independent of the house heating.
One benefit of using an air to air heat pump to heat the house was the realisation that in Ireland when one returns home after being exposed to a damp cold climate it was difficult to thaw out quickly when the whole house temperature was 20/21 degree Celsius when using the storage heaters. By careful placement of the heat pump one room in the house is now at a higher temperature. This almost equates to a fireplace being available to help drive out the dampness one absorbed. We also noticed the room is used more frequently.
The room we selected was the kitchen/dining room. I feel it is important to ensure that the warm air the unit is blowing out does not interfere with the area one uses near or under the unit. This particular unit has an upward air circulation option that can limit this but we still installed it in an area that is not a functional working or sitting area.
To select the correct size of a heating source one needs to review the passive house PHPP software for your home. In principle the passive house standard selects the coldest day of the year for this calculation. In Ireland the PHPP software uses local climate data installed in the software to calculate the heating required for the house. This equates to approximately 1kw of heat for every 100m2 of floor area. As our home is 200m2 we needed 2 kw output on the coldest day of the year (similar to the power a toaster or hair-dryer uses for the coldest day).
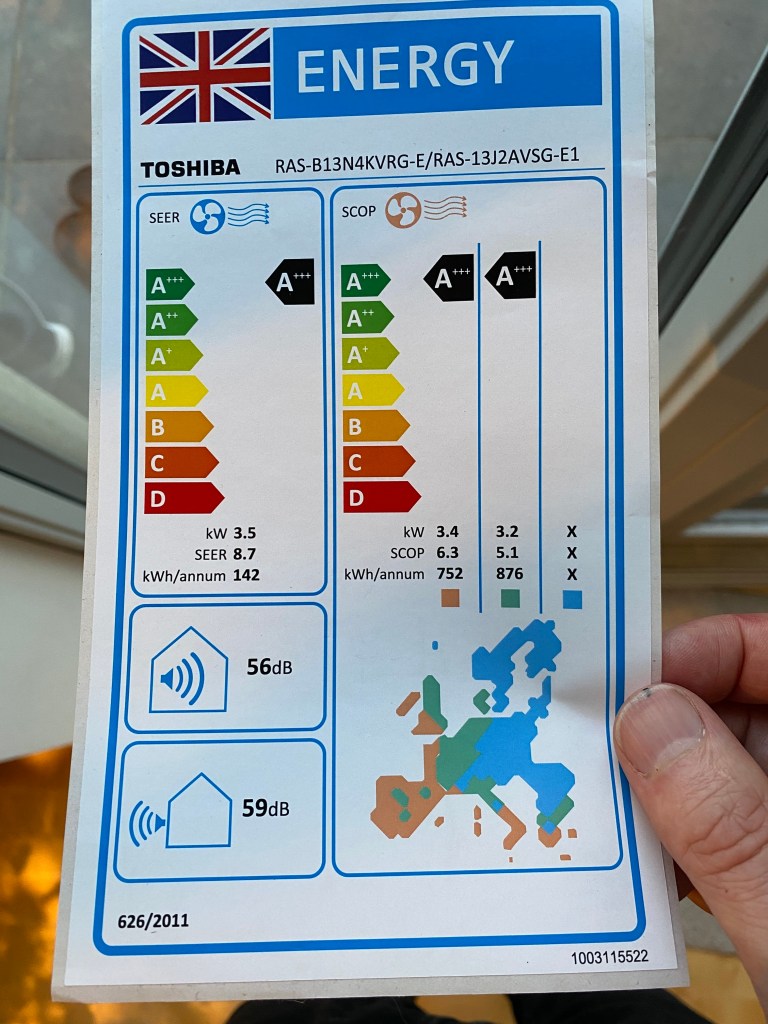
The Air to Air heat pump we used was the RAS-B13J3KVSG-E internal unit and the RAS-13J2AVSG-E1. These were one of the most efficient and economical units I could find. The price of the unit was around €600. Installation was another €1000 approximately. There are designer internal heat pumps options available from the same brand if one want to make the unit a design feature.
How the heat pump works -All heat pumps harness the natural heat energy present in the environment, air-to-air heat pumps can amplify the input power, resulting in a higher output. This is known as the Coefficient of Performance (COP), which measures the ratio of output power to input power. A higher COP indicates greater efficiency, and air-to-air heat pumps typically have a COP of 3-4, meaning they can produce 3-4 units of energy for every unit of electricity consumed. The air to air heat we installed has a SCOP of 6.3 and the designed heating load for the year is 752kw/h per annum. This approximately equates to €25 a month for a 7 month heating season @23 cents a kw/h. The letters SCOP is a seasonal calculation for the full heating season. In our unit the COP can produce 20 degrees inside if the temperature is 7 degrees outside.
There is also a function to cool the house with an air to air heat pump when global warming arrives in Ireland. Ireland missed the global warming cycle this year (2024) so we did not need to use this function.
Part 2 -Installation, performance and lessons learnt after 1 year of use…to be continued…
When planning a solar PV system there are free tools and apps that will help understand how to select your new PV system and how to maintain your existing Solar PV system.
Tools and Software
View Existing Solar PV Outputs-The free software provided by SolarEdge (a solar company) is very good . They allow customers to share how their solar PV system is performing in different parts of the world. One only needs to type in a location and if there are any installations near you they will show up. The SolarEdge link is here. Search for county locations rather than the town name.
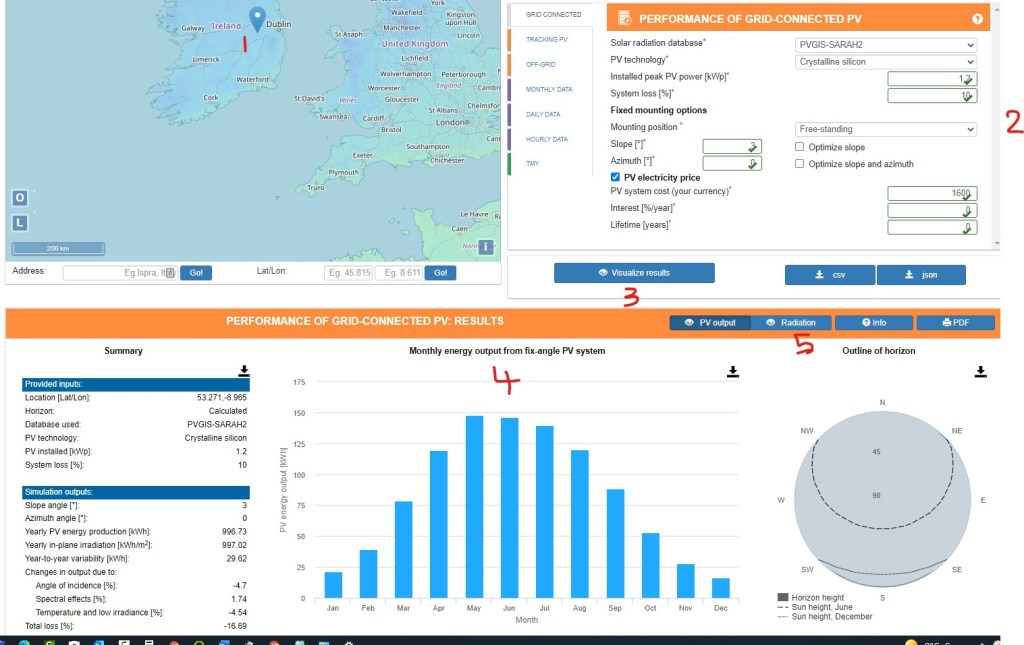
European Union (Photovoltaic Geographical Information System)
This tool allows one to see the expected yield of a PV system in different countries. One selects a location on the map first and then enters the details of your system or planned system. Previous weather data is used to model the results. If one uses the daily data option one can evaluate what would happen if one angled the Solar panel slope and the expected solar pv yield with the changes. One can keep the same setup for your site and pick different countries to see the changes.
The below image shows the steps to get you started ie 1,2, 3,4,5
View the movement of the sun around your home or select your solar PV location.
This software will allow you to view the solar changes of the sun as it moves around your home or solar PV system over time. The app is called Sun Surveyor Lite. It is available in a free version or a paid version on both android and apple platforms. The free version works well.
Sun Surveyor Lite
Bubble Level
When calculating the slope of one’s roof the Bubble Level app is useful.
Check if your PV System is working correctly .
When one has a solar PV system -faults can occur. Some of these faults will not show on your solar PV app. Most PV systems installed do not have individual Solar panel management unless one requested optimisers or microinverters. What is required is a tool to check if your PV system is working efficiently and generating the correct output power.
When a solar PV system is installed the installer will usually carry out this test before completing the installation. This test ensures that the designed output power (in watts) matches the solar PV input power (w/m2).
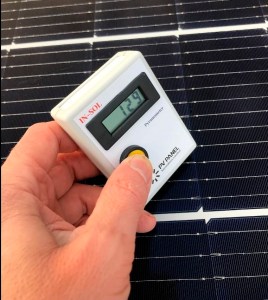
The first tool one needs is a pyranometer or also known as a solar irradiance meter or solar radiation meter. It measures the light that generates electricity within the solar panels-this is the approximately the wavelength from 300 to 1200 nanometers below. An affordable pyranometer can be seen here https://pvpanelinnovations.com/
This solar irradiance meter is calibrated in watts per m2 (w/m2). The light that one can see with ones eyes is between 400 and 700 nanometers. This means that solar panels can convert more light into energy than what the human eye can see. The majority of the heat one feels on your skin is the energy above 700nm and the solar panel can use this light/energy.
As mentioned before there are in principle 3 types of silicon used to make solar panels -mono crystaline, poly crystaline and CIS. Below is a side by side comparison of how the types of silicon use light energy shown from the above image.
Solar Panel Technology
If a solar panel is 20 % efficient at converting this light into electricity then the majority of the other energy ends up as heat. As stated before an increase in temperature negatively affects the output power of a solar panel. If one uses the online calculator app below and adjusts the temperature one can see the effect temperature has on the solar panel.
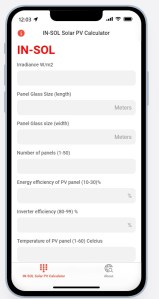
Convert Solar Irradiance (W/m2) into power (Watts)
When one has a solar pyranometer/irradiance meter it provides the data for the App.
IN-SOL Solar Irradiance Meter
This software converts the solar irradiance measurements (w/m2 -watts per meter square) into electric power (watts or kw/h). One can enter the size of your solar panel and the number of solar panels and the output power is calculated in watts) . Solar PV Irradiance converter.
IN-SOL Solar Irradiance Calculator
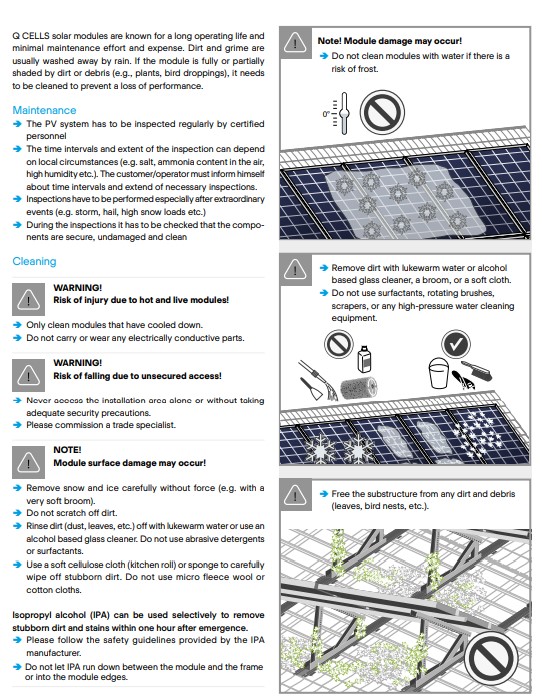
Cleaning/Maintaining Your Solar Panels.
There is a correct way to clean solar PV panels and there are risks. Below are the recommendations by the manufacturer Q CELLS. In summary-
Solar PV Cleaning
Do Not use a hose with water
Do Not clean modules with water if there is a risk of frost
Only clean the modules when they have cooled down
Use kitchen roll for stubborn dirt and not fleece or cotton cloths.
PV Panel Options-Output wattage of pv panels are typically available in the range 270 Watt, 340 Watt, 375 Watt, 455 Watt. A manufacturer’s brand name will add to the price. Some brands names are LG, QCELL, LONGI, REC etc. A manufacturer warranty can be up to 25 years. A performance warranty of up to 25 years is available.
Example -A Qcell 340 W , 25 year manufacturer warranty and performance warranty can be purchased for €60 ex vat, a REC 365W for €165, a LG 440W for €261. Some manufacturers are now including a labour warranty of between 10 and 25 years.
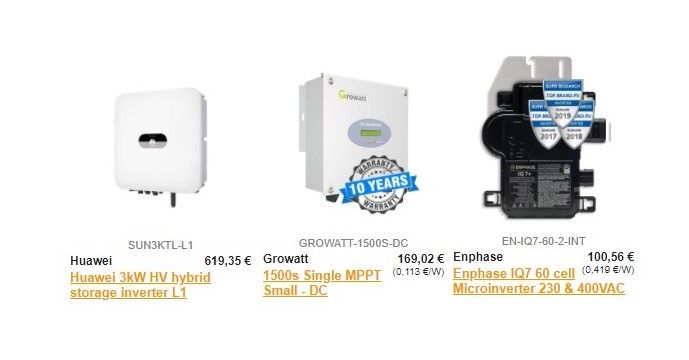
Inverters Options-The standalone single inverter price varies from around €160 for a 1.5kw system and increases to approximately €1,300 for a 10kw inverter for the domestic market (single phase). The number of MPPT channels provided in the inverter changes the price-a single MPPT channel inverter will usually be cheaper than a dual MPPT channel inverter. MPPT methods also affect the price (a list of the mppt types available are listed here–for the techies.) As above the manufacturer brand name and the length of the manufacturers warranty also dictate the price you pay.
Hybrid Inverters (those that charge batteries) start at around €600 for a 3kw system and increase to €1600 for a 5kw system. The warranty varies from about 2 years to 25 years. When purchasing an inverter one must ensure that it has a certificate of compliance to match the national grid profile (a grid profile determines when the inverter should switch off and on if there was a power failure) . So purchasing a cheaper inverter online might not be compatible with the national standards required in each country. This grid profile is usually programmed/selected when installing the inverter.
Another option when purchasing a central inverter is to install optimizers . These provide as a means to improve the solar output if shading exists when using a central inverter. These cost around €50 each.
Microinverters prices start at around €100 for a 350 watt pv panel and increase to approximately €160. Warranty’s vary from 10 years to 25 years. Some brand names that exist are Enphase, TSUN , BPE. They require a single management control unit that controls, configures and allows one to monitor the performance remotely on a desktop or mobile phone App. The brand name also carries a cost. The microinverter is able to monitor the performance of each individual solar panel and inform you about an individual failure or issues. They also offer one of the best ways to manage shading from trees, chimneys, etc., or different orientations as stated earlier. This single control unit costs approximately €140 to €280 depending on the functions you require. These unit types generally have an AC charging function similar to the Tesla battery systems.
When the sun is close to the horizon Solar PV Panels generate less energy than when the sun is directly over the Solar Panel.
The reason for this is that the sun’s rays pass through more of the atmosphere thus reducing the sun’s energy (photon energy) on the PV panel. If it is an overcast day they will produce less energy. To translate this into numbers- in the winter when the sun is low in the sky (say 14 degrees from the horizon ) the total irradiance from the sun measures around 780 W/m2 (watts per meter square) with a clear sky. In the summer one would expect to see 1100 W/m2 (55 degrees from the horizon). The bottom line is that if one can point the solar panels perpendicular to the sun one will get a higher electrical output power.
In order for consumers to purchase and compare solar PV panels manufacturers have agreed a way to compare the output power of Solar PV panels and this test is referred to as Standard Test Conditions (STC) . The test is done at an irradiance of 1000w/m2, at a air mass of 1.5 (approximately 42 degrees from the horizon) and at a temperature of 25 degrees. The value w/m2 is how solar irradiance is measured while the PV panel output power is measured in watts. The following calculator will help you understand how the output power of your PV System (in watts) is affected by solar irradiance and other factors. Check your Solar PV Output Power in watts.
Solar PV Calculator
Most roofs have a pitch of around 35 degrees. The best direction to point the solar panels is usually south but with some solar PV installations, it is possible to have some pointing South and others pointing West in order to collect as much energy as possible during the summer. Meters used to measure solar irradiance are called pyranometers, Solar irradiance meters, or solar radiation meters. An example of how these meters are used to locate, measure, and check if your Solar PV system is working efficiently is shown below. The calculator above can be used with these meters. An affordable pyranometer can be seen here https://pvpanelinnovations.com/
PV Panel Shading
A factor that has a significant impact on the output power of a PV System is shading on an individual Solar PV panel. This can take the form of chimneys, trees or other houses. The reason for this is that if one examines each solar panel one will see that it is made up of individual cells wired together in series to make up a full solar panel (see below). If one or more cells are shaded when installing a traditional solar PV system (One inverter) the output power is reduced for the whole system. There are other solar PV systems that use microinverter’s or DC optimizers that will not be seriously impacted by shading thus the consumer will generate more electricity.
Solar PV
Another factor that significantly reduces the solar panel output power generated is the panel temperature. We are lucky in Ireland to have a mild climate with day temperatures not usually going above 20 degrees (on a good day). What this means from a practical perspective is that a solar panel in Ireland will generate more power than a solar panel in Spain on a cloudless day.
Solar PV Components.
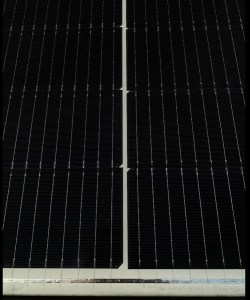
The components that typically make up a solar PV system are PV rails which support the PV panel , roof brackets/hooks that connect the rail to the standard tile or slate roof and clamps that connect directly to a specified roof types such as zinc or steel roofs. There are separate pv panel mounting systems for flat roofs or ground mounting. If one wants to explore PV mounting system suppliers -use a google search for “roof mounting systems for solar panels“. As I used a zinc roof one must ensure expansion joints are installed in the pv rail every 3 meters.
PV Panel Types
There are three types of PV panel cells -monocrystalline (these aesthetically have an even black finish –shown above), Polycrystalline which have an uneven shade of blue crystal cells and CIS types. Monocrystalline are more common and are slightly more expensive than polycrystalline and CIS are now more difficult to purchase (shown in part 1 of the blog). The options available when selecting PV panels other than the type above are length of equipment warranty and length of manufactures performance warranty. The majority of PV panels generate DC (direct current). All PV panels must be angled at least 3 degrees from the horizontal. PV panels produce DC power and to give you an idea of what 4 panels can produce and the energy they can generate for a load, loose connections or cable damage please see this video .
Inverter Options
Inverters are principally available in 3 types -one central inverter for a full PV installation without battery charging, a central inverter that has inbuilt battery charging facility and micro inverters for individual panels or a pair of PV panels.
Central inverters. The important factor here is the warranty length and how many MPPT (maximum power point tracking) channels does the inverter have. If one was installing 8 panels in two rows (strings), two separate MPPT channels would mean that the two rows of 4 panels would have their own ability to generate power independently of the other row (string) so for example if one row of pv panels got dirtier/shaded or a fault occurred on one panel the other row would keep generating at full power. As all PV panels are not exactly the same the separate MPPT channels allow for a higher output yield . When selecting an inverter one must match the PV Panels to a particular Inverter. Once this is done adding more panels can become restrictive and may mean that one needs to change the inverter again. If the inverter fails the whole system fails. If one needs to change a PV panel in the future the central inverter may also need to be changed.
Inverter Options for SOLAR PV
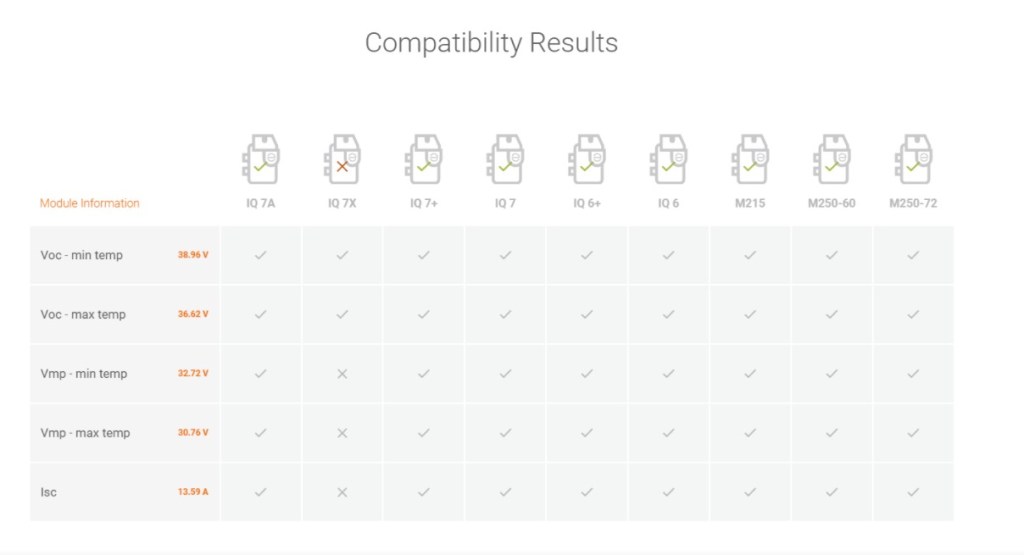
Micro Inverters-simplify the installation of a PV system and permit simple expansion. It is really close to plug and play . Because they are paired with a PV panel they manage shading better than a central inverter. The voltage generated is also different to the central inverter in that it produces low voltage AC -the same voltage as all domestic appliances like fridges, washing machines etc. There is also less of a chance of fires because of loose connections/damaged cables. They offer full management of your PV system with apps and individual panel performance monitoring. Pv panels must also be matched with the individual inverter using the PV panel data sheet. This is one such calculator.
Enphase Calculator
Batteries
As stated before I personally am not in favour of using batteries for PV panel installations. The reason is that batteries are expensive, they are another failure point and I feel they are needed for vehicles more than PV installations. For example, a 300 litre water tank can store 20kw of energy at 60 degrees (a stainless steel water tank would cost around €1000-while a similar battery could cost €10,000 to €15,000 and still would need to be replaced after approximately 6000 cycles). All homes need hot water thus sending any excess electricity from the PV panels could be fed to a hot water tank. So instead of adding batteries why not consider changing the hot water tank and place elements at the bottom of the tank and the middle of the tank.
Another good idea is to switch to night time electricity which currently is half the price of the day unit to supplement the lack of PV power during the winter to heat the water tank.
My preference is to install a side arm heat exchangerto the water tank so that I can achieve better hot water stratification. Stratification is the creation of layers of hot water free from movement/mixing when one heats water. What happens for example is when cold water enters the tank at the bottom it can mix the stratified layers of hot water thus reducing the water temperature. It is difficult in Ireland to purchase water storage tanks that have simple devices fitted that maximise stratification with devices such as an inlet baffle on the cold water inlet .
To complement the above use of a water tank one can add a single shower pump and feed all showers from the tank.
Typical Shower Pump around €157
The above will reduce the use of electric showers which are the highest electrical energy consumption devices in a home. From personal experience, I can say that 150 litres of hot water (half a 300 litre tank) can provide 6 showers a day. Currently, I use off-peak electricity to heat half the tank.
If you are a new build one can plan to install the shower pump outside the house in an insulated chamber below ground level near the tank. This is what I have done to reduce the noise as we have a single-story home.
As energy prices increase and the switch from fossil fuels takes place one is left with few options to offset rising electricity costs. In this blog I am going to go through the choices that are available when using Solar PV. Solar PV systems typically generate DC (direct current) power and this is then converted to AC (alternating current) power for use around the home. These systems also synchronise with your own electricity supply grid so that you can use it. The standard system one purchases will automatically disconnect from the national grid if there is a power failure thus ensuring that you do not send power into the national grid. The abbreviation PV stands for Photovoltaics (when light is used to generate electricity from a semiconductor material).
Solar PV Panel
A common-sense starting point before considering Solar PV is to try and reduce your existing electric energy use. This might be as simple as changing old fridges, washing machines, dryers, or pumps. If one uses electricity to heat one’s house then insulating the house and upgrading the hot water tank is also a good starting point. For example, one 300 litre water tank will store 20kw of energy at 60 degrees Celcius (see the previous blog on the water tank). Typical battery systems can not economically or environmentally compete with water as an energy storage system. All homes need hot water and you will not find a safer, more economical, and environmental approach for storing excess energy from Solar PV. One can also opt for reduced price electricity at night (approximately half the price of daytime electricity) which helps the national grid balance its load.
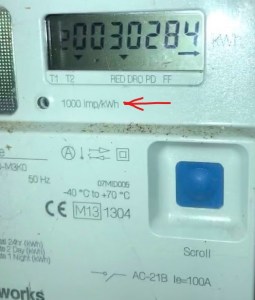
A simple starting point is to visit your home supply meter and work out how much electricity you use per minute on a typical day. This is the load one uses without using main appliances such as kettles, cookers, water heaters, etc. It typically would include fridges, ovens timers, clocks, computers plugged in, modems, etc.
To do this one only needs to look at your meter and it will display a number that tells you how many revolutions or pulses it uses to record one Kw/h (kilowatt per hour) of electricity. One is billed by your electricity supplier for each kw/h you use. Above and below are examples of where you can find the numbers. In the example above the digital meter has 1000 Impules per kw/h and the old type shown below has revolutions -in this case, it is 250 revolutions per kw/h.
To calculate your typical energy use without using main electrical appliances follow this example. Set your phone/ watch to the stopwatch setting. When you see the first pulse start your timer and visually count the impulses in that minute. If you get 10 impulses in 1 minute then multiply 10×60 minutes=600 impulses in an hour. So we know that we now use 600 watts of power in one hour without using main appliances.
In the old type meter, you will notice that there is a red/black mark on the wheel when it revolves in one revolution. In the meter above we can see that it does 250 revolutions in one hour to record 1kw/h use of electricity. So if it does 125 revolutions it is 500 watts of power in one hour or 0.5kw/h. One can use the same principle above and use a two-minute count to increase the accuracy of your calculation. InPart 2 I will look at what PV systems are available to purchase and the parts that make up a good Solar PV system.
There are many options today when deciding to build. One can use a factory built design or use traditional block work or timber frame on site. Some factory built designs are as follows by way of example http://www.scanhome.ie . One can select the level of input oneself such as only construct the frame and say the self builder can do the rest or let the builder/supplier do everything.
How much Work does a self builder take on.
As a self builder I would try and get the foundation, frame, roof and windows installed then one can work in the dry to finish it. One is left with indoor wall completion, plastering , air tightness, Heat recovery, Wiring, Plumbing, Rain Water Harvesting, House heating System, Water heating system, floor finish, Painting, furniture , kitchen more than enough work for the self builder. The above need to be well thought out before laying the foundation or erecting the frame and the finish design of the roof.
The Building Standards-Self Build
One needs to comply with the building regulations. Always remember these are the minimum standard. It is always better to go for a home that will last well into the future that is warm and supplies fresh air. A lot of new homes built today are of a poor standard and this can be seen in the UK and Ireland. See example https://energysaveguy.tumblr.com.
The Sales Pitch
There are buildings that can receive different rating systems such as LEED and BREEAM. A good video on the good, the bad and the ugly of these can be seen here. They focus on equipment and energy accessories so it is best to leave these and focus on the basics. What are the basics –Insulation, Air-tightness, Windows, Heat Recovery (fresh air supply), and minimising thermal bridging(heat loss through details on the build). When one does the above one finds that the heating system is simple, the house costs very little to run and is healthy if the correct materials are selected and installed in correct sequence during the build.
The Gold Standard-Passive House
The highest energy standard to build a house , an apartment, school or commercial buildings is the passive house standard. It focuses on the basics and uses physics rather than rating systems to design the building. All the calculations are done before the house is built on a passive house planning software package (PHPP) which takes into account for example how much solar heat the glass in the window will leave into the house, how much heat will be lost through the glass from the inside to outside, how much heat is lost through the frame, and the heat lost on how the window is installed in the wall. Every building detail physics are analysised to ensure that one ends up with a comfortable home.