Category Archives: Tools and Aids

Thermal Bridges

As part of the passive house requirement one needs to eliminate or minimise heat loss through linear lengths or points around the house. Some of the thermal bridges in my build are typical of other builds. I hope to provide more details in the future.

One of the main linear heat losses is with window/door installations (its connection with the wall frame ). It has been said numerous times that selecting a high quality window/door and installing it poorly can equate to buying a low energy window .

As mentioned before I will use the free software called Therm to calculate the losses. The first detail to tackle is the glazing which was directly mounted in the frame of the house without a window frame.  These windows are 2.4 metres x .9 metre and there are 11 of these mounted on the south face.

The calculation of these linear losses can be expensive to get done so I will be doing the task myself and have it checked by others. I am surprised that good details are hard to come by on the web for free to help the self builder. One of the most time consuming exercises with thermal bridge calculations is drawing the detail. If one undertakes drawing this oneself using CAD (Computer Aided Design) software it can help to reduce the cost of the calculation.

When one needs to come up with a detail to minimise the losses there are a lot of products that help to keep the losses under control. These are semi-rigid insulation products like compacfoam, foamglass blocks, standard insulation, TECTEM, PU or rockwool and fibreglass products and aerogels (which is one of the highest performing insulators being made).

To date there appears to be very few online resources to guide the self builder or provide details that one can use before one starts a build.

Some background and details I found to date on thermal bridges can be found at the following links.

What is a Thermal Bridge

Leeds Beckett University

Scottish Thermal Bridge Details Link

Example of Heat Loss through a glass spacer

Below is an example of the thermal bridge calculations one needs to carry out to establish the thermal bridge performance values in W/(mk).

  • One draws the detail as a DXF file using a drawing package (or draw the detail manually in Therm)
  • Import the detail into Therm Software
  • Add the technical details such as thermal conductivity of each item
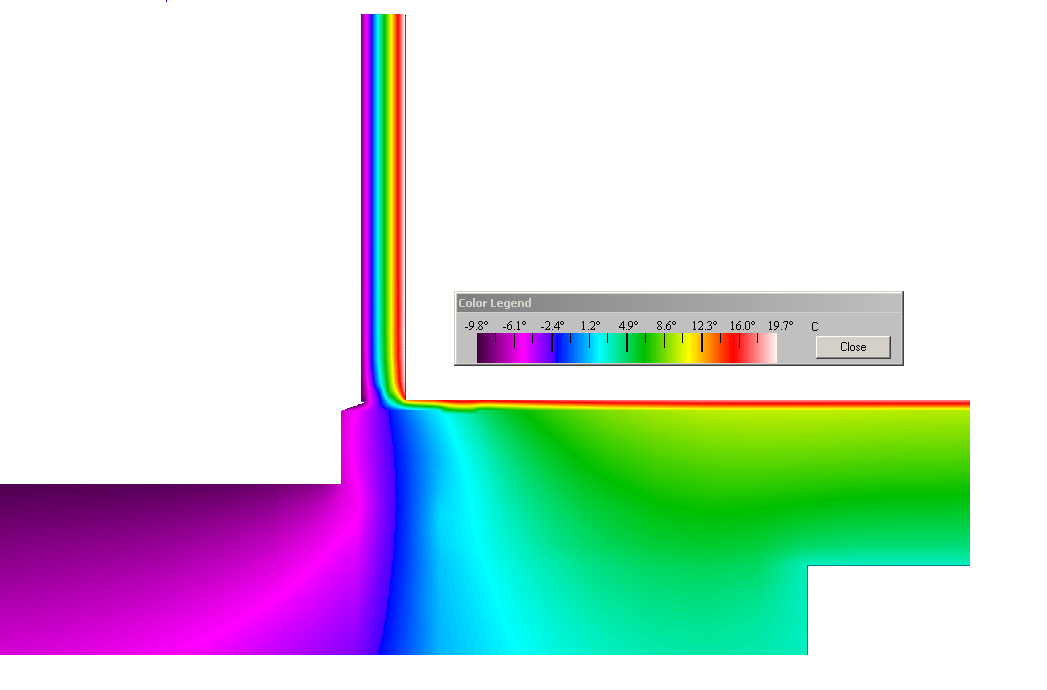
  • Tell Therm where on the drawing to stop the calculation (Adiabatic)-top and bottom of the drawing shown below.
  • Tell Therm what the internal and external temperatures are
  • Go to a spreadsheet and calculate the psi values of the thermal bridge detail for the passive house performance value.

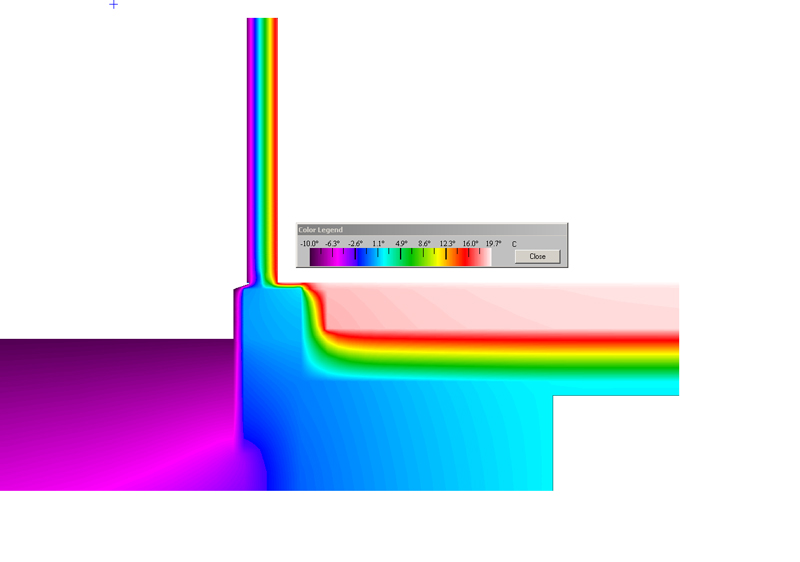
When this is done one ends up with the calculation and an image like that shown below. In this image the glass is shown near the top right.

Drawing Detail


In the next image the colours show the temperature gradients. The purple colour is the outside temperature at -10 degrees.

colour infrared
There is thermal bridge software that one can buy where the software calculates the psi value without using a spreadsheet but Therm is free and there are courses available in Ireland.

If one wants to show the real design and installation details of the thermal bridge values for the Irish regulations rather than the accredited details (without a performance value)  one needs to use a certified thermal bridge accessors but this is not the case for the Passive House Institute.

We can all look forward to the day when standard construction details that are typically used in Ireland are already calculated for the self builder and there will be no need to pay to find out the thermal bridge losses . The Scottish accredited details (see above link) come close to taking the guess work out of construction.


Moisture Control, Supply of Fresh Air, Removal of VOCs.

The Past

Having lived in an house that had single glazing and was draughty, I only realised how inefficient the ventilation was when I purchased a Carbon Dioxide meter (CO2) for the old house. This meter measures the amount of carbon dioxide in a room (as we all exhale CO2). The bottom line is that a level below 1000ppm (part per million) is taken as a healthy starting point. Another factor that is not healthy is Volatile Organic Compounds (VOCs) these are the chemicals, gases given off by furniture, paints, floor coverings, household cleaning agents etc. When one reads the possible health effects from VOCs it becomes clear that one needs to reduce these. See for example http://www.epa.gov/iaq/voc.html

In our last home what was amazing was how little oxygen we were getting especially when asleep (and in turn high VOCs). Within an half an hour the meter would alarm that the levels of oxygen (fresh air) were low.

What I used to do in the old house is determine if there was a wind blowing or a storm due. This then entailed adjusting the window opening to a minimum in order to ensure that we would get some level of oxygen. If there was no wind blowing outside then I would open the window  to approximately 75 mm (The horizontal window was over a meter and a half long) and leave the bedroom door open for some cross ventilation through the house.

I think it is now widely accepted that holes in the wall or opening windows does not work for fresh air and a healthy environment. The only way that appears to work is to blow fresh air in / suck stale air out.

CO2 Meters

CO2 meters for some reason are expensive. The unit I purchased was over €300 a few years ago. I came across a more affordable unit recently on ebay for approximately €100 (allow for customs and excise) that also has a data logger (records the information over time). I feel it is well worth investing in one of these as the true quality of air in a house can only be believed when the CO2 levels are measured.

One seller on ebay was perfectprimetechnology . If one types in the word co2 at their store it should be easy to find or in any other store. 

CO2 Meter
Carbon Dioxide CO2 Meter

While there is no direct link between VOCs and CO2 I have read that if one is breathing air in a room with high CO2 levels it gives  a good indication that the VOC levels are also high.

Going Forward

In the new house we plan to use controlled ventilation which will supply fresh air and in turn recover some of the heat blown out of the house .  It is a mechanical system called a Heat Recovery Ventilation Unit (HRV). I do not know why they don’t call it a fresh air unit as this factor has to be more important than recovering heat. In order for this fresh air supply system to work one has to control all drafts in the house as one does not want to be drawing air in around windows and doors and hope that the fresh air ends up in the correct room. This can only be achieved by eliminating drafts by sealing the building in an air tight membrane/system and blowing fresh air in and extracting stale air out using two ducts.

In order to carry out airtightness in a home one appears to have a few options -On a block house this is achieved by internal plastering (and some preparatory work) or for a wooden frame house one can use a membrane or take a chance on using OSB (Oriented Strand Board). Even a block house will still need air tight membranes on some structural details.

Another reason for using this special air tight system is to control moisture generated in the house from showers, cooking, drying clothes etc. This moisture can have a detrimental effect on the building fabric and reduce the insulation levels and in a worse case scenario lead to mould growth.  I feel the mould issue is going to be a health issue for generations to come where insulation is added ad hoc to dwellings without a proper design using building physics. I am not aware of any building physicists in Ireland guiding the construction industry. A worrying trend I am hearing of is cases where the consumer believed that adding insulation was a good thing not expecting the creation of mould and health issues for themselves.

The Airtight Target for a Passive house

In order to control the ventilation and heat loss the passive house standard requires less than 0.6 air changes per hour at their test pressure. The best analogy I could find for this figure was at the passivhaus.org.uk web site. One must achieve no holes or less than one 18 mm hole for every 5 m2 of the building envelope. 

Passive Haus
Airtight Standard Passive House

Practical Experience of the first steps in airtightness

As I was installing counter battens on the ceiling in front of the airtight membrane I know from experience I missed the rafters in 3 locations in the roof. I am using serrated nails with a nail air gun. Once these nails are fired they are almost impossible to remove.

Nails
Serrated Nails

The strategy is not to try and remove them as this would leave a hole other than a nail in a hole behind the batten.

Battens on Ceiling

Installing battens on the ceiling

Another factor is to ensure that the insulation does not sag below the rafters before the airtight membrane is installed.

When one is laying out the membrane one needs to work in a triangle when stapling. For example staple 3 metres  or more forward on one side and then find the centre of the other side and staple from this point to either side.  Ensure that stainless steel staples are used as there is very little in the price difference.

Self Build (Tools and Aids)

There are a few tools that I found very useful as a self builder (which are free).

One such tool is Evernote.  As self building involves plenty of research and the need to access information. This tool has proved invaluable for me to store information, share information, find information and make it accessible on a smart phone, any computer and automatically back up the information (nothing worse than loosing or not being able to find information). It also allows one to take pictures and have these stored in the same place.

All one needs to do is tag the information (a tag example could be the word insulation) -when you store the price/information you found on the internet about insulation it is stored with this tag and any other insulation data found over time. All pdf documents (these are usually research papers) can be stored also. There is an option to buy the premium version at €40 a year then the individual pdf content of the documents can be searched.

Another tool is Autodesk Design Review 2013. This tool allows you to open autocad files that your architect or engineer may have used for your build. It also allows you to edit these with your comments , take measurements of the drawing and draw simple shapes to highlight issues.

Another tool worth mentioning is Autodesk DWG Trueview. This is more similar to Autocad as it is mainly a viewer (allows one to open files).

THERM

A tool that allows one to calculate the heat loss of thermal bridges is Therm. It was developed by Lawrence Berkeley National Laboratory (LBNL) and again it is free. This tool will show you how cold (and the heat loss) your floor/window reveal etc is going to be near outside walls and the actual performance value so that the real heat loss can be calculated. (One can easily get a feel of the importance of this detail and the energy lost if you see mold/condensation around windows/doors etc ). This software will show graphically how much heat is lost (once calculated) and the temperature/heat loss you can expect on details such as window frames, door thresholds, the steel ties in your block work, the steel beam sitting on your inner wall  or foundation etc.

There are two parts to calculating the actual heat loss – the first is drawing the detail (fairly simple and involves time) and the other is the actual calculation (tricky I feel for a self builder). If one draws the detail this can save costs if a third party does the calculation for you).

Thermal Bridge
Thermal image of temperature changes in a foundation with low heat loss. The right hand side is the internal floor. The blue, purple and green colours are low temperatures. The green colour is 5 degrees Celsius.
Therm
The above foundation with no insulation. The inside floor has a high heat loss when the inside room temperature is 20 degrees Celsius. The small red line on the floor shows a wooden floor installed thus delaying the heat loss.

 SketchUP

This tool allows one to model in 3D your house design and carry out a walk through to get a feeling of the internal or external design. It also is used by the passive house institute on their energy balancing software PHPP so it is a worthwhile tool to learn.

Hardware

Other than a smart phone which is a real help when one wants to send/receive files, images or emails and keep things moving on site a device called the Samsung Note 10.1 (2014 Edition) makes documenting ideas and drawings a great resource while on the move. It is only one of a few devices that has a real pen and sketch pad that allows one I feel to replace a piece of paper because one can rest your palm on the screen like a piece of paper and write or draw.

Sun and Climate

Sun Surveyor Lite predicts and visualizes Sun, Sunrise and Sunset positions and times with a 3D Compass on your smart phone. It is useful in identifying the site layout and potential shading issues from trees etc. One can simulate the sun at different times of the year. If one want to do the exercise on paper then this web may be of help- http://www.gaisma.com/en/

Performance Standard -Setting the Standard

The passive house software allows one to set your own performance standard by selecting how much energy (oil/gas/electricity) one wants to use to heat the building.

For example current Irish house builds that comply with today’s standard 2014 are estimated to use 100watts per m2 (subjective). The passive house standard if one goes for certification uses 10w per m2 (objective).

The real benefit for using the PHPP software is that the performance approach can be set by the home user. For example if I want to reduce my energy consumption to 1.5 litres of oil per m2 of the house size then I can set the software to a maximum of 15kwh per m2 for the year while maintaining a temperature of 20 degrees Celsius.

In a typical 3 bedroom house with an area of 100m2 the oil usage would be 150 litres a year.  With the PHPP performance software one can set the number of litres of oil (or gas etc) per year that your residential or commercial property will use to within a small margin of error. In other words you select the performance value of your build.

In summary the PHPP software takes into account your comfort and health (temperature and oxygen levels)  by removing high CO2 levels and VOCs and providing an even temperature throughout the house.